

My content creation process from start to finish, as a web designer
Table of Contents Show
I’m excited to take you behind the scenes and reveal how I keep my content ideas organized, plan them on a calendar, and even track your valuable suggestions! Have you ever wondered what happens when you respond to my emails or share ideas/questions with me? Well, your ideas don’t just vanish into thin air. They get meticulously recorded and organized in Notion, so I can actually answer them in future content!
I create content for you every week, both on my YouTube channel and on my blog, and I’ve done all of it myself, …without outsourcing any part of the process. ––I know; mic drop moment! 😬
Because I assume that if you’re reading this, you’re DIY-ing your content too, I'll guide ya through each stage of my process, shedding a light on how everything works for me, the average time it takes to do each piece, ––and maybe most importantly, why I invest such significant effort for the final result that you get to read/watch each week.
If you're thinking about adding a ‘content marketing’ strategy into your business, but are not sure if it's the right fit, hopefully this glimpse into my workflow will provide some much-needed clarity and help you make an informed decision that will fit YOU –because it’s not for everyone!
In case this sparks an interest and you'd like to give it a go, I'll also share some of the tools & tech I use, like my wireless and wired microphones, along the way so you can explore these tools and kickstart your journey with more confidence.
Here's the deal, I’m gonna be SUPER honest with you in today’s post. This strategy requires some very real time, effort and dedication to produce my blog & video content at this frequency, from idea to publication, all done myself without outsourcing. …Which is why, I think I’m finally ready to start outsourcing bits of it to get some of that time back each week.
––But that’s not what this post is about, so if you’re interested to hear how that outsourcing bit goes… check back, keep your eyes & ears peeled, subscribe to my YouTube channel &/or my weekly emails, so you’ll be the first to know when I inevitably talk about that experience! 😉😂
Okay, now it’s finally time to dive in!
From Blogging to YouTube: how it started vs how it’s going
Just to be clear from the get-go, I've been blogging since 2016 and only added YouTube to my content strategy in 2022, so I had YEARS of writing regular content to practice before I added YouTube to the mix.
I’ve always written my own posts, so when I added YouTube I knew I’d also be editing my own videos. I record the videos, I edit the videos, I transcribe & write the blogs, schedule it all myself, make the thumbnails, and track the idea.
It's a time-consuming process, no doubt about it, but in my experience, though my content creation process might seem lengthy (to me & basically everyone else too), but it's also pretty average in comparison to others. It just takes the time it takes! The only way to shorten it for myself, is to delegate or outsource pieces of it to someone else.
What takes up the most amount of time BY FAR, is editing the video and turning the video into a blog post. But I've got some tricks up my sleeve to make these steps as efficient as possible for the DIY-er.
There's enormous value in having both a blog post and a corresponding video –or vice versa (whichever one you focus most of your effort)– because it opens up two different avenues for organic, searchable content: Google and YouTube, and even Pinterest if people are also pinning your content.
This dual approach means that people can discover my content directly through
my website if they go directly to it,
via a Google search,
through YouTube, and
even Pinterest for anyone that pins my posts (for me, because I no longer have a Pinterest strategy myself).
That’s why I invest all the time and effort, because the majority of my leads and clients have always come through search engines (because content creation has been my chosen medium). I genuinely love it, so it's not a chore for me. Pieces of it are hard to complete & take a lot of time, but the creation & sharing of the content is what makes it all worth it ––and I hope my enthusiasm shines through in the content you see every week.
So, that's the scoop on what goes into making the content you see here on the regular. It's a (true) labor of love, but I wouldn't have it any other way because the end result brings me (& hopefully you too) joy!
How I use Notion for the Content Creation Process: From Ideas to Execution
Let's peek behind the curtain at how I use Notion to keep track of all my content!
First off, I want to give a shoutout to the creator of the template I use. It's Thomas J. Frank's Ultimate Brain and Creator's Companion Template Pack, and I can't recommend it highly enough. (Not an affiliate, just a super fan!)
If you're new to business, his template might seem a bit overwhelming at first, but it does offer lighter versions of the complex dashboards, so you can start small and gradually work your way into using the whole template as you need more functionality. Honestly, it's the best use of Notion I've ever seen and the most efficient way to keep your relevant information connected throughout your Notion account.
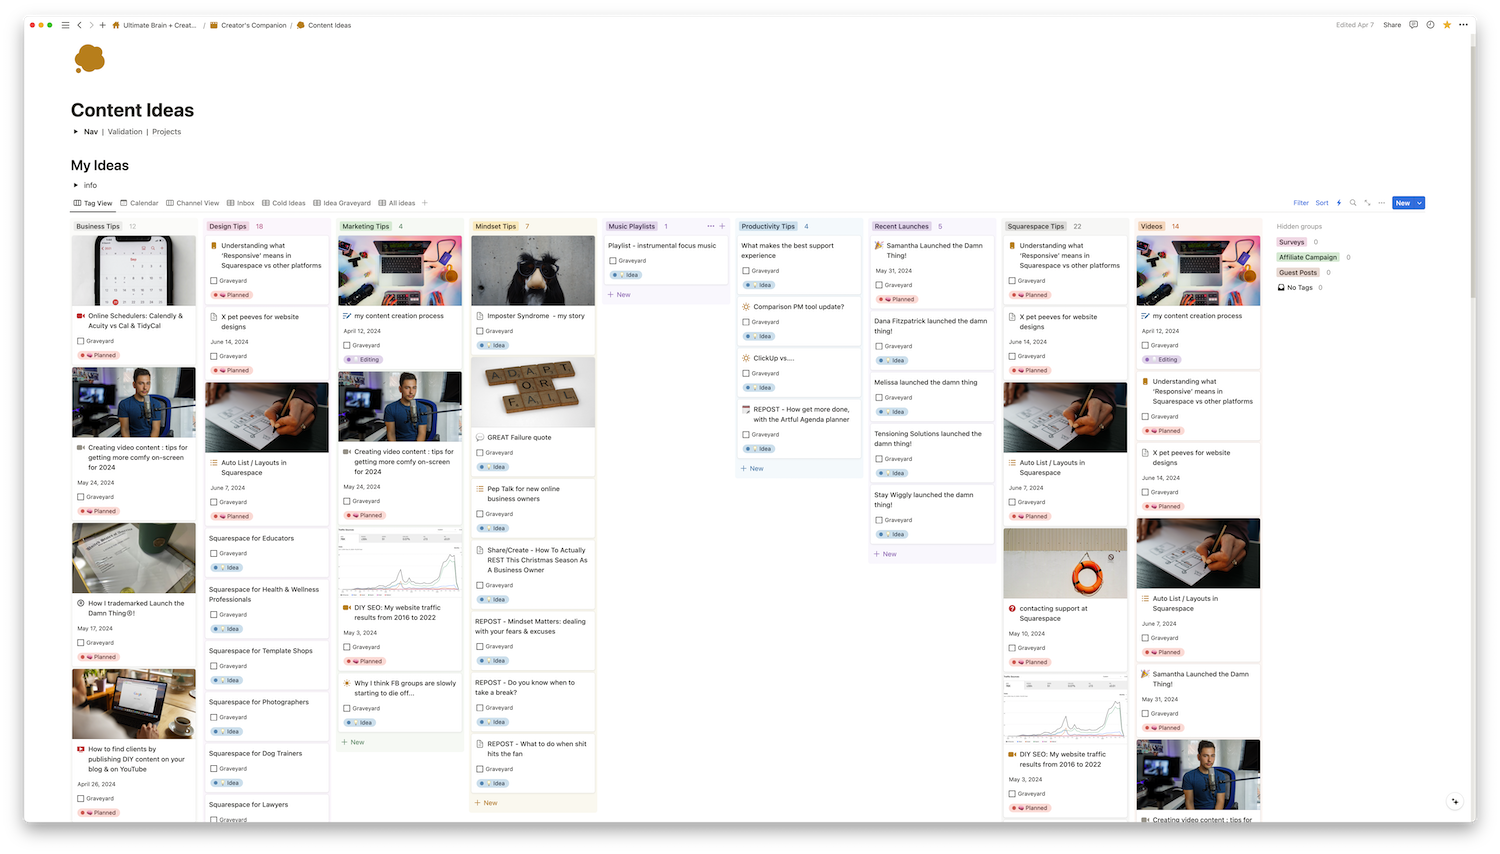
screenshot of my ideas board, inside my Creator’s Companion template from Thomas Frank
This is my content as it appears in the Content Ideas template in my account, within Creator’s Companion. I have a variety of views of the information in the database on this page, but the most relevant one right now is my content ideas kanban board.
This Ideas by Tag view only displays ideas grouped into columns (the categories or pillars of my content), but does not show any posted or published content. From here I can see the status of each idea, and an intended Publish Date if I’ve assigned one, –or I can check the Graveyard checkbox to archive it if I decide I’m not interested or don’t think that topic is a good fit for my business or audience.
I also have the Notion widget on my iPhone, set to the page where I can quickly capture content ideas, tasks, notes or resources, and and categorize them later, no matter where I am when I need to ‘write it down.’
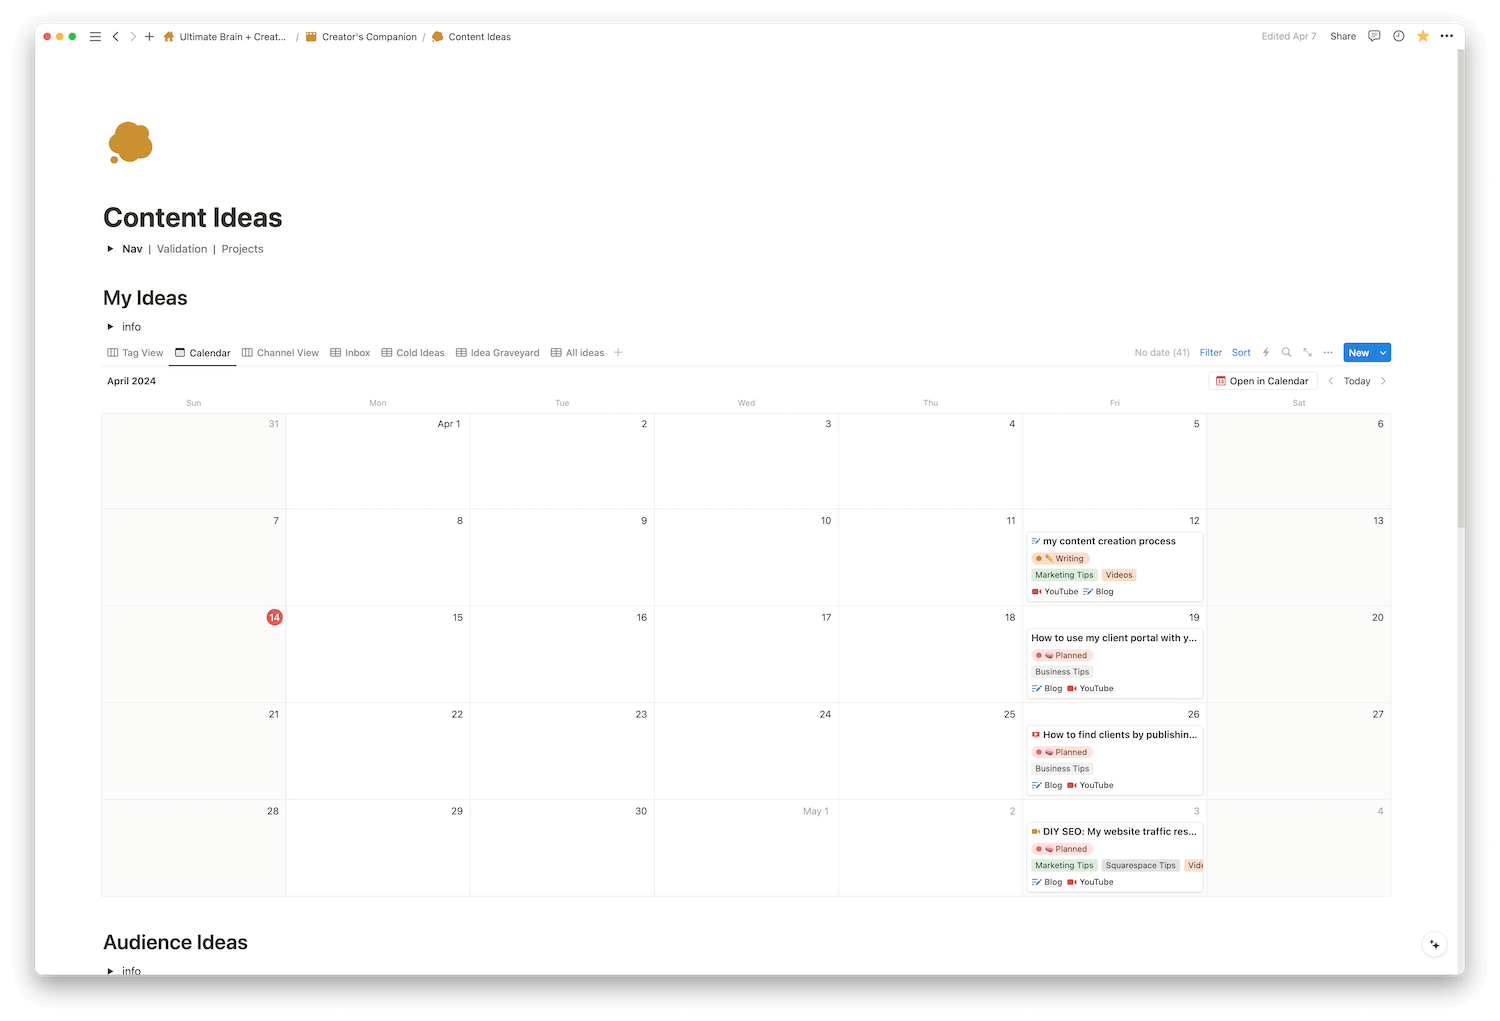
I also use Notion's calendar view in this database.
Fun fact:
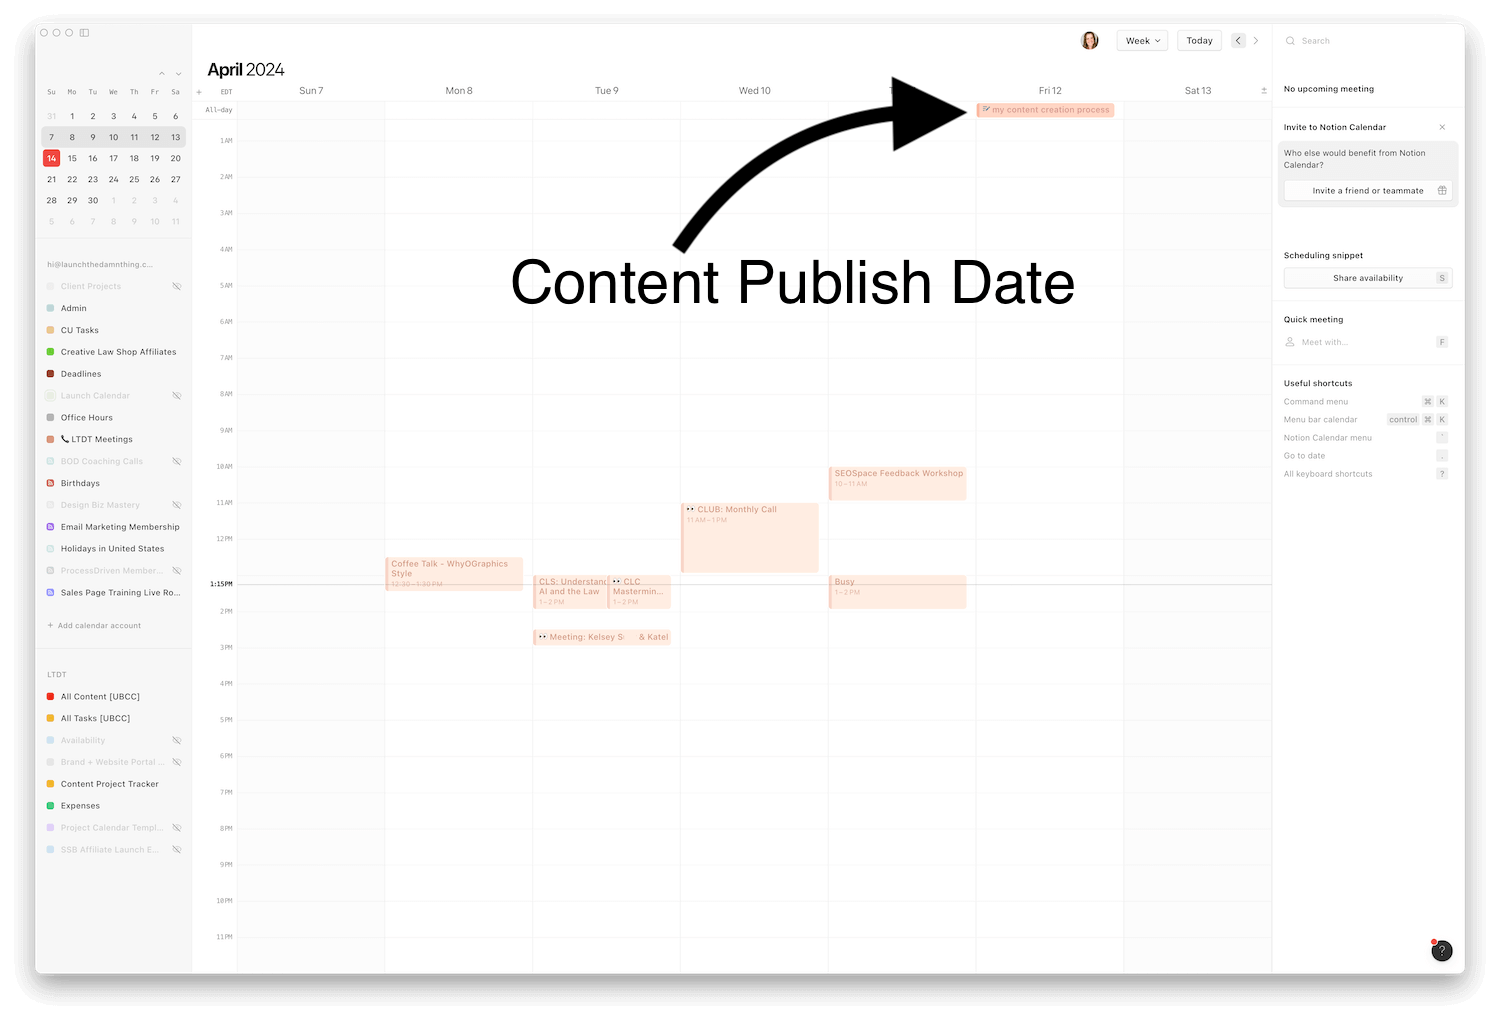
If the original database has a calendar view, you can connect it to display your content dates in the new Notion Calendar app, which is free (and previously called Cron). This way, you can see your intended publish dates, alongside your other Google events.
Underneath the main idea tracker database, I also keep a list of audience suggestions. If you're on my email list or subscribe to my YouTube channel, and you've ever commented with a question, or responded to an email of mine, this is where I store that info so I won’t forget! Knowing where you are struggling is often incredibly helpful as I come up with future content ideas and plan out my content calendar! So I try to respond to everyone that takes the time to share thoughts & feedback with me, and I also keep a list of those ideas for future content.
How I plan my content in Notion
I start with the list of content ideas that have no date assigned yet. Then, I simply drag one from that list onto the Calendar view in Notion. When I’ve assigned a date, then I change the status to “Planned” so I can see which ideas are just ideas and which ones have been vetted or put on the calendar for production.
In the Calendar view, along with the status of the post, I can also see the shorthand name of the post, the categories, and the “channel” (aka: where it will be posted), so I can see at a glance if the content planned before & after it will make sense in that order. Sometimes I need to rearrange things a bit and when I do, I can just drag the little cards around to new dates on the Calendar to reassign the intended Publish Date.
I can see my content schedule this way, and easily navigate from week to week, or month to month. Currently, I've planned my content ideas for the next 8-12 weeks which makes actually creating the content each week a little less stressful, because I already know what to create & don’t also have to stress about coming up with an idea first.
Inside any one of these ‘tasks’ (post ideas) in Notion, that's where the content ideas, notes, research, related tasks, outlines, and everything else for a particular piece of content will live.
For today's content, I just have an outline, but for others I might also have tasks listed to remind myself to get/find certain B-roll (video footage) or record my screen to explain specific things. It might also include uploaded screenshots, thoughts, ideas, and anything else related to each idea.
While I tend to plan my content out in advance, I tend to actually create the video and blog content on a week-to-week basis, usually filming, editing & writing each post the week before it publishes. Which, to be frank, is a bit stressful and something I wish I was better at batching so I could get a bit ahead in the production schedule.
When I inevitably start outsourcing the video edits, that will massively help me with batching & getting several videos planned, edited, and scheduled, several weeks ahead of the publish date, because a huge part of the process will be completely removed from my calendar & so each post won’t take ME as long to produce, freeing up quite a bit of my time.
So, that's my Notion process, tracking all of it in here! It's an efficient, flexible system that keeps my content creation process as smooth and organized as possible, –and it’s fun to use!
Writing Outlines vs Transcripts
I know a lot of people who do, but I don't script my videos because that would make me sound like I was reading from a teleprompter.
Trust me when I say, you do not want to hear me read aloud, even if I wrote the transcript. 😂 I've put a lot of work into developing my speaking style over the years (much needed; I literally used to sound like Daria or Zooey Deschanel) and I don't want to take a step BACKward, and lose my much-improved natural enthusiasm while speaking, because I’m reading a script.
So, I only write an outline and that’s my guide while recording. I keep it open and glance at it when needed to keep myself on track or make sure I don’t forget any important touch points.
Then, I edit out the parts where I'm looking off-camera at my notes. This does mean my raw footage is more… well, raw, and it requires more editing, but I think the end result is worth it, because I sound more natural in the video.
Creating Video Content: Insights & Tools
Recording the video
I start by filming the main part of my video, which usually involves a tutorial or an explanation of a particular topic. Once I'm satisfied with that part, I record a short intro and outro. Sometimes, I record the intro & outro as separate clips, and sometimes, I record them in a single take and split them up later in the editing proccess.
Selfies for the video thumbnail
After filming, preferably on the same day, I take some selfies for the video thumbnail! It’s best to do this on the same day because that’s how I looked in the video, and what I just filmed is fresh in my mind, so I can take photos with more accurate expressions which match the general idea of the video. I use my camera + a timer, stick to my home office for these, and just edit out the background. Since this whole process already takes up SO much time, I don’t add time to create or hunt for ‘the perfect thumbnail’ shot or location.
Editing the video
Next up, I add the raw clips to my video editing software, which is now Final Cut Pro. Here, I piece together the intro, main tutorial/educational part, and outro, and paste in the template for the last 10-20 seconds where the music fades in & my animated logo is shown with any relevant disclaimers. Then I add any necessary edits at this stage, including overlay screenshots, animations, stickers or gifs, and sound effects, which I’m currently getting from Motion Array, or Giphy.
I didn’t start with using Final Cut Pro, though! I actually started with Descript* as my video editor, which is SUPER easy to pick up & learn as far as video editors go & it has a ton of useful features built in for content creators (podcasters, YouTubers, bloggers, etc).
As I got more comfortable and needed more features, I upgraded to Final Cut Pro, but that took 12-18 months or so. Final Cut Pro is a bit pricey upfront, but it's a one-time fee for a lifetime access deal, so I love not having a subscription for it longterm & it feels a lot like a pro version of iMovie if you’ve ever used that on your Mac. (Sorry, PC users! I don’t think FCP works on Windows.)
Even though I have Adobe Creative Cloud & could’ve used Premier &/or After Effects for ‘free’ (included in my subscription), I didn’t have the capacity to learn those massive programs & keep on the faster publishing schedule I wanted. Both feel as overwhelming to me as Photoshop did when I first began learning that, and frankly those are not as easy to just ‘pick up’ as quickly as an Apple software. 😬
Once the video is edited, I export the final video file and upload it to YouTube. But that's not the end, unfortunately! I also export the chapters using Creator’s Best Friend, a simple $10 plugin for Final Cut, which copies the chapter markers to my clipboard for YouTube. I also optimize my YouTube posts for SEO using an extension called VidIQ. It gives me a score on how SEO-friendly my post is, and I aim to get this score as close to 100 as possible.
Now, while all this is happening (uploading to YouTube & optimizing the post), I'm also importing the final video file into Descript* to transcribe the video for me. That transcription is used as the foundation to create the corresponding blog post, and I’ll go into that more in a minute.
Finally, I schedule the video on YouTube. However, due to some recent changes by YouTube, I can't grab the embed code for the video until after it's published, and video blocks in Squarespace can only ‘see’ published videos so the share link won’t work either until the video is live. So, I have to publish the video first, then embed it into the blog post.
And that's it! That's my process, –for the video part. Now let’s switch over the the blog post part! 😂
The Blogging Process: Transcription to Publication
Now I’m ready to make a standalone blog post from my video’s transcript. This process can be a bit lengthy, but is totally worth it because it allows people to learn in different ways (video vs article) and allows my posts to be found by those search engines (video search via YouTube, or text-based via Google).
This step in content creation can take anywhere from 2-6 hours per post, but don't freak out quite yet; I’ll share some tips to make it faster!
Transcribing the video
First, you'll need to have your video transcribed. As I said, I personally use Descript* for this step, honestly because I haven’t another tool that does it as well. It not only transcribes the content but also helps to eliminate filler words (like "so's" and "you know's") which could be a huge timesaver, if you’re not also rewriting, proofing, or editing the transcription.
After you've got your transcription, I copy the whole thing and paste it into the ‘task’ as a Notion document. This could replace the initial outline, or it can be a sub-page within the task. I like to make it a subpage on a clean, empty page, so I can see an approximate word count as I edit, because Google has a 2,000+ word preference for “quality” blog posts and my transcriptions tend to be quite lengthy, typically closer to between 4,000 and 6,000 words. So, the next step is to condense it a bit; just because my video is wordy, doesn’t mean the blog post should be also!
Using AI to edit the video transcript
To make the video’s accompanying blog post more digestible, I typically use AI to help me clarify, summarize, and rewrite each chapter or section of the content. This way, the post will be shorter and more coherent, making it a standalone piece that doesn't rely on the video for context.
Specifically, I use Notion’s AI to “improve & rewrite for clarity, with actionable steps, keep details. Write in a similar tone as original, friendly & casual.” (Yes, that’s the exact prompt I use.) Once Notion’s AI finishes with each part, I insert it below the original & color it blue so I can tell the difference between my words & AI’s. Then I visually compare each set of paragraphs to see if it appears wildly different in length. (Too short probably means important details have been left out; too long & I might as well just edit my own transcript for that part.)
I repeat this all the way down the transcript. This process can take a few hours if I’m not focused, so I highly encourage you to close tabs, email, turn on Do Not Disturb, and start this process when your brain has the best focusing-power, to get it done quickly!
AI might be doing a lot of the heavy lifting for me to start, but I still have to make sure it sounds like me & includes all the important details it needs to be useful, before I hit publish.
While editing, I also add notes for myself via “callout” blocks in Notion. These have a colored background and standout in the text so I can’t miss them. They act as reminders for where I need to insert screenshots, affiliate links, images, examples, or even video clips wherever they’re needed for context. This saves me time later when I’m copying and pasting the content into Squarespace, –or whatever your blogging platform of choice is for you.
Finally, once I've done all the editing in Notion, the last step is to copy/paste the content into a blog post. While this is mostly a simple copy-paste job, you may need to tweak the styling a bit if it pastes in a bit funky, carrying over some of the “markdown language” from Notion (ie: double asterisks around text to create bolded letters, etc), which it uses for styling or formatting text in their editor. You can use something like Google Docs instead, but that tends to add extra spaces between paragraphs which creates more editing time.
One bonus of doing all your editing in Notion (or Google Docs) first is that you'll have a backup of the blog post, for just in case scenarios. 😁
And that's it! The goal here is to create a blog post that can stand alone, separate from the video; and a video that can stand alone, separate from the blog post. It's a process that requires quite a bit of time, but again, I think the end result is well worth it & helps the most amount of people.
Pro tip:
I recently discovered Blogify on App Sumo. This tool claims to both transcribe (live or uploaded) videos & turn those transcriptions into blog posts (with chapters, etc) while keeping the word count closer to the original transcript. I gave it a try with this video's blog post, and while it did do a lot better than Chat GPT or Descript, I’m still happier with my Notion AI process, going section by section. It came up with a post just under 2,000 words, but the transcript was triple that length; so it definitely did a better job than other tools I’ve tried so far, but not quite good enough to use without a lot of editing for this post. It’s worth a try though if this is something you’re struggling with! I’ll be keeping it in my back pocket to help as needed, for sure!
My Content Creation Timeline & Workflow
Let's break down my content creation timeline. I find it works best to split up the process over several days, making sure to put at least a day between each of these steps, to avoid burnout and exhaustion.
It may seem time-consuming when you combine it all (because it absolutely IS), but every part is important, and ensures I’m creating a high-quality post that is useful for my audience, –which is the ENTIRE point of creating content. I’m not making this shit for bots & Google algorithms. I’m making it for YOU. 😂
So I can expect to spend anywhere from about 10 to 20 hours on this process from start to finish. Remember, the quality, engaging content I’m producing is well worth the time investment because each high-quality piece I publish continues to bring me traffic, leads, customers and clients for years to come!
Day 1: Record & Snap a Selfie
All I do on the first day is record the video parts in chunks and take a selfie for the video thumbnail. It's important (to me) to get the selfie on the same day, because I want to look consistent with how I appeared in that video. If you ever spot me in a different outfit in the thumbnail, that's because I forgot to take a selfie on recording day! 😄 This stage takes 1-2 hours typically, depending on how many ‘takes’ I record, if I get interrupted while filming & lose my train of thought, need to stop & rework something, etc.
Day 2: Video Editing & Transcribing
A couple of days later, I begin editing the video and the process of uploading it to YouTube. I also use this time to put the video file in Descript* for transcription and then copy and paste that transcription into Notion, so it’ll be ready for me to start editing later. This stage usually takes between 2-6 hours, depending on the video length and any technical issues I come across while editing. Sometimes I get a hair-brained idea for how I want to edit & need to stop to go figure out how to do that, before I can actually do it. Obviously, shorter videos (10-20 minute) are easier & faster to edit, with longer videos (20-40 minute) taking the longest to edit.
Day 3: Blog Post Creation
On the third day, I edit the transcription in Notion, then transfer it into a Squarespace blog post when the edits are done. With the help of AI, this usually takes between 1-4 hours, plus an additional 30-45 minutes to write the email blast that accompanies the blog post. Sometimes the AI rewrite is good & I can make minor changes, but other times I have to add important details back in, make notes for where I have to add contextual images, etc, and add my own personality back in bc AI stripped too much away.
Why I Love Content Marketing & Its Real Impact on My Business
Now that you know how long all this takes, you're probably wondering why on earth I pour so much time into my weekly content. That’s a valid question! 😂 And lucky for you, it’s one I’m happy to answer.
So, why on earth would I spend HALF my working week on content creation? The answer is simple – I love it! There's something incredibly fulfilling about creating content that not only educates and helps other people, but also brings a unique perspective to the table that I feel like not many other content creator’s offer. Based on your feedback, I know my content resonates with you maybe better than other creators you follow, and so each piece I produce has the potential to actually help someone!
But there's more to it than just the love for content creation.
When I first started my business and set up my website in 2015, “everybody” said blogging or writing articles was the best way to get traffic without paid ads. So that’s what I did, even from the beginning.
You may be surprised to know that in 2023, of the 60 projects or services I provided, a whopping 43% of those clients found me through Google searches, another 15% discovered me on YouTube, and another 12% found me through specific blog posts.
That's a whopping 70% of the total projects I worked on all year, that found my website without me having to chase them with ads or through different platforms!
That’s why I focus all my effort on blogging and YouTube in my marketing strategy, instead of spreading myself thin across various social media platforms. As the chart above shows, Instagram, Facebook & LinkedIn brought in only 6% of my total projects.
I've found my preferred sweet spot in creating searchable content that has a virtually unlimited shelf-life per post, each of which continue to draw in audiences long after it's been published.
Tips for new content creators
If you're toying with the idea of content marketing too, it’s important to note that there’s definitely a learning curve. It's going to take a while before you get the hang of it, and another long while until you feel like you've begun to master it, ––but don't let that stop you.
Embrace the process and remember that EVERY expert was once a beginner too.
Don’t let the PRESSURE get to you. You DON’T have to be everywhere all the time. In fact, that’s practically impossible for a solopreneur that doesn’t have any help (who wears all the hats).
I started blogging in 2016, and didn’t add YouTube to my content marketing efforts until 2022. That's six and a half years of learning how to blog, experimenting, then refining my writing & publishing schedule, FIRST, before adding another layer (complexity) to the process.
My advice to you is to start small, if it feels overwhelming. Write shorter blog posts of about 1,000 words, or longer 2,000 word posts once or twice a month instead of every week, until you get the hang of it. Or start by creating five-minute videos if you’re nervous on camera, so you can practice!
Basically, to avoid burning out, you have to choose which campfire you stoke. Focus on mastering one platform/service/hobby/whatever before venturing into or adding others.
If you think of each of your content platforms as 'campfires,' each one needs to be tended to and built up before it can become a f*cking bonfire. If you try to keep too many fires going at once, you'll end up spreading yourself too thin and NONE of them will reach their full potential. Meanwhile you’ll be exhausted from all the effort going nowhere.
Hear more about turning campfires into bonfires at 1:21:26 in Ryan Holiday’s interview with Matthew McConaughey
If you're ready to dive into the world of content creation, here's your roadmap:
start small,
focus on one platform at a time,
create content that you're passionate about,
and remember that it's okay to grow at your own pace.
Embrace the journey,
learn from each step,
and before you know it, you'll have a bonfire that attracts and engages your audience.
Final Thoughts & Encouragement
Just to clear the air, because let's be real, content creation isn't a one-size-fits-all process. It works for me, but you need to figure out what works for YOU. Don't feel like you have to copy my strategy, just because it works well for me.
Remember, the key to successful content creation is finding JOY in the process. You want your energy and your passion to shine through your work. If you dread your marketing method every week, it's time to rethink your strategy, because doing something you dread is not going to bring you joy & it’s not going to work as well for your business. So, figure out what works for you and RUN with it!
That's all for now. Now, go and create some amazing content! 😃
