

How to schedule client projects & plan to achieve your annual income goals
Table of Contents Show
Before I started doing this for myself, I felt aimless & stressed about money all year.
I felt like I had to take every project that walked into my inbox to reach an imaginary financial goal that I never seemed to make progress toward.
Looking back at it now, I realize I was never able to hit my goal because I wasn’t actively DOING anything to plan for it.
Duh… 🤦🏼♀️
I had no idea how many projects I needed to book in 1 year in order to reach it, and so I never did. 🤯 Simple as that!
I don’t want you to learn this lesson the hard way, over years of naiveté like I did, so today, I'm diving into this crucial aspect of running your website design business: scheduling your actual projects into your calendar.
And –because I’m awesome– I'll be sharing a handy FREE template that you can seamlessly integrate into your project management system (like Notion or ClickUp). So, if you're ready to streamline your scheduling and make the most of your time ––and income–– grab the template below so you can follow along!

Do this before you use a Project Calendar
Before we jump into the nitty-gritty of the template, there are a few key elements you'll want to have in place. Let's cover those quickly!
❶ Know Your Pricing Inside Out
Understanding the value of your services is crucial!! If you don’t know for sure your rates are “right” (for you), then how can you plan an income goal? And without an income goal, how do you know how many projects you need to book in 1 year to make that money? 😬
You need a clear picture of what you're charging for each service offering to set realistic booking goals for your business. Your prices may vary throughout the year and that’s okay, but having a baseline is crucial!
This is something I did NOT do for YEARS, myself. And guess when I started finally making more money? When I started using a Project Calendar and planning my annual spots based on how much I needed to earn. 😳 Just sayin’!
❷ Using my Pricing Calculator Template
If you haven't already, take a moment to check out my pricing calculator template overview video. It's a super handy tool, built for exactly this process & it’s available in my shop for just $27 bucks.
I designed it to do ALL the math for you. After a couple of quick updates to formulas (don’t worry, I show you exactly how to do it!), then pop in your numbers and you'll have a clear idea of how many projects you'll need to meet your income goals for the year.
After all, without a goal, what the hell are we aiming for (for real)? 😰
❸ Guiding Clients Through Discovery Calls
Last, our Discovery Calls are a super important part of the booking process for many service providers, because this is your chance to show your potential clients that you are their expert.
Yes, –THEIR expert. Maybe not “the expert” (as in, the only one), but definitely the right one or the wrong one for them in particular. This meet & greet is to help you both figure out if you’re a fit for each other!
Not sure what to do on these calls? In this post, I walk you through how I handle them –and spoiler alert, it's all about listening & listening to your gut!
If you're curious about when to discuss project availability and related details, be sure to watch my process videos on my two-week website process and my VIP Day processes, along with the Discovery Call video.
What’s inside the Project Calendar?
Now it's time to take a closer look at the template!
Here's a peek at it in ClickUp, shown first in List view (a view similar to a spreadsheet). In ClickUp lingo, "tasks" refer to the records, items or entries in the spreadsheet, and that's what we'll be working with: adding or editing 1 task per ‘project’ until we’ve mapped out the whole year.
Remember, if you find yourself a bit lost, don't hesitate to check out those videos I mentioned above for added context!
Explaining the template fields (columns)
Each ‘task’ or line item in this database list represents a project spot. And each spot comes with a Start Date and a Due Date. The ‘start date’ is literally the date the project starts, while the ‘due date’ represents the date the project ends.
In ClickUp you can’t rename these 2 particular date fields, but you can substitute them for a “Custom Field” date property type which you can rename instead. I use the standard Start & Due date fields because it helps in the Calendar view to have the duration between them showing on the calendar for multi-day or week projects.
However, in Notion, they can have any name you want if “Start Date” and “End Date” make more sense to you!
Now, when it comes to setting dates, you have options. For VIP days, both fields could have the same date, or you could skip the start date altogether and just set a due date which is probably a tad easier for your setup & maintenance of this calendar.
And as I said before, aor a multiple-week project, you'll want to specify both a start and end date for each task or project you’re listing, so the project duration displays on the calendar view.
Status & Availability fields
The Status column is your personal way of managing your client funnels and processes. Remember, it's for your eyes only; that status is not public-facing in the Calendar you’ll share with your clients.
This Status field has a lot of options and you can add more if you need them for your behind-the scenes processes, so you can see which projects are in what stage as clients are booking them, as long as you keep it updated!
On the flip side, the Availability field is a single-select field type, and is what you want your client to see when they view the public version of your calendar. This is public-facing, and that’s where there are fewer options to choose from in that field.
# of People Interested & Who fields
Next up, is the # Interested field. This is a label field type (multi-select) where you can indicate how many people have expressed interest in a particular spot on your calendar. This label will be visible to your clients in the public calendar view too.
The Who (Client) field gives you the secret option to manually type in the names of people who want that spot, if you want to keep track of specifics. Sometimes it helps to remember who wanted which spot, when you have more than one client trying to book in the same timeframe!
Value field (your secret weapon!)
Now, let's talk about the Value field –my favorite part! This is where knowing your services pricing inside & out really pays off.
By assigning a monetary value to this field in each spot, you can see your potential annual earnings if you can fill all these spots in your calendar, which gives you an actual goal to work toward!
For example, if you plan to charge $3,000 for a two-week website project, then all you have to do is calculate how many spots you have to book at that rate to meet your income goal. If the numbers don’t match up, you need to change your income goal or the price for your service. Easy peasy!
Trust me, it’s a LOT easier to reach your first $30k, $50k, then $100k when you know exactly how many projects you have to book & at what rate, to reach it. Otherwise, that financial goal is just an idea that you’re not planning for. 🫣
For ClickUp users, this column can do the total calculation for you if you’re on a paid plan (the Unlimited plan is quite budget-friendly, at just $5-7/mo).
If you're using a platform like Notion, the good news is that this feature is available for anyone, on a paid plan or not.
By calculate the total Value of the entire column, you’ll have an easy, no math, clear picture of your earning potential for the entire year & that goal suddenly becomes a real, actionable thing!
I've pre-filled both versions of this free template with some fake data, so you can see how it all comes together.
Trust me, once you've got the hang of it, you'll wonder how you ever managed without it!
Fine-tuning your Calendar: Editing & Viewing Options
Alright, now that you understand what’s inside each task (project entry), let's talk about customizing this template to fit your business needs individually, where to customize those settings & how to share this with your client when you’re done!
Navigating Different Views
Let's talk about the different views inside this template. In project management apps like Clickup and Notion you can have one container (called a “database” in Notion, or “list” in ClickUp) that holds the information and multiple ways to VIEW that information.
This is how we can have one set of project information, but still view that same information in different formats, such as a calendar view instead of a spreadsheet view.
In this free template, there are three views preinstalled for you:
List or Table view This is the view we've been working in so far. It gives you a clear, organized list or spreadsheet of your project spots & important info on each one + the total for everything.
Private Calendar view (ours) This view provides an unfiltered, comprehensive look at your calendar. It displays all the data, making it easy for you to spot potential scheduling conflicts, especially for ClickUp users who can connect your Google Calendar to your account to see your appointments show up here alongside your tasks.
Public Project Calendar view (our client’s) This view is designed specifically & only for your potential clients, so they can see your availability.
There are a couple of filters in place on this view! In ClickUp, 1 filter shows this quarter’s dates and 1 filter shows next quarter’s dates so both sets will display, but nothing outside of those parameters. In Notion, there’s 1 filter that shows dates within the next 6 months, essentially achieving the same thing.
Basically, in the ‘Public’ calendar, your clients will only be able to see due dates for the next six months in either template, no matter when they look at the calendar. This ensures they don't get overwhelmed with long-term availability and you won’t be locked into your schedule when it’s time to take a break 8 or 12 months from now & you desperately need a vacation… 😬
My personal preference is to NOT book more than 6-ish months out, so I can maintain my work flexibility and feel free to schedule time off when I need to, in order to prevent my own burn-out.
But that’s just me –you do you, and if you want to change that filter or remove it entirely, feel free to do what feels good for you!
Editing or Deleting Pre-filled Information
If you want to clear the slate and start fresh, just hover over the column header field, and click the checkbox next to the name field to select everything in the list below it (should work in both ClickUp and Notion).
From there, you can hit the archive or delete button in the multitask toolbar that pops up. This way, you can mass-delete information and get a clean start.
However, if you'd rather tweak the existing details rather than starting over from scratch, that's just as easy to do. Just click on each field to edit the details, or open the ‘task’ to see subpage with all the details for that task by itself.
Tailoring the Calendars: Viewing Options for You & Your Clients
Now it’s time to make this calendar uniquely workable for our clients before we present it to them. Here's how you can customize their view!
Customization Options in ClickUp
Head over to the right-hand side and click on "Customize." This will open up a dropdown menu with more options to tweak the calendar to your liking.
Choosing Colors You have the option to color-code tasks based on their status. This can be a helpful visual cue for clients as they browse the calendar if your status increase in cautionary colors as the project gets booked & the potential client booking each date goes through your processes.
Weekends, Hours, & Past Events You can also choose to show or hide weekends in your public calendar view, hide or show the hour grid lines in ‘day’ view of the calendar, and even fade the color of tasks (projects) scheduled in the past if you want them to show up in the calendar.
Displaying Week Numbers This setting will display the week number on the left side of each row in the calendar throughout the whole year. This is handy for those who like to know & it’s a small detail that’s unlikely to get in the way for those who don’t notice.
Other Display Options You can also toggle on the start and due dates, which are vital for seeing product durations for multi-day or multi-week project timelines.
Setting Visible Fields
Click on "Fields" to choose which custom fields you want to be visible in the calendar for your clients. This allows you to control what information is displayed to both you and your clients in the public view, and you can do the same in your view to adjust how you want to see it for yourself.For instance, for your public calendar you might want to show the availability and the number of interested clients for each spot, but NOT the value you assigned each spot. And showing the # interested field can be useful for your clients to indicate potential competition for a spot.
Customization Options in Notion
Notion’s properties (or fields) for each entry in the database work differently & have different editing & viewing permissions, so you will have LESS privacy with these in Notion than you do in ClickUp.
Just like ClickUp each entry in the Notion Calendar database will have it’s own subpage, but the details that show on that subpage aren’t as hide-able as they are in ClickUp.
For example, if you click on any property type in that sub-page, you can select from 3 options: Always Hide, Hide When Empty, or Always Show.
Always Hide means any properties with that hidden setting will be nested in an open-able toggle or dropdown on the subpage; it won’t be immediately visible, but logged out people viewing that subpage will be able to open that dropdown & see what’s inside.
Hide When Empty is a great way to get unused properties out of the way in the subpage view, but again, they will be visible if the viewer clicks that ‘X More Properties’ dropdown.
Always Show means exactly that: this property whether filled or empty will always show on the subpage.
This is the extent of what you can customize in the subpages view! In the Calendar view, you can click the ••• in the top right of the database & adjust what shows in that view, similar to ClickUp’s customization panel.
Notion’s calendar view doesn’t label the field’s information in Calendar view though, so make sure your field’s data makes sense without knowing what property type that data falls under. 😉
Differentiating Between Views
Remember, you will share the "Public Calendar" view for your clients, and the “Private Calendar" view for your own use, so make sure you’re sharing the correct link with your clients!
Sharing Your Template: Making It “Public”
Now, let's talk about how to make your template accessible to your clients by making it “public.” This is how to open the doors for potential clients to view your availability after all your hard work setting up this template!
When you first get your hands on this template, it won't be automatically shared with the public because you have a new copy of the template that’s stripped of this setting.
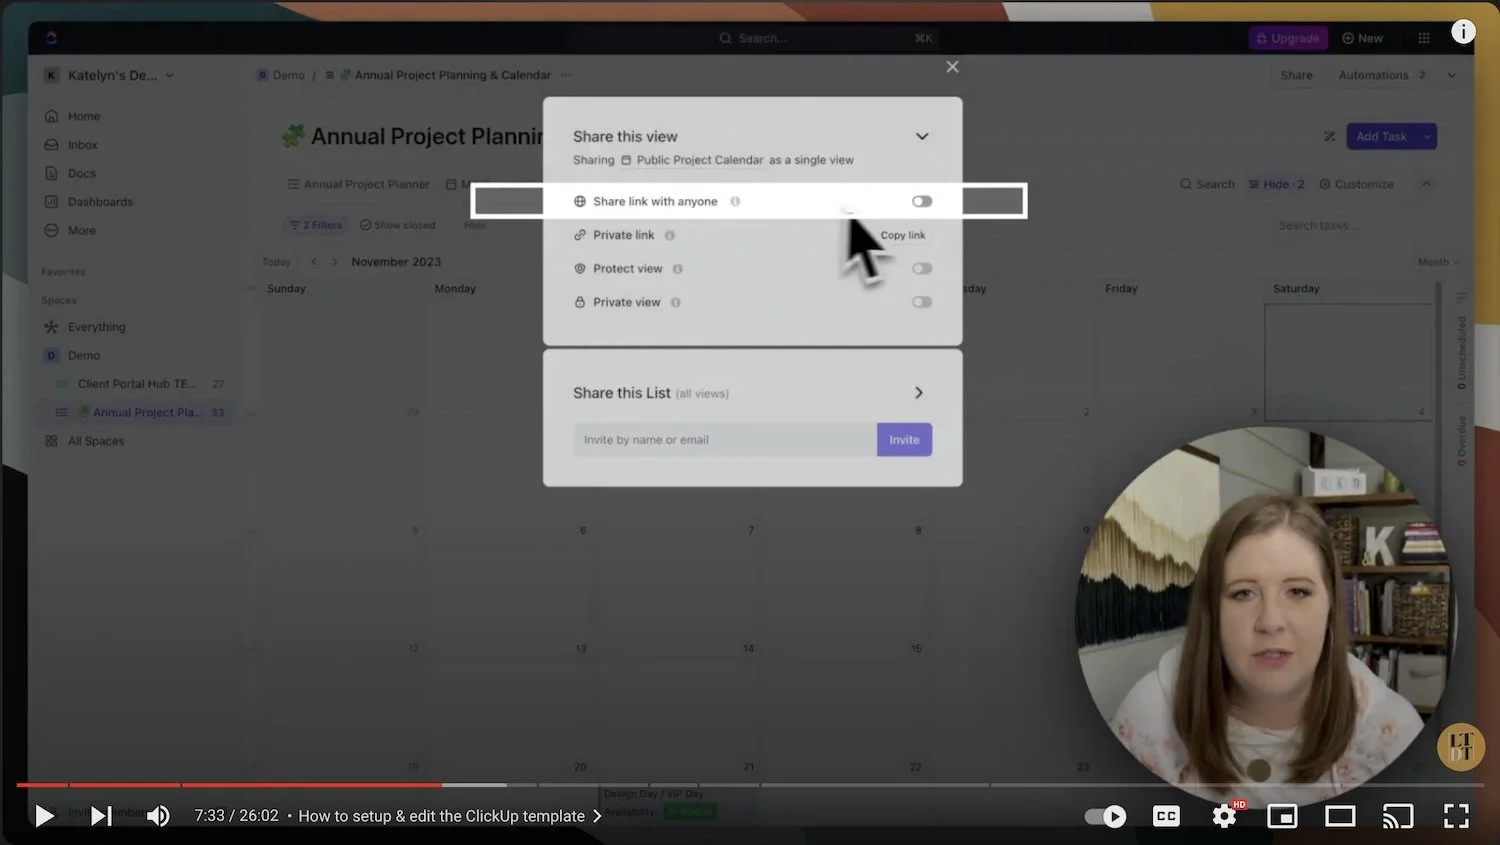
Here's how to make a view public in ClickUp:
Right-click on the ‘Public Calendar’ view title.
Select ‘Sharing & Permissions’
Turn on the setting labeled ‘Share link with anyone’
Then click the purple ‘Copy public link’ button to copy the link you’ll share with your clients!
The Share link with anyone option will open some additional settings, such as the embed code to embed that view on your website or in your Dubsado form, etc.
If you want to allow people to open ‘tasks’ listed on the calendar to see more details inside without needing an invitation or edit permissions to your ClickUp list, you can also turn on that feature too. If you do, you’ll probably also want to choose which field’s data you want to share with them if they open each task.
In my case, I tend to prefer keeping this OFF, because I like to keep the internal details of my tasks private.
However, if you turned this ON and strategically hid details you don’t want to share, it might be very helpful to have in the task description field something that explains what you want the client to do when they’ve chosen the dates they want. Just keep in mind, that description will need to be inside EACH ‘task’ or project listed in the calendar & should not be specific information for any individual person.
Embedding the ClickUp template
If you caught that brief mention of ‘embed’ earlier, and you're feeling extra tech-savvy, –yes you can embed these views in other places –unlike Notion’s version. All you need is the copy/paste code & you’re done!
This allows you to seamlessly integrate this calendar view into a code block on your website, or even in a Dubsado form!
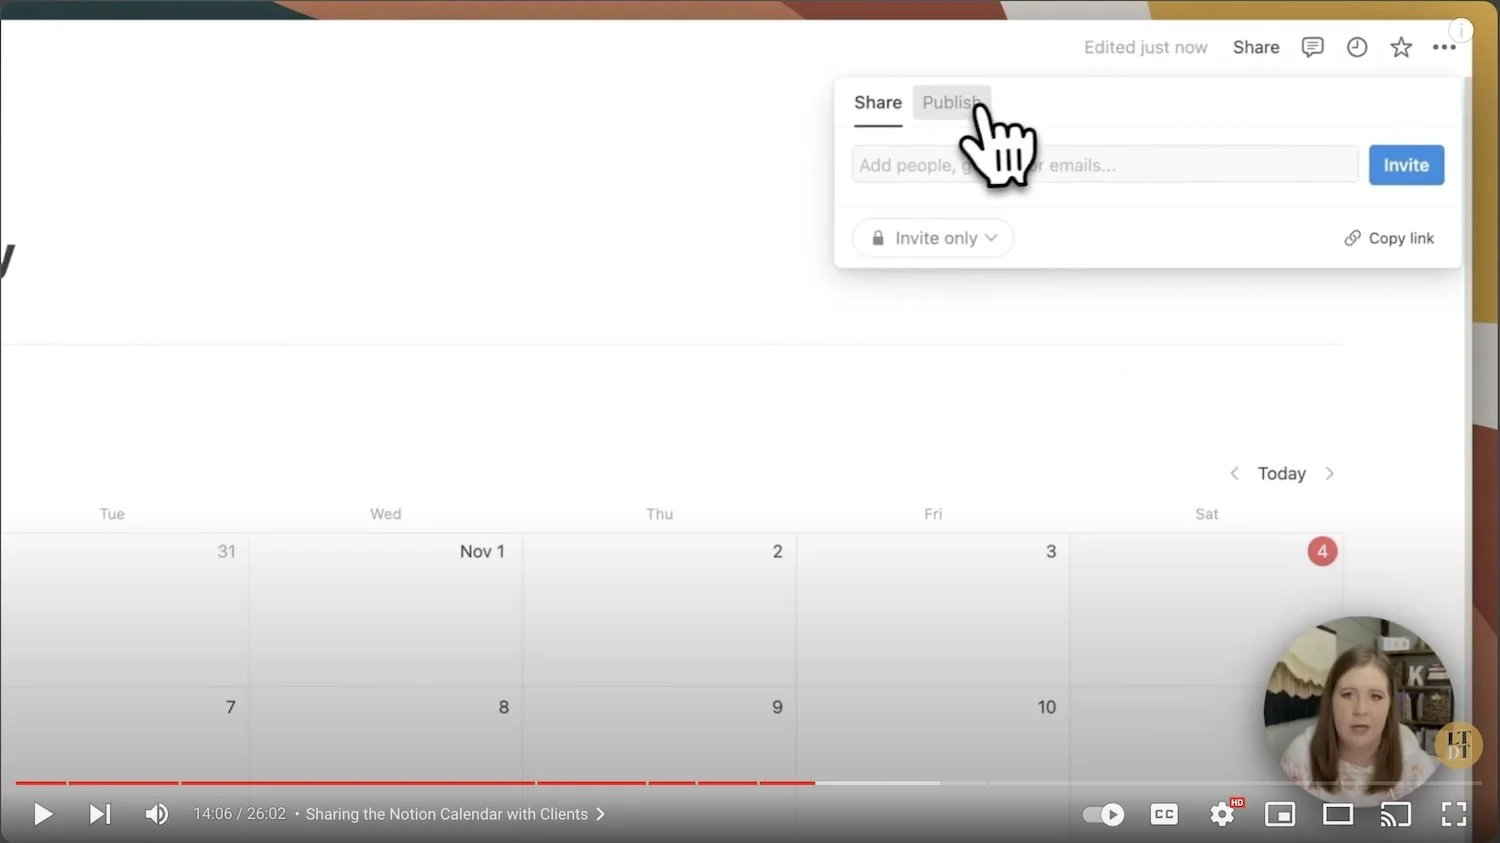
Here’s how to make a view public in Notion:
Create a brand new BLANK page in Notion.
Add a Linked Database to the page, pulling information from that Public Calendar view in your Project Calendar database –a “linked” database will be a synced database, not a copy that has to be edited separately!
Change the page width to Full Screen in your page’s settings area to make the most of the page width & make sure things are easy to see/read.
NOW you can grab the share link from this extra page!
Go up to Share (top right corner of the page),
Click on the Publish tab in that popup window,
click Publish to Web,
turn OFF the toggle for ‘Allow Duplicate as template’ because that’s unnecessary here,
then click the Copy web link button to copy it to your clipboard for sharing
Unfortunately, Notion doesn’t allow embedding their pages into other platforms, but you can use this link in any of the ways I’m mentioning below, just like you can with the public ClickUp link! You just won’t be able to embed the calendar page into your website or Dubsado forms, etc.
How to share the Public link with our clients
Once you've published the public calendar view, in ClickUp you'll notice a little 🌎 globe icon in the top right corner of that specific calendar view once you’ve exited the permission’s settings panel. Clicking on it will allow you to quickly jump back into that panel to copy the public share link again if you ever need it.
In Notion, you’ll just have to jump back up to that Share link in the top right corner & click Publish to grab that public-sharing link again when you need it!
Remember, there are a few ways you can use this link!
You can include it in your lead inquiry form to let potential clients see your availability before they pick a spot.
Or set up a redirect page on your website that displays the calendar, either embedded or linked.
And for those automated emails that go out when someone submits a form, you can include this link there too.
Not sure what I mean by redirect pages or automated email responders to inquiries? Check out this post to deep dive into lead inquiry forms or this post to learn more about my lead inquiry processes.
Remember, using this public calendar is all about giving them easy access to your availability as a service provider WITHOUT letting them peek into your personal calendar. 😉
How to Use the Calendar to Book & Manage Spots
Now you've got your calendar all set up, so it's time to put it into action! Here's how you can seamlessly use this new tool to streamline your booking process when clients ask about project dates on the Discovery Call.
Discussing Project Dates on Discovery Calls
When you're on a discovery call with a potential client, and the conversation turns to scheduling, it's your time to shine.
Simply open your calendar, grab the share link & send it to your client through your chosen meeting platform, whether it's Google Meet, Zoom, Whereby, or any other video conferencing tool.
This way they can compare your availability to theirs & tell you which dates work best for them, without the back & forth emailing after you hop off the call.
Updating Your Calendar
After a productive Discovery Call, it's time to manage the updates in your calendar. Let's break down the steps! It’s so easy, you can even do it during the call so they can see the change live on their end too!
AVAILABILITY
This is why I have the Availability status for ‘Booking in Progress,’ so I can tentatively inform anyone else looking at that spot that someone is actively trying to lock it down, but it’s not yet officially booked.
STATUS
Then you can also update the ‘task’ status to "Follow Up" to set that ‘task’ in our funnel so we know where we are with this particular project date. The status will give the entry a distinctive color in ClickUp’s calendar views too, making it easy for you to spot at a glance.
OTHER DETAILS
I also encourage you to fill out the # interested, Value, and Who (Client) fields while you’re looking at it so you won’t forget those details. For instance, if multiple clients express interest in the same spot, you’d have already updated the "# Interested" field to reflect this for them too & they can see there’s competition.
PROJECT DESCRIPTION
In ClickUp, it might be nice to also use the description field inside the ‘task’ details page to write down what you discussed on the call, in case that adjusts the paperwork you need to send when you start the booking process. Whether it's specific project details, additional services, or any unique details for each client, this is your space to write everything down if you need to.
In Notion, this is trickier, because you can’t hide this from viewers. You can still do it though, if that doesn’t bother you.
The biggest lie I tell myself on a regular basis is that I DON’T need to write it down, because I’ll remember. 😂 (I never remember & I always need to write it down!)
Keeping Track of Progress, Post-Discovery Call
It's important to note that this system operates independently from your CRM. Meaning without automations with Zapier, for example, whatever happens in Dubsado will not also happen in ClickUp or Notion, and vice versa.
While it may require manual updates, the simplicity ensures you can still keep up with the system while maintaining control over the sharing process with your clients.
This approach streamlines & minimizes the need for back-and-forth emails, allowing clients to conveniently view your availability when they need to at any time during the booking process or even their initial research if they have access before they book that initial consult call with you to chat.
It empowers them to make the best decision for them, and empowers you to confidently manage your schedule, even affecting your annual income goals in the process!
Planning for Off-Time & Work/Life Balance
Whew! Congrats on setting your prices and mapping out your projects for the year! Before you walk away today & put your hard work to good use, I have one final note of advice to share.
❶ Allow Buffer Time
For two-week website projects, schedule at least 1 week between each one if you can, or between every 2nd project. This buffer provides essential time for managing your blog, social media marketing, admin tasks, and other passion projects in your business.
Honestly, it's also a safeguard against burnout, ––especially for us entrepreneurs with a tendency toward shiny-object-syndrome! 😂
Once I worked in every single minute of my free time for what felt like a solid year ––nights, weekends, vacations, etc, and what happened? You guessed it! Burnt the fuck out. 🤣 I purposefully didn’t take ANY new projects for MONTHS after that, because all I could mentally & emotionally handle after that was my full-time job, despite how much I wanted my own business to grow. Learn from my mistakes!
❷ Plan Your Year Strategically
By spacing out projects and giving yourself that essential breathing room, you can still manage two projects in a month effectively. This might mean starting & completing one project, having a week in between, and then starting the next project before the month ends so you’ll get paid for at least 1.5 big projects each month.
In between, if you feel comfortable, you can also offer Design Days to help fill the financial gaps. If that sounds interesting to you, make sure you also check out my VIP Day process.
❸ Embrace Balance in Your Life
For a balanced approach, make sure you’re not spreading yourself too thin & build in the time you need to unwind and take care of yourself ––because no one else can do that for us!
Balance may be a challenge, but it's worth striving for. Don’t get me wrong, I’m not sure there ever really is a “true balance” in our life/work, but we can purposefully tip the balance in either direction on & off during different seasons of our life.
Sometimes it’s okay to work more, and sometimes it’s okay to play more! I just want you to make sure you have BOTH, otherwise at some point, you’ll want to burn down your whole business & walk away before you realize that’s what you’re doing.
❹ Leverage the Template
This template is a powerful tool to help you map out your year’s income goals –not just to help you schedule your projects.
Thanks to defined project spots & the value fields, it allows you to plan your income more accurately, so you can set realistic goals to work toward throughout the year.
final thoughts
This admittedly more structured approach literally transformed my business! And I'm confident it can do the same for you too.
If you can’t afford to grab the Pricing Calculator Template just yet, in the interim find out how to start pricing your services in this post or watch the video overview of how to use the calculator template & maybe you can recreate it yourself.
If you have any questions, or want to share your “A-Ha!” moments or any insights that blew your ever-lovin’ mind, leave a comment below!