

How web designers transfer ownership to clients in Squarespace websites
Table of Contents Show
There online business world seems to throw a lot of shade at Squarespace, because "they" think they know what it does or doesn't do based on a quick trial or the general rumor mill.
Every website builder has its pros and cons, but ultimately what works "best" will depend on what level of tech YOU want to manage in your business, not what everyone says you should do/use.
That said, Squarespace is probably most widely known as a DIY website builder, NOT a website builder for clients.
I think that’s why most non-Squarespace users assume it's a trash platform & snub their nose at it. ––To which I say, "you do you!" and snub my nose right back.
Because I've also used a lot of other platforms and Squarespace –despite any limitations it has– is still my favorite, because it's the best combination of features matched with how I want to manage my website.
It's the most accessible, right out of the box
It's the most responsive for mobile, right out of the box
It's SEO-friendly, despite what (outdated rumors) you've heard.
It's cost-effective & has a lot of features built-in
It's very efficient to manage longterm & requires very little maintenance.
It's very DIY-friendly, while also creating a fun challenge for pro designers.
That last point is why I think most newbie designers are curious about the transfer process and how we pass it on to our clients, because it's so DIY-friendly.
Meaning, there's not a lot of info on how to transfer ownership, unless ya dig for it, because Squarespace's primary audience is the do-it-yourselfer.
"We" (professional designers) are its secondary audience/user.
Luckily though, the ownership transfer process is really easy, quick & straight-forward!
In the previous post, I showed you how to create or start a client website in your Squarespace account and why, so if you haven't read/watched that yet, definitely check that out before we move on!
Because today I'm showing you how to transfer ownership of that website to your client and give them access permissions.
Don’t worry! It'll be quick and easy; not a long tutorial today.
Before we dive into that, though, if we haven't met before, my name is Katelyn. I run Launch the Damn Thing®. I am a Squarespace website educator and designer and I've been in the design industry for well over a decade, ––so I can't wait to share my expertise with ya! Let's dive in.
How to add contributors & transfer ownership of a Squarespace website
Find the Permissions Settings in Squarespace
Inside your Squarespace account, the settings have been moving around a little bit as Squarespace has been reorganizing their main menu. So instead of directing you to exactly where it lives just in case it moves again, I'm going to show you the quick way to find it ––no matter where it is.
If you press the question mark or backslash key (?/) on your keyboard, that is a search through the menu, not through your website.
Click in that menu search field and start typing permissions, then you should be directed right to it automatically.
It may not always live there, but right now (as of posting), it currently lives within Settings, under the Website section, and is labeled Permissions.
Inviting a Contributor & Assigning Permissions
In the Permissions panel of your settings you have two options, Invite Contributor or Add Basic Author.
A Basic Author is going to have very limited permissions, so you probably don't want to use that unless you literally just want to add an author for posts.
For a client, since we’ll be handing a finished website off to them, you'll want to invite them as a Contributor. When you click the Invite Contributor button, you'll have a pop up asking for that Contributor’s Name and Email address to send the invitation.
Before I talk about the permissions you can give them before you send this invite, it’s very important to know that email address should be sent to whatever email address they want to use for their login to access Squarespace and their website.
If they don’t already have an account, it won’t matter as much because they can always change the email address in their account settings.
If they DO have an account already, with other websites they manage, best practice is to help them keep those websites in the same account, so make sure you send the invitation to the email address used when they access those other websites.
Okay, back to the permissions levels!
When I invite a client to their own website, I’ll give her Administrator permissions. Selecting that toggle will give them permission to everything in the website, as if they were an owner. So that Administrator toggle will turn on the rest of them, and the rest can’t be edited individually; they’re either all ON or they’re all OFF with this option selected.
Alternatively, you can turn on each permission level’s setting granularly to select which options you want that person to have. If you select everything except Administrator, they effectively still have administrative permissions, but without the admin title & you can always remove any of these one-by-one when/if needed.
Since we're going to transfer ownership to the client, it makes sense to start by giving them the highest permission level of Admin.
So then we'll click Invite to send it!
After you’ve sent the invitation, you can click on any of your pending invites to see or edit their permissions or grab their special invitation link in case they can't find the email from Squarespace.
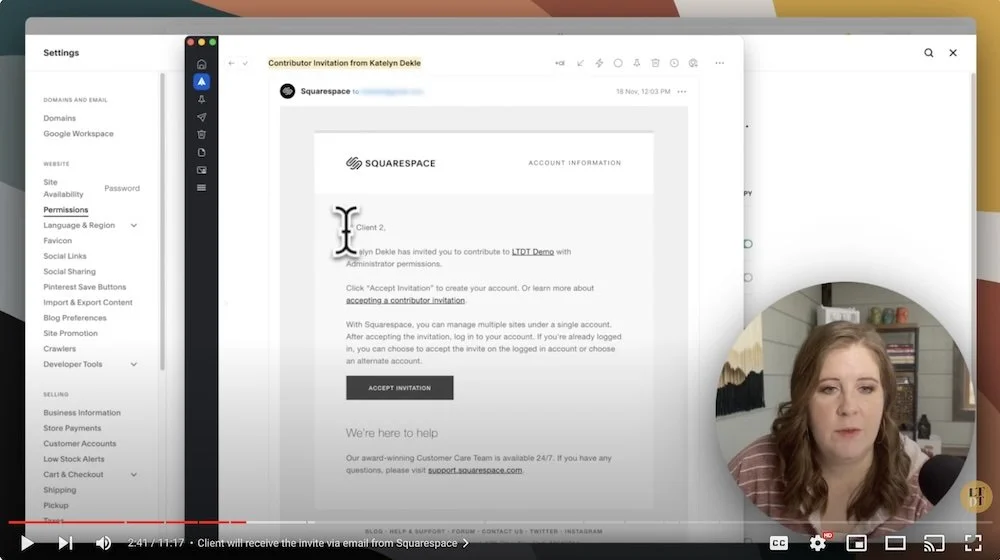
Screenshot of what the invitation email from Squarespace will look like for our client
Sending & Accepting the Contributor Invitation
Now that you’ve sent the invitation, they should get an email from Squarespace, which will look something like this.
It should have the subject line, Contributor Invitation From [designer’s name here].
Then in the email itself, it should say
“hi [client name], [Designer’s name] has invited you to contribute to [website title] with [administrator] permissions.
Click Accept Invitation to create your account or learn more about accepting a contributor invitation….”
Again, you do want to stress that when they click the Accept Invite button, they should log into or be logged in to the account you sent the invitation to, because ultimately you do not want them to be a contributor on multiple websites and all of them be in different Squarespace accounts with different logins for each one –that’d be hard to keep up with. The goal of this is to have sort of a consolidated dashboard where any website they have permissions to see shows up in the same account dashboard in one centralized Squarespace account.
When they click Accept Invite,
if they’re already logged into Squarespace, they may see a screen that says, ‘do you want to continue using the email address that you are currently logged in with?’ or
if they’re not already logged in, it will prompt them to do that before the step is finalized.
Then from the inside of Squarespace, this should be the view for the client:

Screenshot of the Client’s Permissions panel, showing the new Contributor after they accept the invitation
Now, inside either of our accounts, we can see that my design profile is the Owner still, and my other ‘fake client’ profile (with the darker profile picture) is listed as an Administrator.
As a Contributor, you can’t edit your own permissions –only the website Owner can do that.
Once we transfer ownership, they will control our permissions, which is why it's very important to do this step at the end of your project & only after you've received payment in full. That way, you can remove them & unpublish or password protect the website if you ever need to light a fire under their ass to make that last payment.
I should add here, that I’ve never had to do that before, but it’s just a way to protect ourselves as the service provider when the work is done, to make sure we get that last payment from our client as agreed.
Transferring Ownership to the Client, as the Designer
After they've accepted their invitation back in the main permissions area as the owner of the account and they’ve paid in full, it’s it's time to transfer Ownership to the client.
To access that option, you’ll go back into the Permissions area and next to the name of the website’s Owner, you’ll see a text link that says Transfer Ownership.
Screenshot of the Designer’s Account permissions, to find the Transfer Ownership button after inviting a Contributor
This option is ONLY available to the website’s owner, and there can only be ONE highlander owner. 🤣 (#sorrynotsorry for the bad movie reference!)
If you click that button, you’ll see a little verification pop up asking you to log into your account just to verify that, yes, you are indeed the website’s Owner.
Screenshot of the login verification step during the transfer process
Then click Continue, and now you’ll get a second pop up with a dropdown to pick which Contributor you want to transfer ownership to.
Screenshot of the Contributor selection step during the transfer process
This is why you invite the client as a Contributor first, so they’ll be in the system for this step. If there are no Contributors, there’s no option to Transfer Ownership to anyone.
In this example, there's only one other contributor to that demo website, and so that's the person that I would pick.
If there were multiple contributors, obviously you would pick the right contributor to transfer ownership to.
Select the person from the dropdown, then click Continue.
Screenshot of the Confirmation step during the transfer process

Screenshot of the Ownership changes in the Permissions panel (in the Designer’s account)
Then click Confirm, now the Owner by default has been swapped with the Contributor.
Once the transfer has started, it can't be canceled or undone. The only way to undo a transfer is for the new owner to transfer ownership back to the original owner voluntarily.
Now, in my account as the designer or original owner, I now have Administrator permissions.
Again, once you’ve let go of your ownership, you have no control over your own permissions!
Managing Permissions as the Client
Now both of us can see that they (the client) is labeled as the owner of the website.
The transfer of ownership is nearly immediate, but to see it one or both of you may need to refresh your browser’s page.
The Contributor is now the Designer of the website with Admin permissions and the client can now control my permissions as the Admin.
For our client, they can turn our Admin permissions off but not remove us, which just basically means that we are still a Contributor, but we have no current permissions to access anything until they change that setting. If they do that, they can always go back in there and turn it on, without having to invite us all over agin.
Most of my clients don't bother with turning my permissions off because I don't interfere with their content, and they like the safety net of me having quicker access in case there’s ever a problem.
––But you do you. Just make sure you communicate what you want with the client so they don’t have to guess.
One thing that the client can also do from this view as the Owner is to Remove Permissions with a click (rather than individually selecting the toggles below) or Remove the Contributor altogether. They are two separate things.

Screenshot from the Client’s account, where to remove Contributor Permissions or their access to the website entirely
If you remove the contributor as a whole, that removes them from the website entirely and they no longer have access to it at all. The website won't show up in their account, they can't look at the pages or see analytics, –they can't do anything with it.
Okay, so that covers how you can direct them to remove your permissions if they want to know (& I’d argue that you should be telling them even if they don’t ask).
Removing Yourself as a Contributor
After the project is over and the support period has passed, if for any reason you don’t want to be connected to that website anymore, you can remove your own access to that website if you want!
I know I said you can’t change your own permissions, but you CAN remove yourself as a Contributor to a website any time without asking & waiting on the Owner to remove you.
From your main dashboard area, inside your Squarespace account, you can remove yourself from any website in the list from here.
Just find the website in the list from your Dashboard, click the ••• ellipsis to access the quick actions panel, and click Remove Me.
That would literally remove my Contributor access to that website, and remove it from my dashboard. Our client can always add us back if they want to, so this isn’t a ‘block’ or permanent/irreversible setting.
Recap: Summarizing the Process & Sharing Best Practices
I told you there wasn't a lot to it! It's a very simple and easy process that should take at most about 5 minutes, even with the back-and-forth with your client (always goes faster if ya do this on a live call with them right before you help them publish & launch the website!).
To recap, the objective is to give them access or permission to the draft site that you created, once they have permissions or access to that website, then you are able to transfer ownership to any of your contributors that you have invited.
Once you transfer ownership to a Contributor, they are now the Owner and you are, by default, the Administrator and they can control your level of permissions.
Contributors cannot control the level of their permissions, only the Owners can, but you can remove yourself if you don’t want to be attached to the website on a long term basis.
Teaching Clients How To Manage These Permissions
There's not really a best practice for how long to stay on a website as a Contributor. That's totally up to you, the relationship you have with your client, and whether or not they trust you to let you hang on.
I do think it's a good practice to explain this process to your client so they understand how it all works & where to adjust our permissions so they feel in control as the new Owner. It doesn't take very long to explain!
In fact, for VIP Days or Design Days, I just send a pre-recorded video where I show them how to send me Admin permissions, when they have to give me Contributor access to their website for the day. It's a very simple process, two or three minute video should suffice, even for a long winded person like myself.
If you want to stay a Contributor on the website for any reason, you can also give them a benefit or perk if they don’t remove you. An example of that might be, maybe every January you go through all of the websites in your dashboard in Squarespace and change that pesky little date in the copyright line of their footer, or something like that. And, of course, having easier access to the website if there’s ever an issue or emergency.
There's really not many issues with Squarespace though, so that’s more of a fail-safe or peace-of-mind thing than something that’s actually needed.
was that helpful?
I hope that was helpful for you & cleared up some murkiness to the process.
If you are excited and had an “Ah-ha!” moment, or you didn't know it worked that way, or thought it would be more complicated, leave a comment below! I'm so curious to know how you thought this would actually work versus how it does actually work.
And if you want to learn more about my client processes and tips for 2-week processes, VIP days, and more, check the Tips playlist on my YouTube channel; those videos are specific to client processes.
That's all I have for you today!
