How to put multiple links in your Instagram bio

📌 Pin it!
Having a good Instagram bio is so important, and for businesses, having a link in the bio is KEY.
As you go along throughout the year though, you may find that you are changing out your URL as needed, linking to a sales page for a new launch, or changing to your shop page when you have a sale, etc.
Here's why that's not productive:
When your audience gets nosey, and they likely will (I do!), they'll scroll through your whole gallery if they are really that interested (and have the time). What happens if they stumble upon a post from a year ago that refers to a URL "link in bio!" that is no longer there?? Oops!
Aside from that, in business it's always good to have more than 1 option available to you.
Today I'm going to teach you the simplest of How To's. A 5-minute step that will give you more control over that URL, and put more links in your Instagram Bio.
Oh, and did I mention they have a FREE plan (last I checked)?
Method #1 – Build your own landing page recommended
I cover this method in detail, over here! It requires no signup, no extra plan, no extra place to log in, AND it’ll match your branding because it’s already on your own website. 🤯
Method #2 –Linktr.ee
Linktree is ah-mazing. Super simple, easy to set up, and it makes those links customizable. Yep; you heard me!
Once you arrive at their website (click here, & it will open in a new window), and log in with your Instagram account info. After that you should come to a screen like the one below (but with no info in it yet).
4 quick steps to add multiple links to your Instagram Bio
(Read them below, or scroll down to watch the short video.)
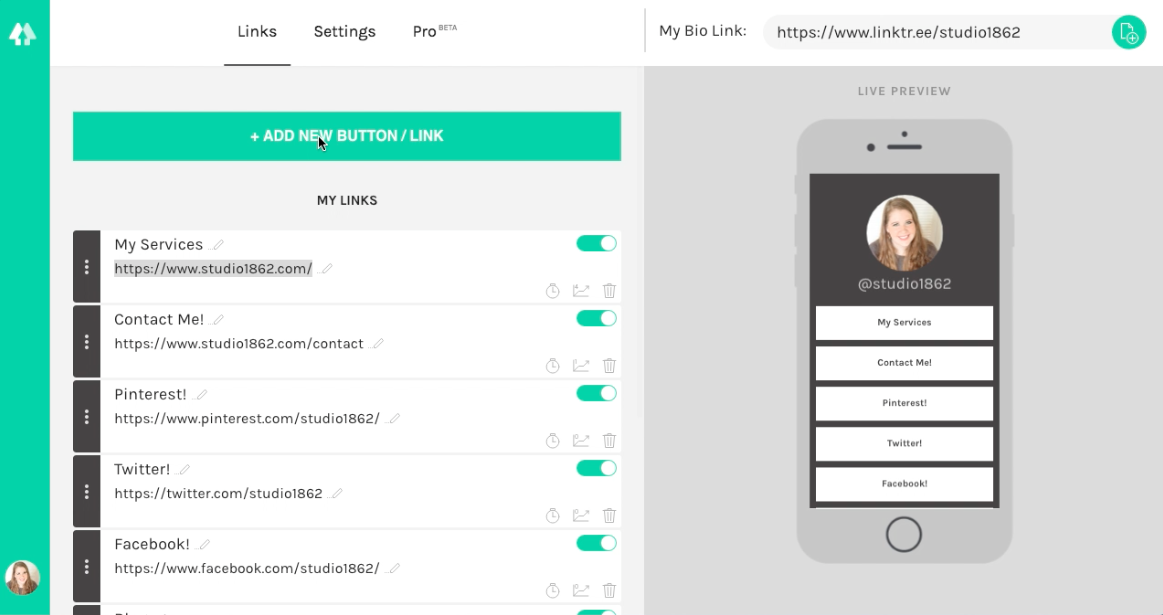
1 | Click on: + Add New Button/Link
The area opens up underneath, and all you have to do is
type in a title (what people will see on the button)
paste your link in the URL section
hit enter/return on your keyboard, or
click the "On/Off" slider in the top right corner of that bar to turn on the link
For now, you can just leave the links in the order they appear as you add them. You can rearrange them later.
2 | Duplicate that process for every link
Use the same process until you have all the links you need in that space. You'll see a preview of each as you build your list, over on the right-hand side of your window.
3 | Re-organize your links
If you want to rearrange anything, use the dark grey area with the 3 dots on the left side of each bar. They allow you to drag each listing up or down in the list. Release your click when you have the listing where you want it, and the preview on the right will update.
4 | Customize your Linktree
If you want, you can choose a different color scheme from the settings tab at the top of the page.
There are 9 preloaded color settings, and if you upgrade to Linktree Pro, you can customize it further.
On the Free plan, you can have an unlimited number of links in your list, and you can see link click totals. To access most of Linktree's features though, you'll need to upgrade. But their free plan will probably work just fine for most people.
Visit their site to see their pricing.