

All things Inquiry forms & how to use ONE in multiple places!
Table of Contents Show
If you have a website on Squarespace or pretty much any other platform out there, you're probably also wondering how you can collect inquiries, what happens when they fill out that form ––and also, where do people get that form??
If you're on Squarespace, there's actually a form block that's built into the platform, which you can use on any page of your website, and it's super easy to set up and use.
And guess what? You don't need any external software in order to get those submissions to you.
Today, I’ll show you all the ins and outs, pros and cons, ––and my favorite hacks that you might not know for making this a little bit easier.
But before I dive into that, if we haven't met before, my name is Katelyn and I run Launch The Damn Thing®. I am a Squarespace educator and web designer, and I've got a lot of tips like this to share. Now, let's hop on into my account!
Lightboxed vs. Embedded or Inline forms + their settings in Squarespace
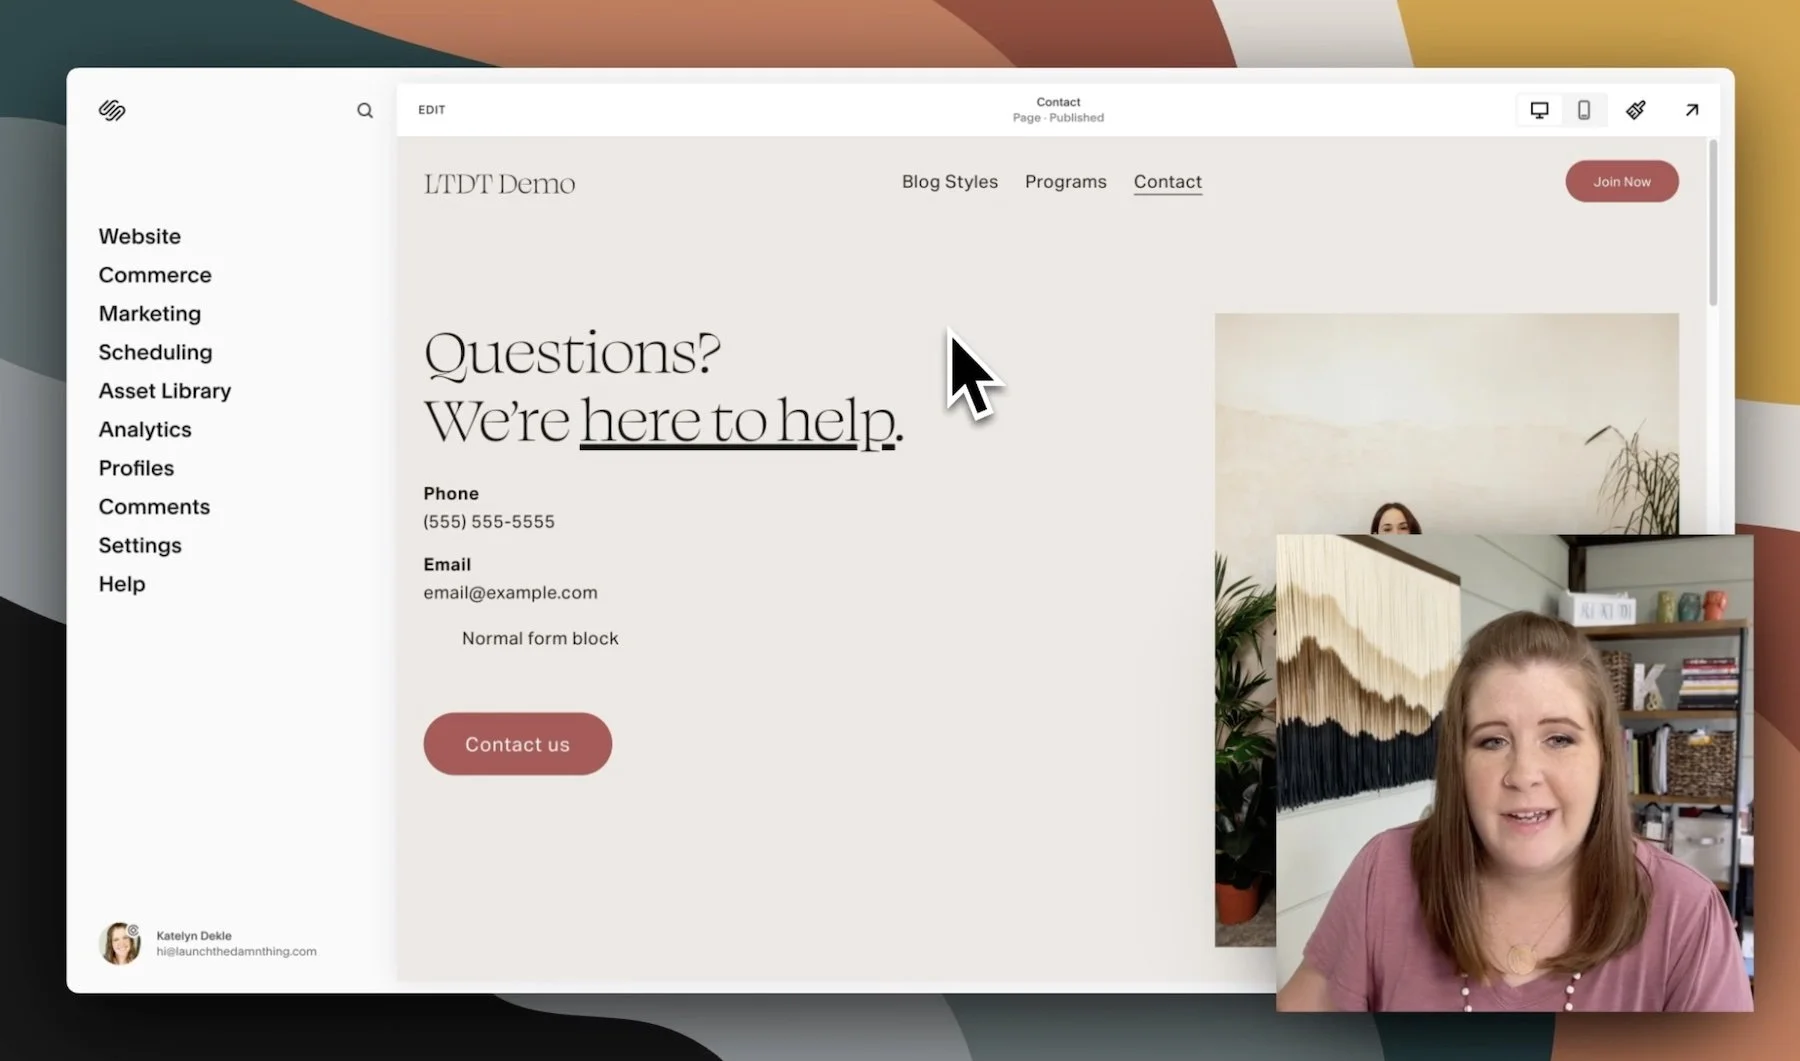
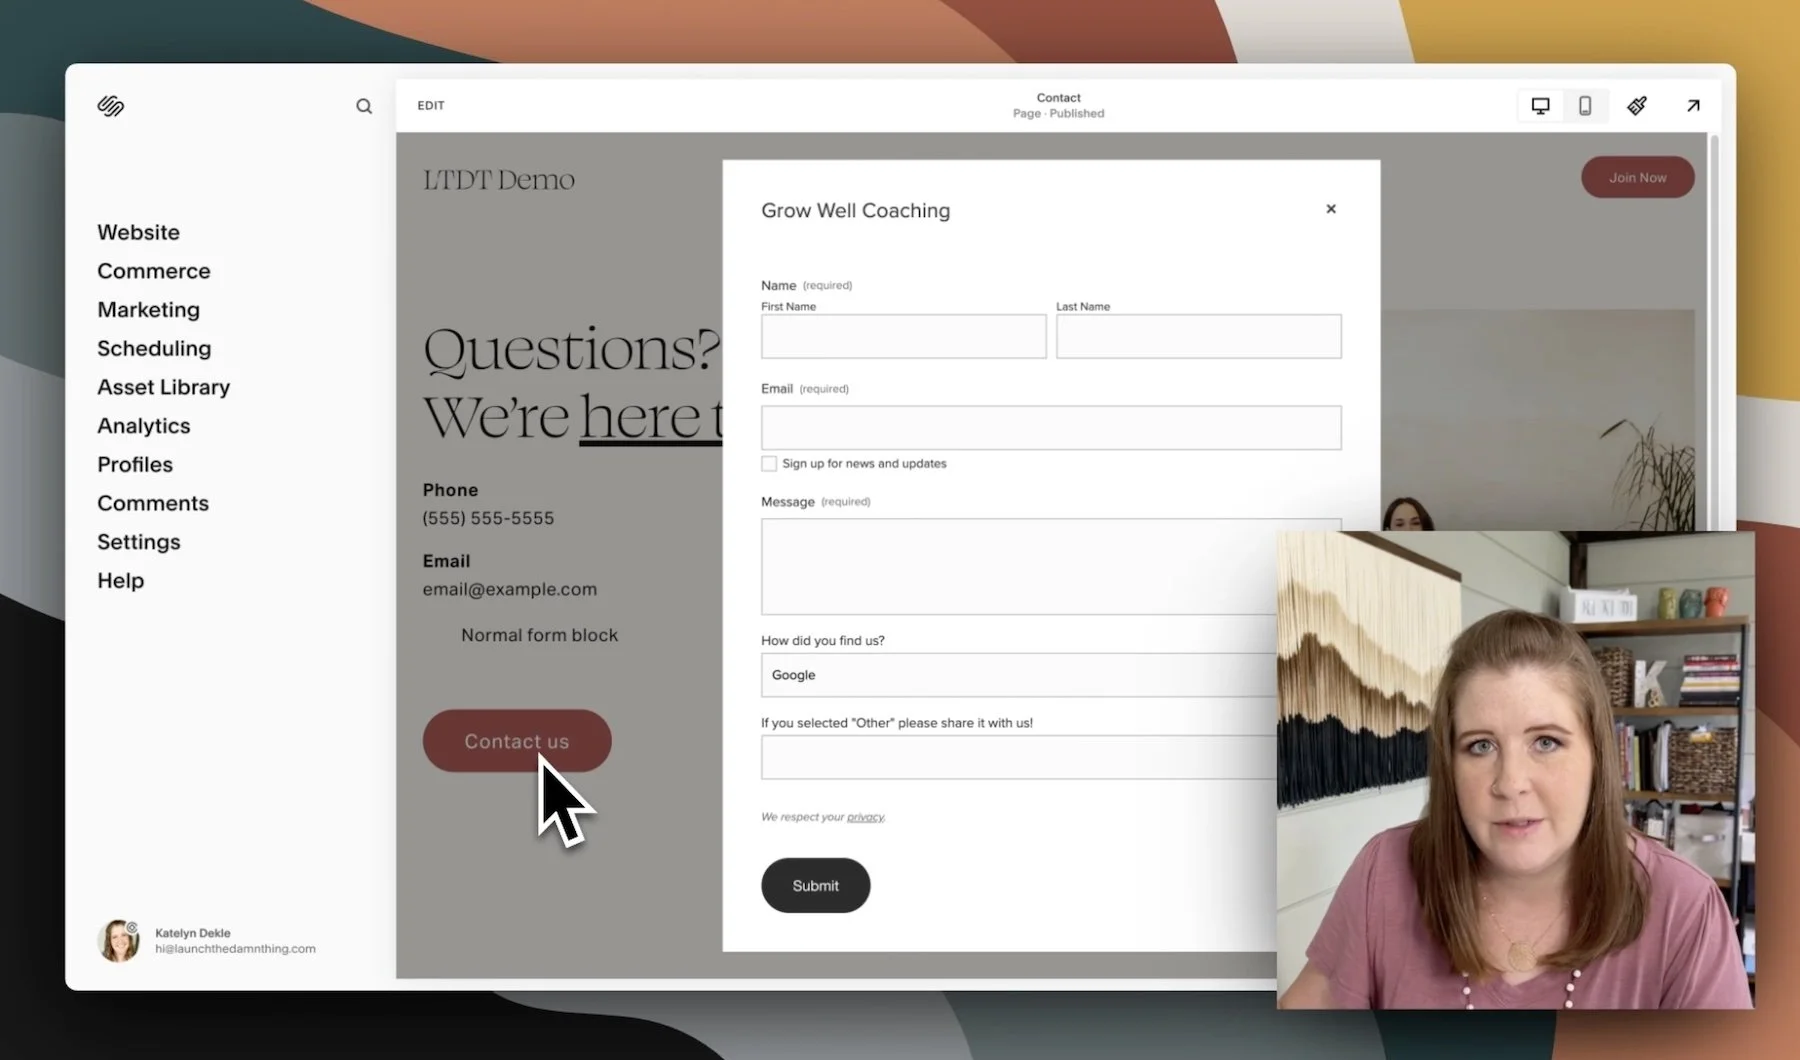
Here’s an example of a very basic contact page on one of my demo sites, with a lightboxed form. You can use the form in a couple different ways.
There's one form style that is called a lightbox, which basically just means it opens the actual form in a pop-up and it kind of hides it underneath the button so no one can see the actual form until they click to open the form. That button can say whatever you want (ie: ‘Open Form’ etc). From the popup, they can fill it out and submit. The submission goes to one of a few places, whichever option you set in the settings.
The other (default) option is an embedded form, where you can see the whole form & there’s no popup.
Knowing those two options, if you go into your Squarespace account, all you need to do is click Add Block, then choose Form to add a new form on the page.
In form settings ––this is very important–– make sure you name the form.
Forms in Squarespace are not global. Meaning, a form on your Contact page can’t also display on your Services page, without adding a second form.
Syncing a form across pages doesn't work natively in Squarespace without third-party plugins. ––Don't worry, I’ll explain that further down. But without using plugins, you can't use one form across the entire site.
(Further down, I’ll explain in more detail)
Lightbox (open form) button vs Submit form button, using the built-in Squarespace form options
If you have more than one form, this is why you need to name it something descriptive so you’ll know what each form submission is or where the form was submitted.
Form titles are not necessarily something that people will see. If you use the lightbox feature of forms, then you'll see the name of the form in the popup. If you embed the form, you won't see the form’s title.
Sidenote: new drinking game!
Let’s take a drink every time I say the word “form!” 🍻 😂
J/K. 😳
Next, is the Submit button text (that's what shows up on the form itself, not the lightbox button).
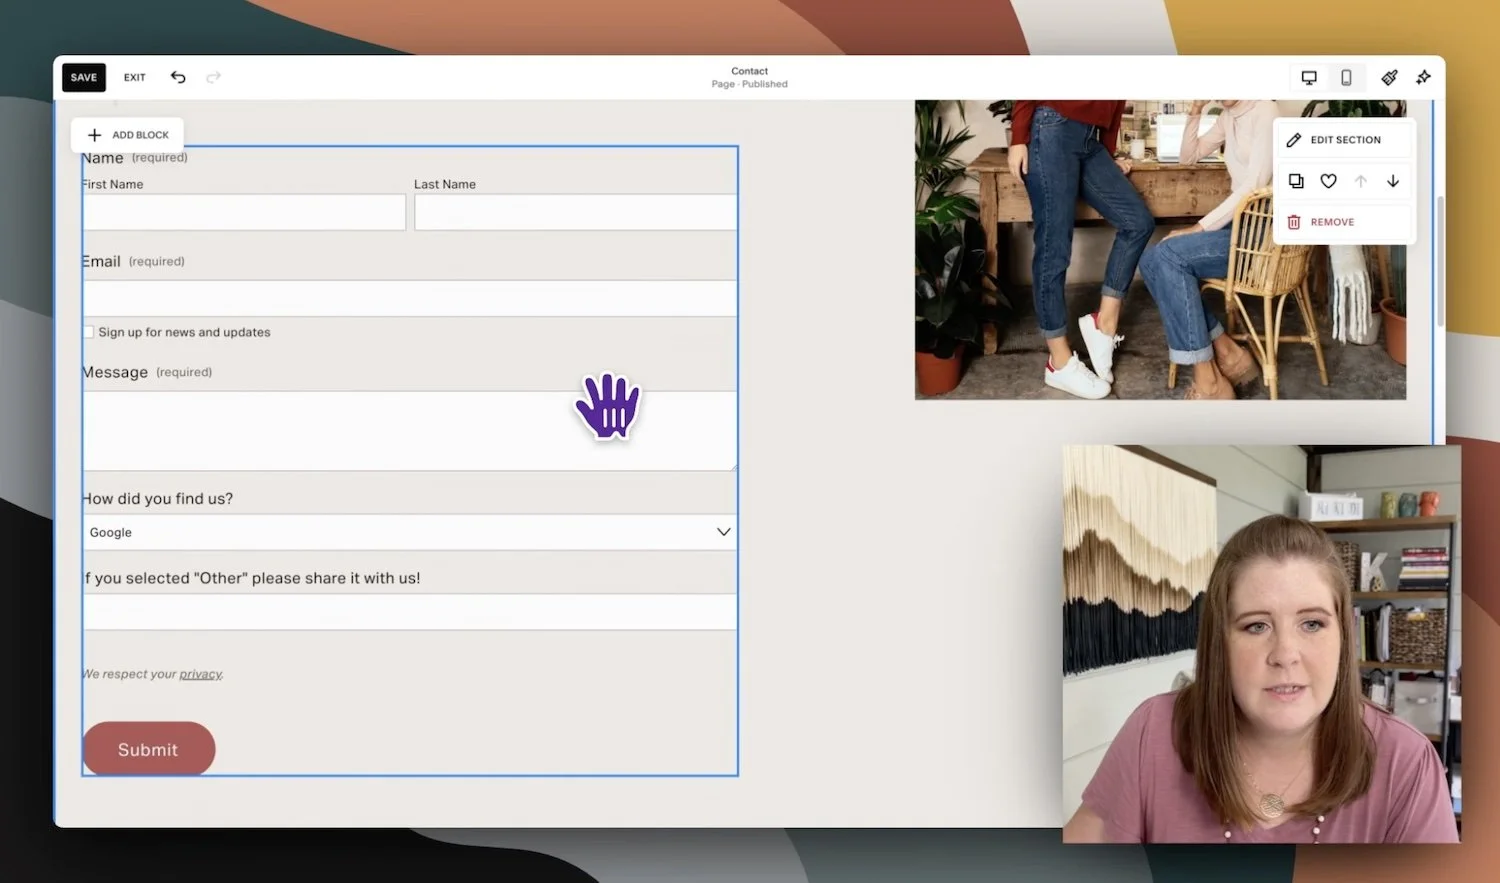
Default fields for new form blocks
Anytime you ever add a form to a page, the default form fields will be Name, Email, Subject, and Message. If you click Edit Form Fields, then Add Field, this is where you edit/remove any of those fields. There are about 18 or 20 different field-type options that you can add as many times as you want, per form.
How to Add Fields in form settings
3 important field types
❶ EMAIL FIELD
The email field is necessary if you want to be able to reply to the person submitting the form. Maybe that’s obvious, but maybe it’s not. 🤷🏼♀️😂 It also helps by cutting out a step when you reply, because when an email address is shared in the Email-specific field, you can reply to their submission from the copy Squarespace sends to your inbox (if you’re using that setting). Alternatively, when you respond to inquiries, you’d be composing a new email, copying their email address into the To field, writing a Subject, maybe also copying/pasting their form submission details into your email somewhere (so they remember what they’d said, etc).
Also on the Email Field, Squarespace recently added the email sign-up option, so people can submit the inquiry & subscribe to your email list at the same time.
With one caveat: how useful that new ‘email subscribe’ checkbox feature is, actually depends on which email marketing platform you’re using (ie: it probably only works with either MailChimp or Squarespace Email Campaigns –if you’re not using Zapier). If you're using Squarespace Email Campaigns, you can edit the confirmation email (autoresponder) from there too. Basically, I think Squarespace added this with the intention that you would be using their Email Campaigns feature, in-house.
That said, I don’t typically recommend using Email Campaigns because I don't think it’s the best bang for your buck. It’s an add-on subscription to your website’s hosting plan, but you don't get all the typical features that most reputable platforms have for that price. It's great & easy to use for a beginner but just use it with the knowledge that you will probably have to migrate your Subscribers somewhere else eventually because it’s just not a robust-enough option.
❷ LINE FIELD
You can use the Line Field to add a privacy disclaimer at the bottom of the form, which links to your privacy policy. Here’s the code snippet for that:
<i>We respect your <u><a href="/your-url-slug-here">privacy</a></u>.</i>
Privacy link - code snippet used in Line field description
That is text with HTML which styles it a bit to put the sentence in italics, to underline the hyperlink, and to link the word “privacy” to a legalese page that has the Privacy Policy on it.
To use it,
copy the snippet above,
delete the Line field’s title (leave it empty), and
put that code snippet in the Line field’s description
Make sure you replace “/your-url-slug-here” with whatever your privacy policy link is on your website.
Done!
Line fields also have a toggle to show or hide an underline beneath it, which is a great way to segment different sections of your form, separating the collection of different types of information, etc. I turn OFF the field’s underline toggle when I use this field for the link to the privacy policy though, but that’s just my personal preference.
❸ SINGLE-SELECT OR MULTI-SELECT FIELDS
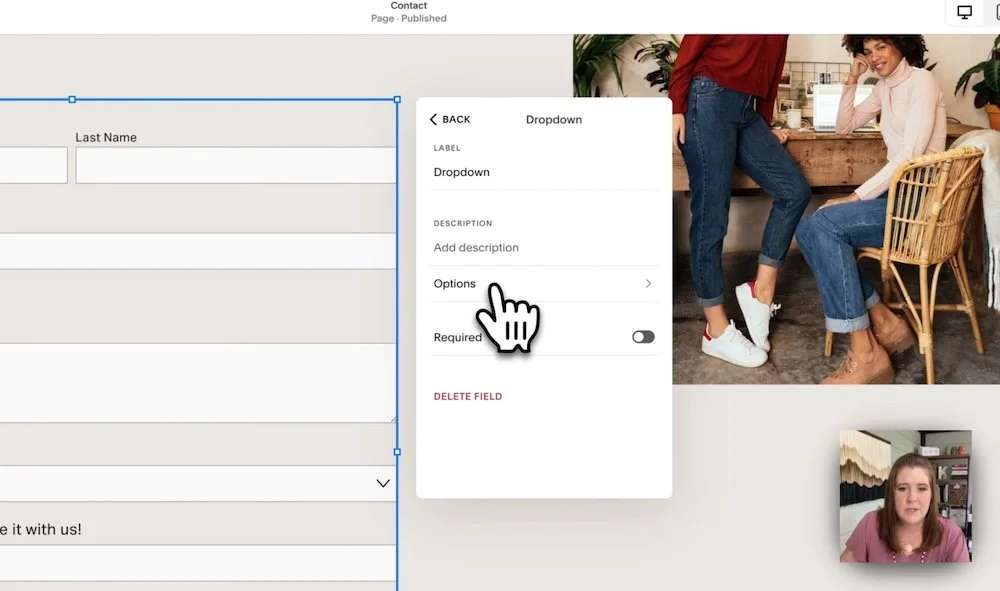

For Dropdown, Radio and Checkbox fields, you’ll have an Options area where you can and Add as many selectable options for each field as you want, Edit or Delete them. You can also drag-and-drop them while editing that list to rearrange the options while adding to/removing from the list.
You can do a lot with just the built in features! If you want to dive deeper into Squarespace forms, check out these posts too:
Adjusting the Post-Submission options in Form settings
Post-Submit settings
Next, we’ll leave the Edit Form Fields part of settings, and go back to the main Content tab in Form’s settings, then click Post Submit and you have two options for what happens after they submit the form.
❶ Adding a Post-Submit thank you message
Option ❶
Add a basic thank you statement with directions or an explanation for what happens now. This would just basically say, “Thank you! We'll respond within __ business days.”
It's always a good idea to add something here that will give them some sort of expectation of how quickly they can expect a response from you. In this message area there's some rich formatting options, including hyperlinked text to link to another page if you want to be able to send them to an onboarding page or a page with more information to browse while they wait for you to respond.
Option ❷
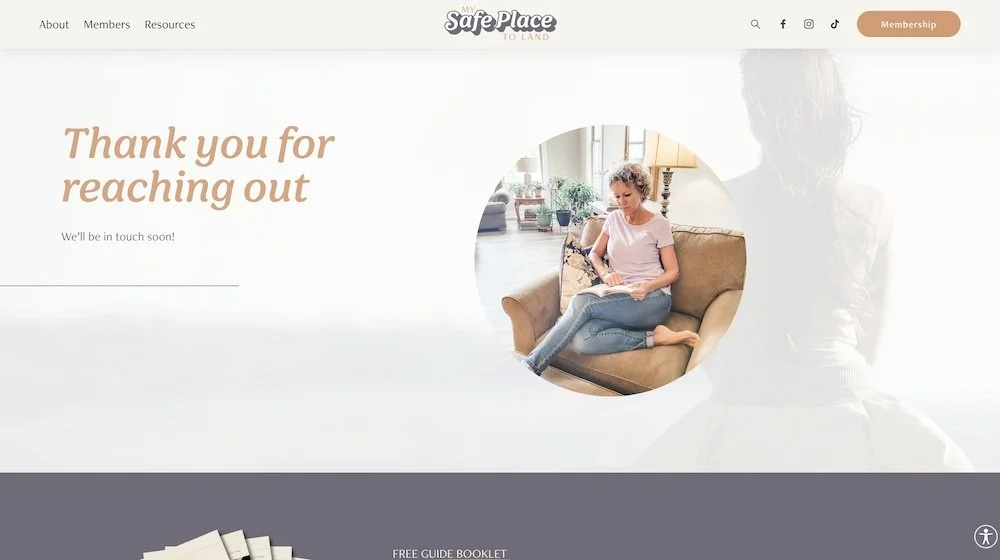
Or you can simply create a totally new page on your website that's specifically meant for people to see immediately following submitting their form. For example, if you wanted them to book an appointment with you after filling out a form, you could send them directly to your Calendly or Acuity scheduler or to a page where you've embedded a scheduler, or to a page with your welcome packet information, etc.
You can also redirect to a very simple thank you page (one you build in Squarespace –or anywhere, for that matter) that can be totally generic with an image of you smiling or some pretty/happy stock photo, with a text box on it that literally just says “thank you.” The action of redirecting the page after they submit the form shows the user the form has been submitted without you really having to say that it’s been successfully submitted.
No, you don't have to use either of the Post Submit options, but I do think it's a good idea to pick one so your website’s users will have a better overall experience submitting any of your forms.

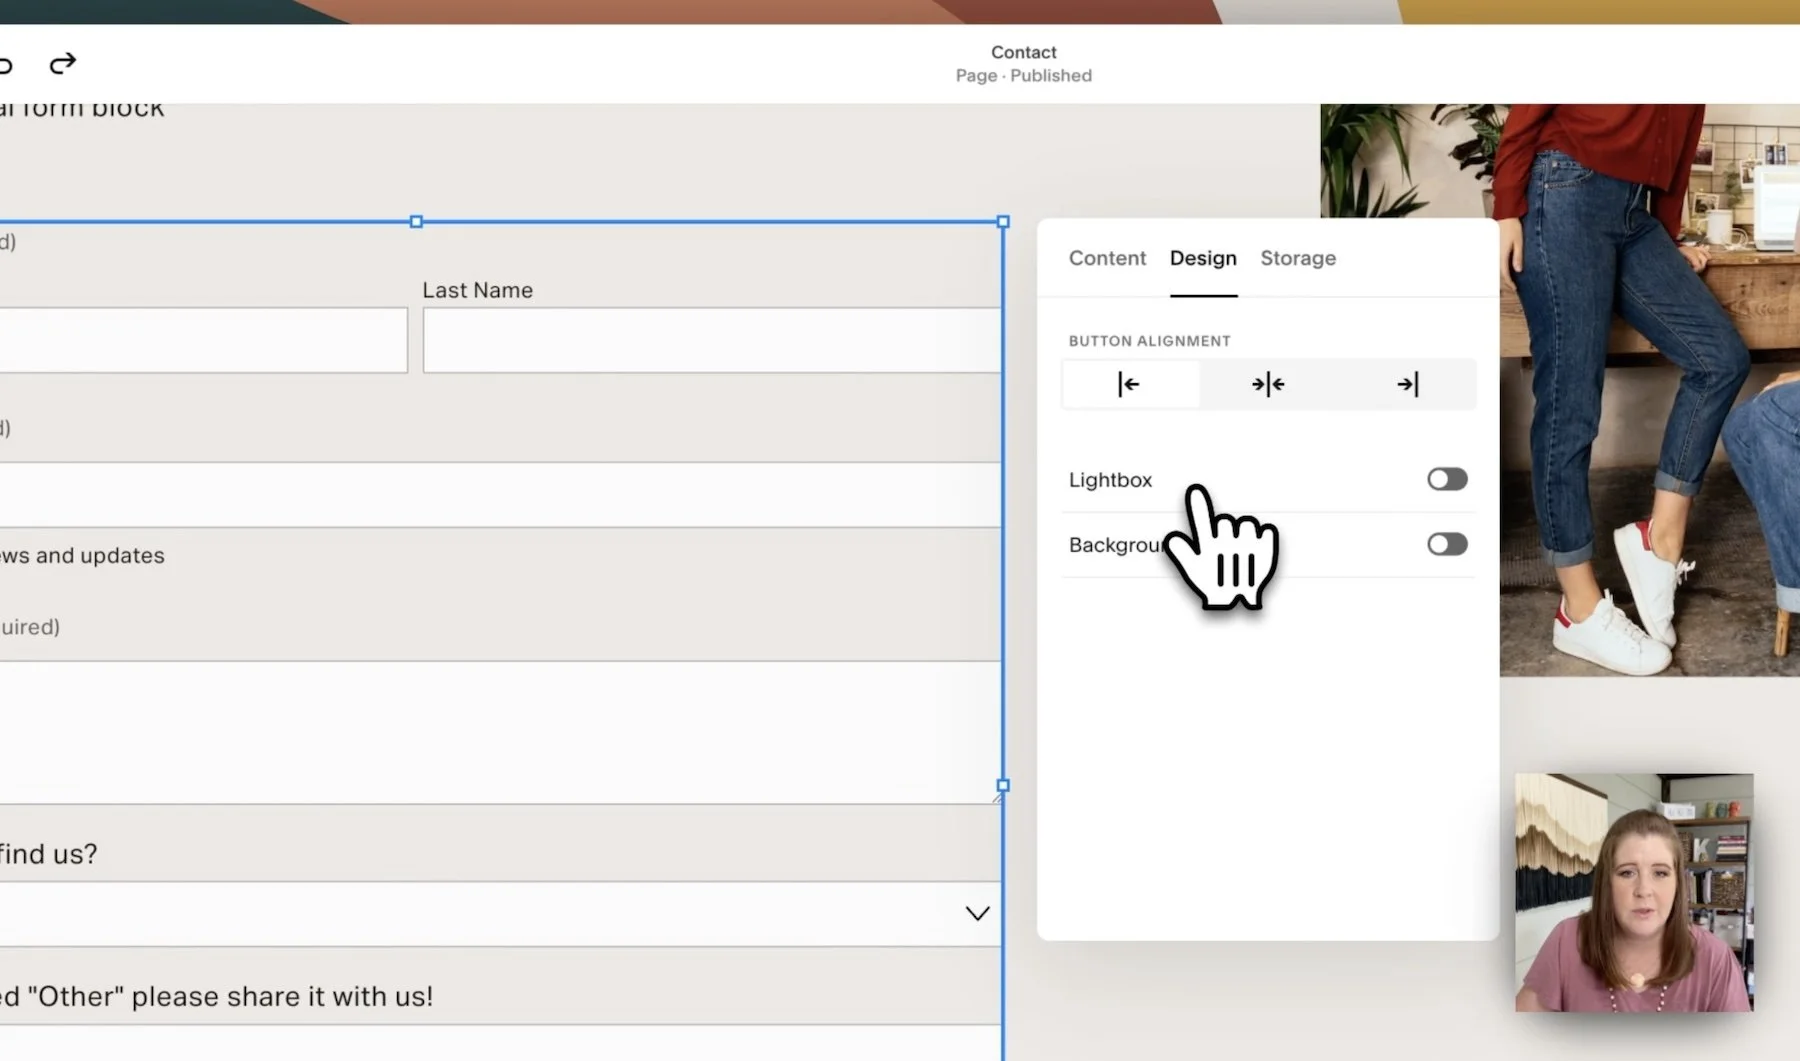
form Design settings
Design settings
That's all your form’s content settings! Next we're going to the design tab to set the minimal form design options.
Here in the Design tab of your form’s settings, you can turn on the Lightbox feature and edit the button text for that lightbox button.
You can also give the whole form block a background color, and choose the alignment of the button itself as it shows either in the lightbox popup or embedded form block (not lightboxed).
form Storage settings:
Manage submissions, Email notifications & Additional Storage options
Storage settings
The last option –and the most important– is what happens to the data when people submit the actual form. Where does that submission data get stored or sent? Where can you find it in Squarespace?
If you click on storage, you'll have a few options there.
The newest option is the topmost option in bold that says Manage Submissions (I'll show you where that is & explain how it works in just a minute
Email notifications: if you enter your email address here, you will receive an emailed copy of each form submission
Additional Storage options below the top two, are for:
Google Drive – click connect there, you'll get a pop up window that will ask you to log into your Google account, give them permissions (to add form data to a Google Sheet for you), then it will ask you to name the spreadsheet. Essentially, that has connected this form on this page to a brand new Google Sheet in your Google Drive account. If I name the Sheet (example) “Contact page demo”, I can see that Sheet in my Drive account & Squarespace + Google will create a database of all form submissions for this page’s form in this Sheet. (Yes, you can use this AND the Email Notifications setting together.)
That's a great way to have kind of a backup system just in case the emailed copy were to misfire.
Zapier – this option will allow you to set automations to send the form submission data to other platforms like ClickUp or Dubsado, etc. but you may need a paid Zapier account if you get a lot of form submissions.
MailChimp – this will dump the submitter’s information into your MailChimp account, whatever will translate (you may have to add custom fields to the subscriber to map in information outside of Name and Email).
You can also turn on the Google reCAPTCHA option if you’re worried about getting a lot of spammers submitting forms. (I know this happens, but it’s never happened extraordinarily to me, so I’ve not needed to use this feature much myself.)
That's the basics of the form’s settings! There's a lot more I could tell you, but that's where I'm going to end for now. Make sure you go check out the linked posts I’ve mentioned above for more details on forms & custom code to style the lightboxed form popup.
Additional Storage options for Google Drive, Zapier and Mailchimp
If we Save our changes and Exit out of Edit mode, then we have a contact form that’s fully functional. But just to check before we ask people to use it with us, let's test it out really quick.
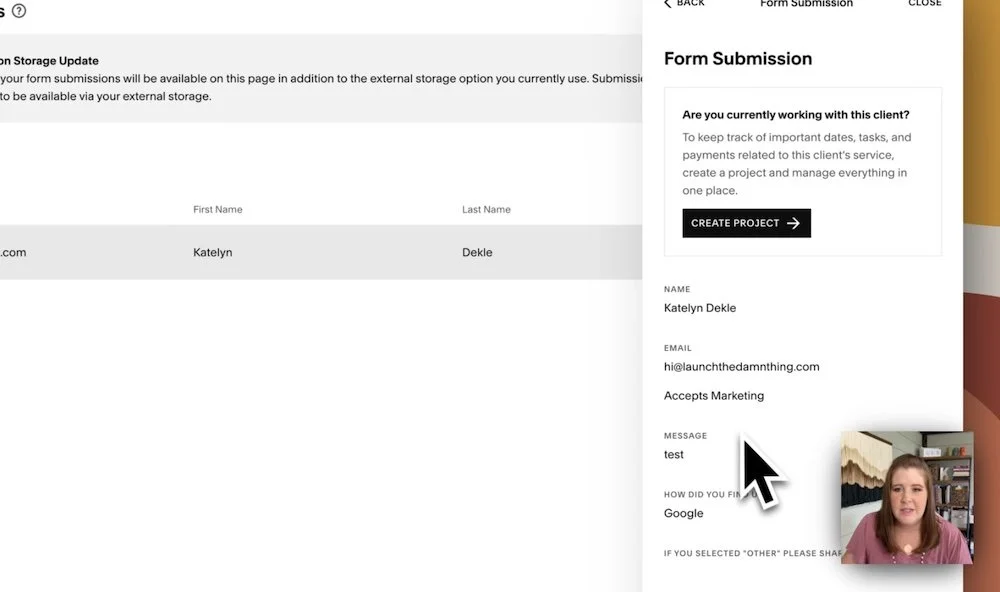
After submitting a test, now I can show you what that email submission will look like, from Squarespace.
Example of the emailed copy of a form submission from Squarespace
results – test your new form
Here is an example of the emailed form submission from Squarespace. It will tell you the title of the form (in the subject of the email), what website the form was submitted on, show all the fields the form has, and which of those the person has filled out.
Notice after the email, it also says, “accepts marketing: false” which means the person did NOT check the subscribe to updates/newsletters when they filled out the form.
At the bottom of that email it also has a link to Manage Submissions in Squarespace.
That link will take you to the Contacts (may also be labeled Profiles) area where you can see all form submissions in one place, and a link to report the form submission as spam.
Let’s back up for a sec though, because jumping right here from the link in your email might not help you learn where exactly to find it on your own, while in Squarespace.

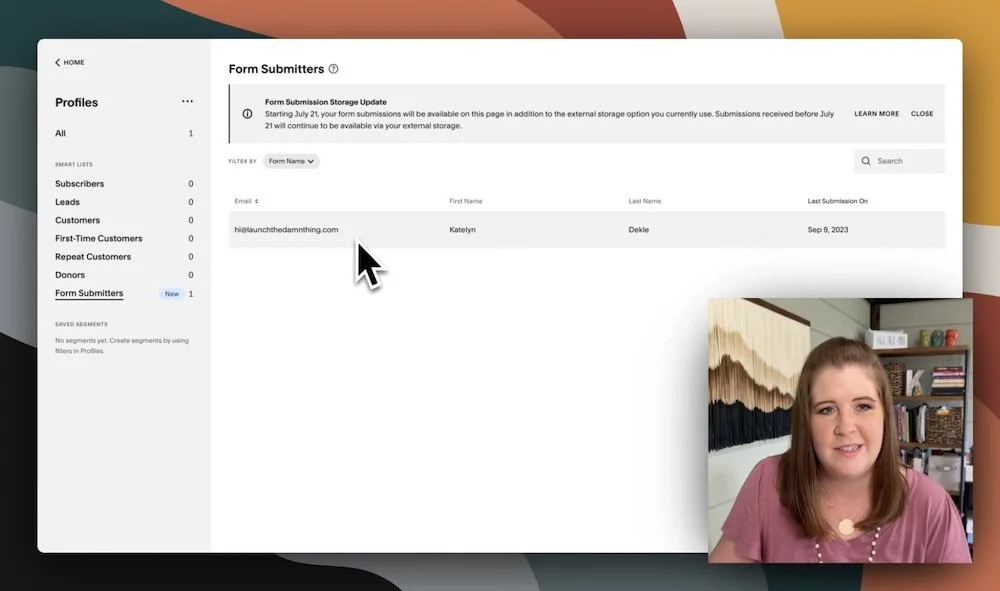
If we go back to the main screen for your website with the menu panel on the left, you’ll look for either Profiles or Contacts in that menu.
NOTE:
Some of you will have a menu that looks like the pictured example here. Some of you will have a menu that looks a little simpler. Either way, Profiles or Contacts are both going to lead to the same area, just depends on which version of Squarespace and their menu updates that you have access to when you're viewing this video.
Click Profiles or Contacts, then at the bottom look for a Form Submitters option. This is a newer feature of Squarespace released in mid-2023.
ANOTHER NOTE:
This feature is NOT retroactive, meaning any forms submitted prior to the release of this feature will not show up in this list; only forms submitted after Squarespace released this feature update (Form Submitters) will display in this list.

Home → Analytics → Engagement → Form & Button Conversions
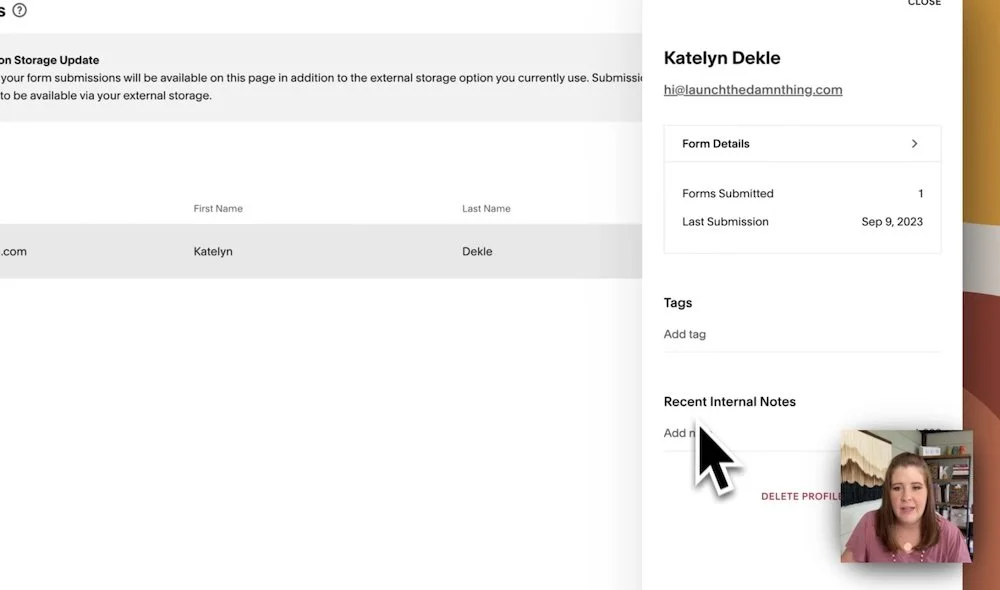
If you click on your entries here in this list, you can see the form submitter’s contact details, you can add tags to that entry and even add internal notes from that initial detail panel. You can also look at the form details, and –here’s another new feature from Squarespace– create a project with that person from here.
Projects in Squarespace is another new feature released in mid-2023, but I won’t be going into that today; that’s saved for the next post where I’ll compare Squarespace Projects with something like Dubsado, Honeybook or Bonsai, so you can decide which option makes the most sense for you in your business.
If you have multiple forms, you can filter this list down to show only the submissions for specific forms, ––and this is why I told you earlier that it's really important to name your form something that will be a title of the form but ALSO the location of where it lives. That way you’ll not only know what kind of form it is, but also where the form is located on your website so you’ll know where it was when that person filled it out, helping you gauge which forms get used most often.
Filtering forms by form-name in Form Submitters within Profiles/Contacts
PRO TIP:
You can also see form analytics from the Analytics area of your website, in the Buttons & Conversions area.
That's a quick overview of all of the built-in features for forms & form management in Squarespace.
Squarespace hack:
How to make 1 ‘global’ form you can display wherever you need it
Now that you know the basics about Squarespace forms, I'm guessing you're probably wondering how to not need a copy of your inquiry form every time you want to display it on another page, ––because having multiple copies of anything makes it hard to keep each of them updated & maintained with the same set of information, right?
That's a smart thought/question! That's a very efficient way to handle inquiries if you only need 1 form, but you can't do that with Squarespace’s features alone. (Definitely encourage you to contact support & submit that as a feature request though!) You’ll need a third-party tool to make that possible.
Lucky you! The last half of THIS post is going to show you my favorite ways to do exactly that!
Will Myers’ plugin Section Loader Supreme
option 1
Will Myers’ plugin: Section Loader Supreme
Basically, this plugin allows you to build a page with 1 section, anywhere on your website, and insert that section’s content into any other page (or pages) of your website. So it actually shows one set of things in multiple places at once, which allows you to have just one place to edit what’s in that layout, right?
🤯 IKR?! Thank you, Will!
It’s sort of like using Saved Sections in Squarespace, but using this plugin, you won’t have duplicates of your saved sections, it’ll be the same everywhere because it's synced content.
It's great for newsletter blocks, your pricing section if you want to display it in a few different places, opt-ins or ad graphics, –and of course, forms. There are a ton of use cases for this!
SQSP Themes’ plugin: Lightbox Anything
option 2
SQSP Themes’ plugin: Lightbox Anything
This works in a very similar way to Will’s Section Loader plugin, except it actually creates a pop-up where it will load the other page’s content and can be activated via a simple formatted link from a button, text link (or hyperlink), or a linked image.
So it's very versatile and works in a lot of use cases throughout the whole site, like displaying size charts in e-commerce shops, schedulers, pricing, or basically anything else you’d like to add to a page without taking up space on that page.
watch the video
Either plugin will allow you to buy a standard license for one user, or a business license so you can add it to multiple websites.
I've installed both of those plugins on this demo site so that I can show you how they work.
You will have to buy these plugins yourself because I can’t give you the code for the installation, but I’ll show you how they actually function in the video below.

