

Bulk rename & resize images EASILY without Photoshop
Table of Contents Show
Have you ever had a long list of photos that you need to resize and rename, but you either don't want or can't use something like Photoshop or Lightroom to get that done for you, and you have no idea what to do with it?
Yes, you could & should use something like Squoosh, or the more popular TinyJpg (but TinyJpg can only resize up to 20 at a time for free & each file must be under 5MB).
These sites don’t rename the files for you though, they just resize them! So I’ve found the best option is a combination of using TinyJpg or Squoosh to resize images, AFTER you’ve already downsized the image on your computer, so you get the smallest size possible.
Turns out this is a method a lot of people don’t know!
You can actually resize & rename images for free with no extra software if you're using a Mac.
Sorry, PC users; I haven't used a PC regularly in my life for 20+ years now, and I couldn't for the life of me tell you how to do this on a PC, even if I wanted to. #sorrynotsorry
Before I dive into that –why am I sharing this? I’ve run my business by myself since 2015, so I've had to find a lot of ways to streamline things with software and become more efficient because I'm a one-woman show and I think you’ll be able to relate to that.
So let's hop on into my computer, and I'll show you exactly how to do this step by step.
Why do you need BOTH methods?
All image files have a ‘physical’ size in terms of their dimensions (ie: how tall & wide is the image in its original quality). That means there can be a HUGE difference between resizing a picture on TinyJpg or Squoosh that is 8,000 pixels wide (which you might get from your photographer, for example, after a professional shoot) vs resizing a picture on that is only 2,000 pixels wide.
Since websites need to load as fast as possible, you don’t want to use large image files, especially for websites that have lots of photos.
If you’re only dropping original quality images into TinyJpg to resize,
you may not even be able to with their free plan’s limitations (try Squoosh instead!)
the resulting optimized image is still going to be too large because we’re talking about a MASSIVE image to start with.
I’m struggling to think of an example here, but let’s try this one!
My husband is a great cook, but when he cooks he uses every possible utensil and pot or pan, there are chopped remnants of veggies everywhere, herbs or bits of chopped onion on the floor ––it’s a MESS. (Thankfully the food is good, I eat slowly, he eats fast, and always starts cleaning up while I’m finishing my plate. 😂 )
If you were him, in that –maybe terrible– example, would you prefer to clean up that kitchen if it were a small apartment or galley sized kitchen? Or huge, spacious kitchen with tons of counter space, lots of spattered cabinets around the stove, a huge island where you were chopping vegetables, and a huge kitchen sink, –etc?
The job, and maybe the mess, is the same in both situations (because we often fill the spaces we’re actually in, right?), but the space in each that’s required to clean up… is WAY different!
Your images work like that too. These image optimization sites like TinyJpg and Squoosh can only optimize the image at the size (dimensions & file size) you give it. So if you downsize the image (change the pixel width or height) before you upload it to them, you’ll get a MUCH smaller, more web-optimized file as a result.
How to resize your images in Preview (on a Mac)
First, I’ll show you how to open a group of images & adjust the image & file size one-by-one in Preview. After you get the hang of that, the process will be very similar to do for a group and I’ll show you that step-by-step further down too.
step 1 - initial file list in the Finder window
First, you'll want all of your photos to be in the same Finder window & folder. I tend to view them in list view so I can see file details/info and reorder them by the Size column, from largest to smallest so I know which ones need the most size adjustment.
Then, you can either select all of the images together to open them in Preview, adjusting them one by one in Preview while they’re open in the same window.
Or, you can also select the ones that are in portrait orientation to open them together, and then later go back & open all of the landscape orientation images together & edit them in separate groups.
Either way, it doesn't really matter; just keep in mind that you’ll be adjusting the longest pixel width of each set, which is typically the width on landscape images and the height on portrait images.
I’ll start with all the landscape photos first. Once they’re open in Preview (with all images in the same preview window), …
then go up to Tools in the taskbar menu across the top of the screen
select Adjust Size from the Tools dropdown menu
then you can see the width, height, and resolution in that popup window
Step 2 - go to Tools, then Adjust Size
Best practices to get the best resolution AND the smallest file sizes (on average; varies from image to image):
info for a background in a page or section, do something in the neighborhood of 2,000 - 3,000 pixels.
info for a decorative element on the page, I stick to between 800 - 1,500 pixels along the widest side.
Depending on how big you want the final image to be, you’ll develop your own go-to sizes. For me decorative images tend to be around 1,000px and backgrounds tend to be around 2,000 if not much quality is lost.
Let's pretend that these example images are going to be in an image block inside a section, and we don't need it to be a full background. In this case, we change the width to 1,000px wide.
Now you can see the resulting file size is predicted to change drastically, so let's stick with the 1,000px for now. Make sure the two boxes underneath the Resolution are checked (for “Scale proportionately” and “Resample image”) and that the resolution is between 72px and 144px for web. Then click okay.
info
The preview file size in that pop-up window is not always accurate!
Use it as a guide, but always double-check the final output when you export in the next steps to be sure!
Step 3 - adjust the pixel size & resolution
Now the image will resize visually in the main Preview area and appear a lot smaller, while the thumbnail will probably become blurry ––don't freak out! It’ll be fine.
What you’re seeing is the difference between a HUGE image which has been resized to approximately 1/3 of its original size & quality, so that’s normal. Just make sure you preview the files after you export them to make sure they actually meet your expectations.
If you’re resizing a PNG and you can’t get the file size small enough, you’ll want to export it as a JPG or JPEG (from the File menu in the Taskbar) to get it even smaller ––but only if you don’t need any transparency in the image (because JPGs don’t support transparency at all and will fill that space with a white background).
So that’s how you resize images individually!
But you can also do them in groups ––and this is why I mentioned selecting groups in the same orientation (landscape or portrait) because you’ll want them to all have the same height or width, depending on which side is longest.
Adjusting the size of a group of images in Preview at once
selecting multiple images to resize together
If you want to adjust all of them at once, then first you’ll want to make sure the thumbnails are all selected in the left side of the Preview window.
So, select the first image in the list, press Shift on your keyboard, and then select the last one in the list while still holding Shift; then the whole list of images opened in Preview should be selected and can be adjusted together as a group.
Then, go up to Tools and Adjust Size, to do the same thing you just did for the individual image.
Now the pixel values will be empty with placeholder text inside that says “Multiple Values” (example pictured in the gallery below) which just means it knows multiple photos are being adjusted together and they may each vary slightly in pixel widths & heights.
We'll put in 1,000 pixels for the longest side of the photos selected, at 72 pixels per inch, and make sure the two checkboxes are both checked (for “Scale proportionately” and “Resample image”). Click OK.
In the Results area at the bottom of that window, it told me the total file size for all three of the selected images (total), as opposed to the total file size they were before so you can see whatever choices you made before clicking OK would work to get the file size down.
Again, now they're all going to look blurry in their thumbnail preview & small in the main preview, but don’t worry about it! That’s normal for this process.


Exporting the group of adjusted images at once
(Example screenshots are in the gallery above! 👆🏻)
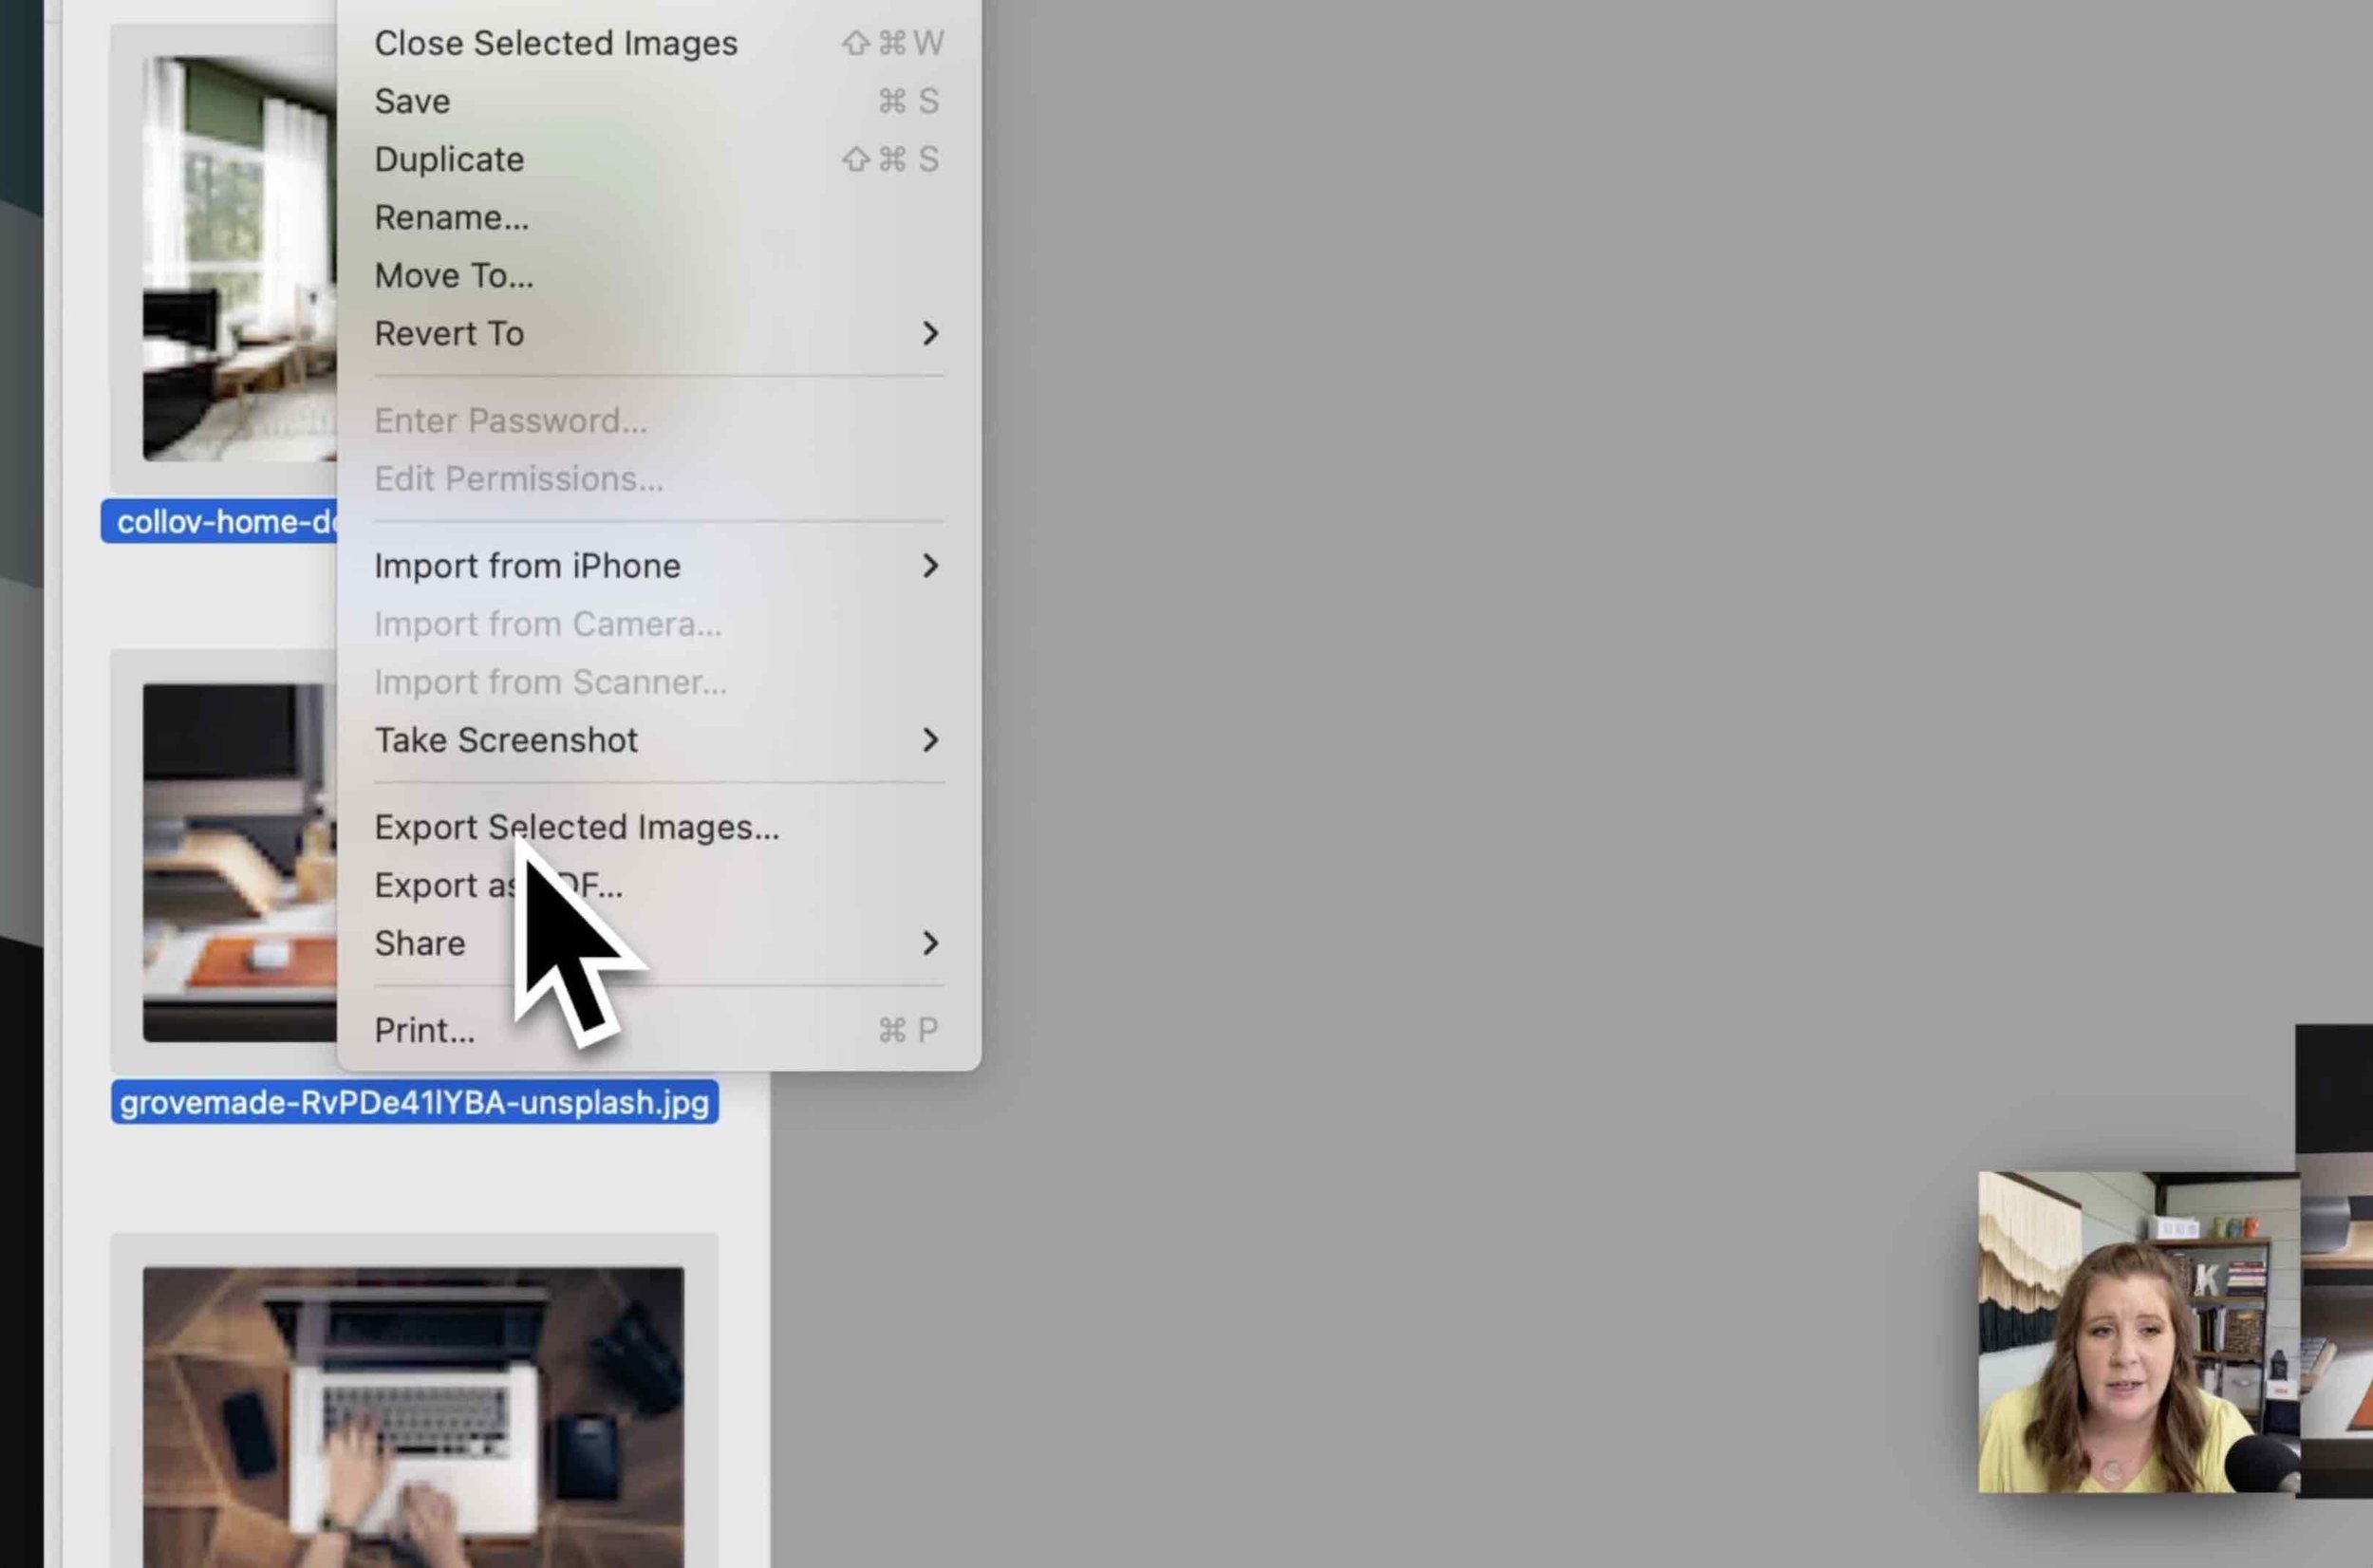
The next step is to Select All in the group again (which is Command + A on my keyboard), go up to File and then Export Selected Images, click Show Options, and then make sure it's selected on JPEG to export as that file type.
infoThere is no reason that you need to use PNGs on a website unless you need that transparency effect background, such as a logo or graphic element that is meant to have a shadow or overlap other images where you can see more of the overlap (such as overlapping a drawn flower illustration over a photo or Shape block.
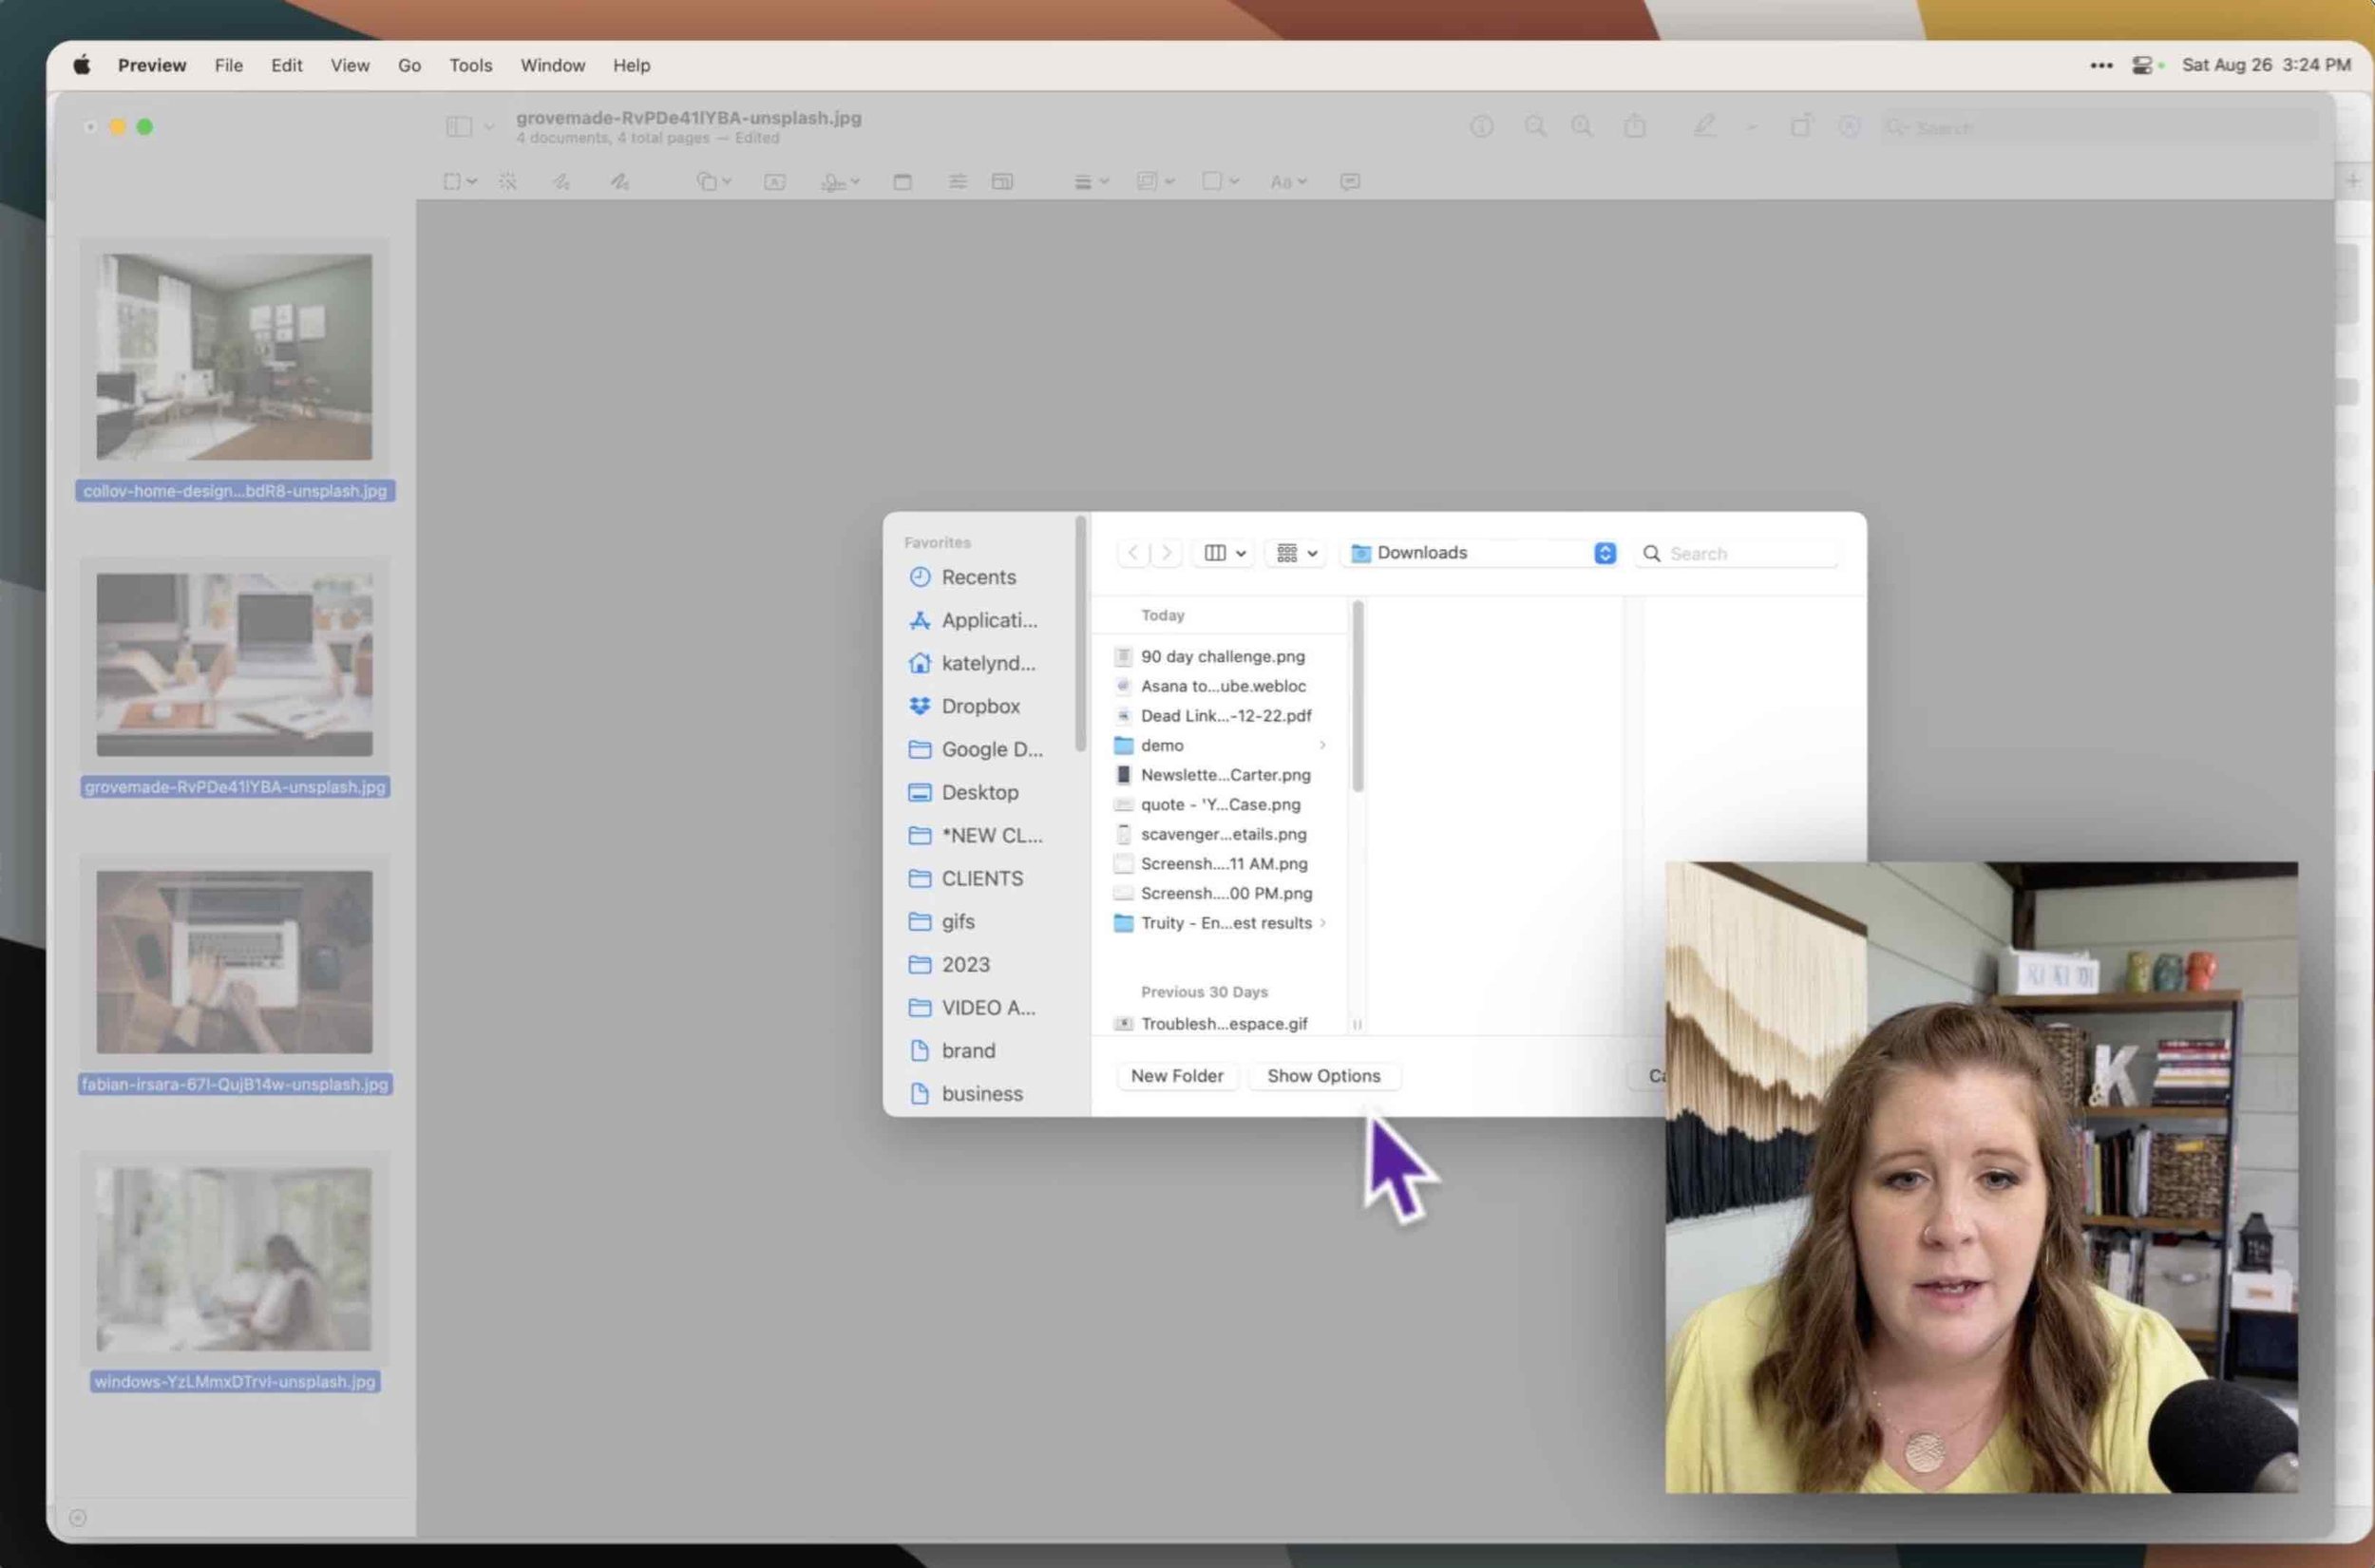
Select the location where you want to save these images, then select Choose. Now it's exporting all three images & saving the adjustments we made to those JPGs.
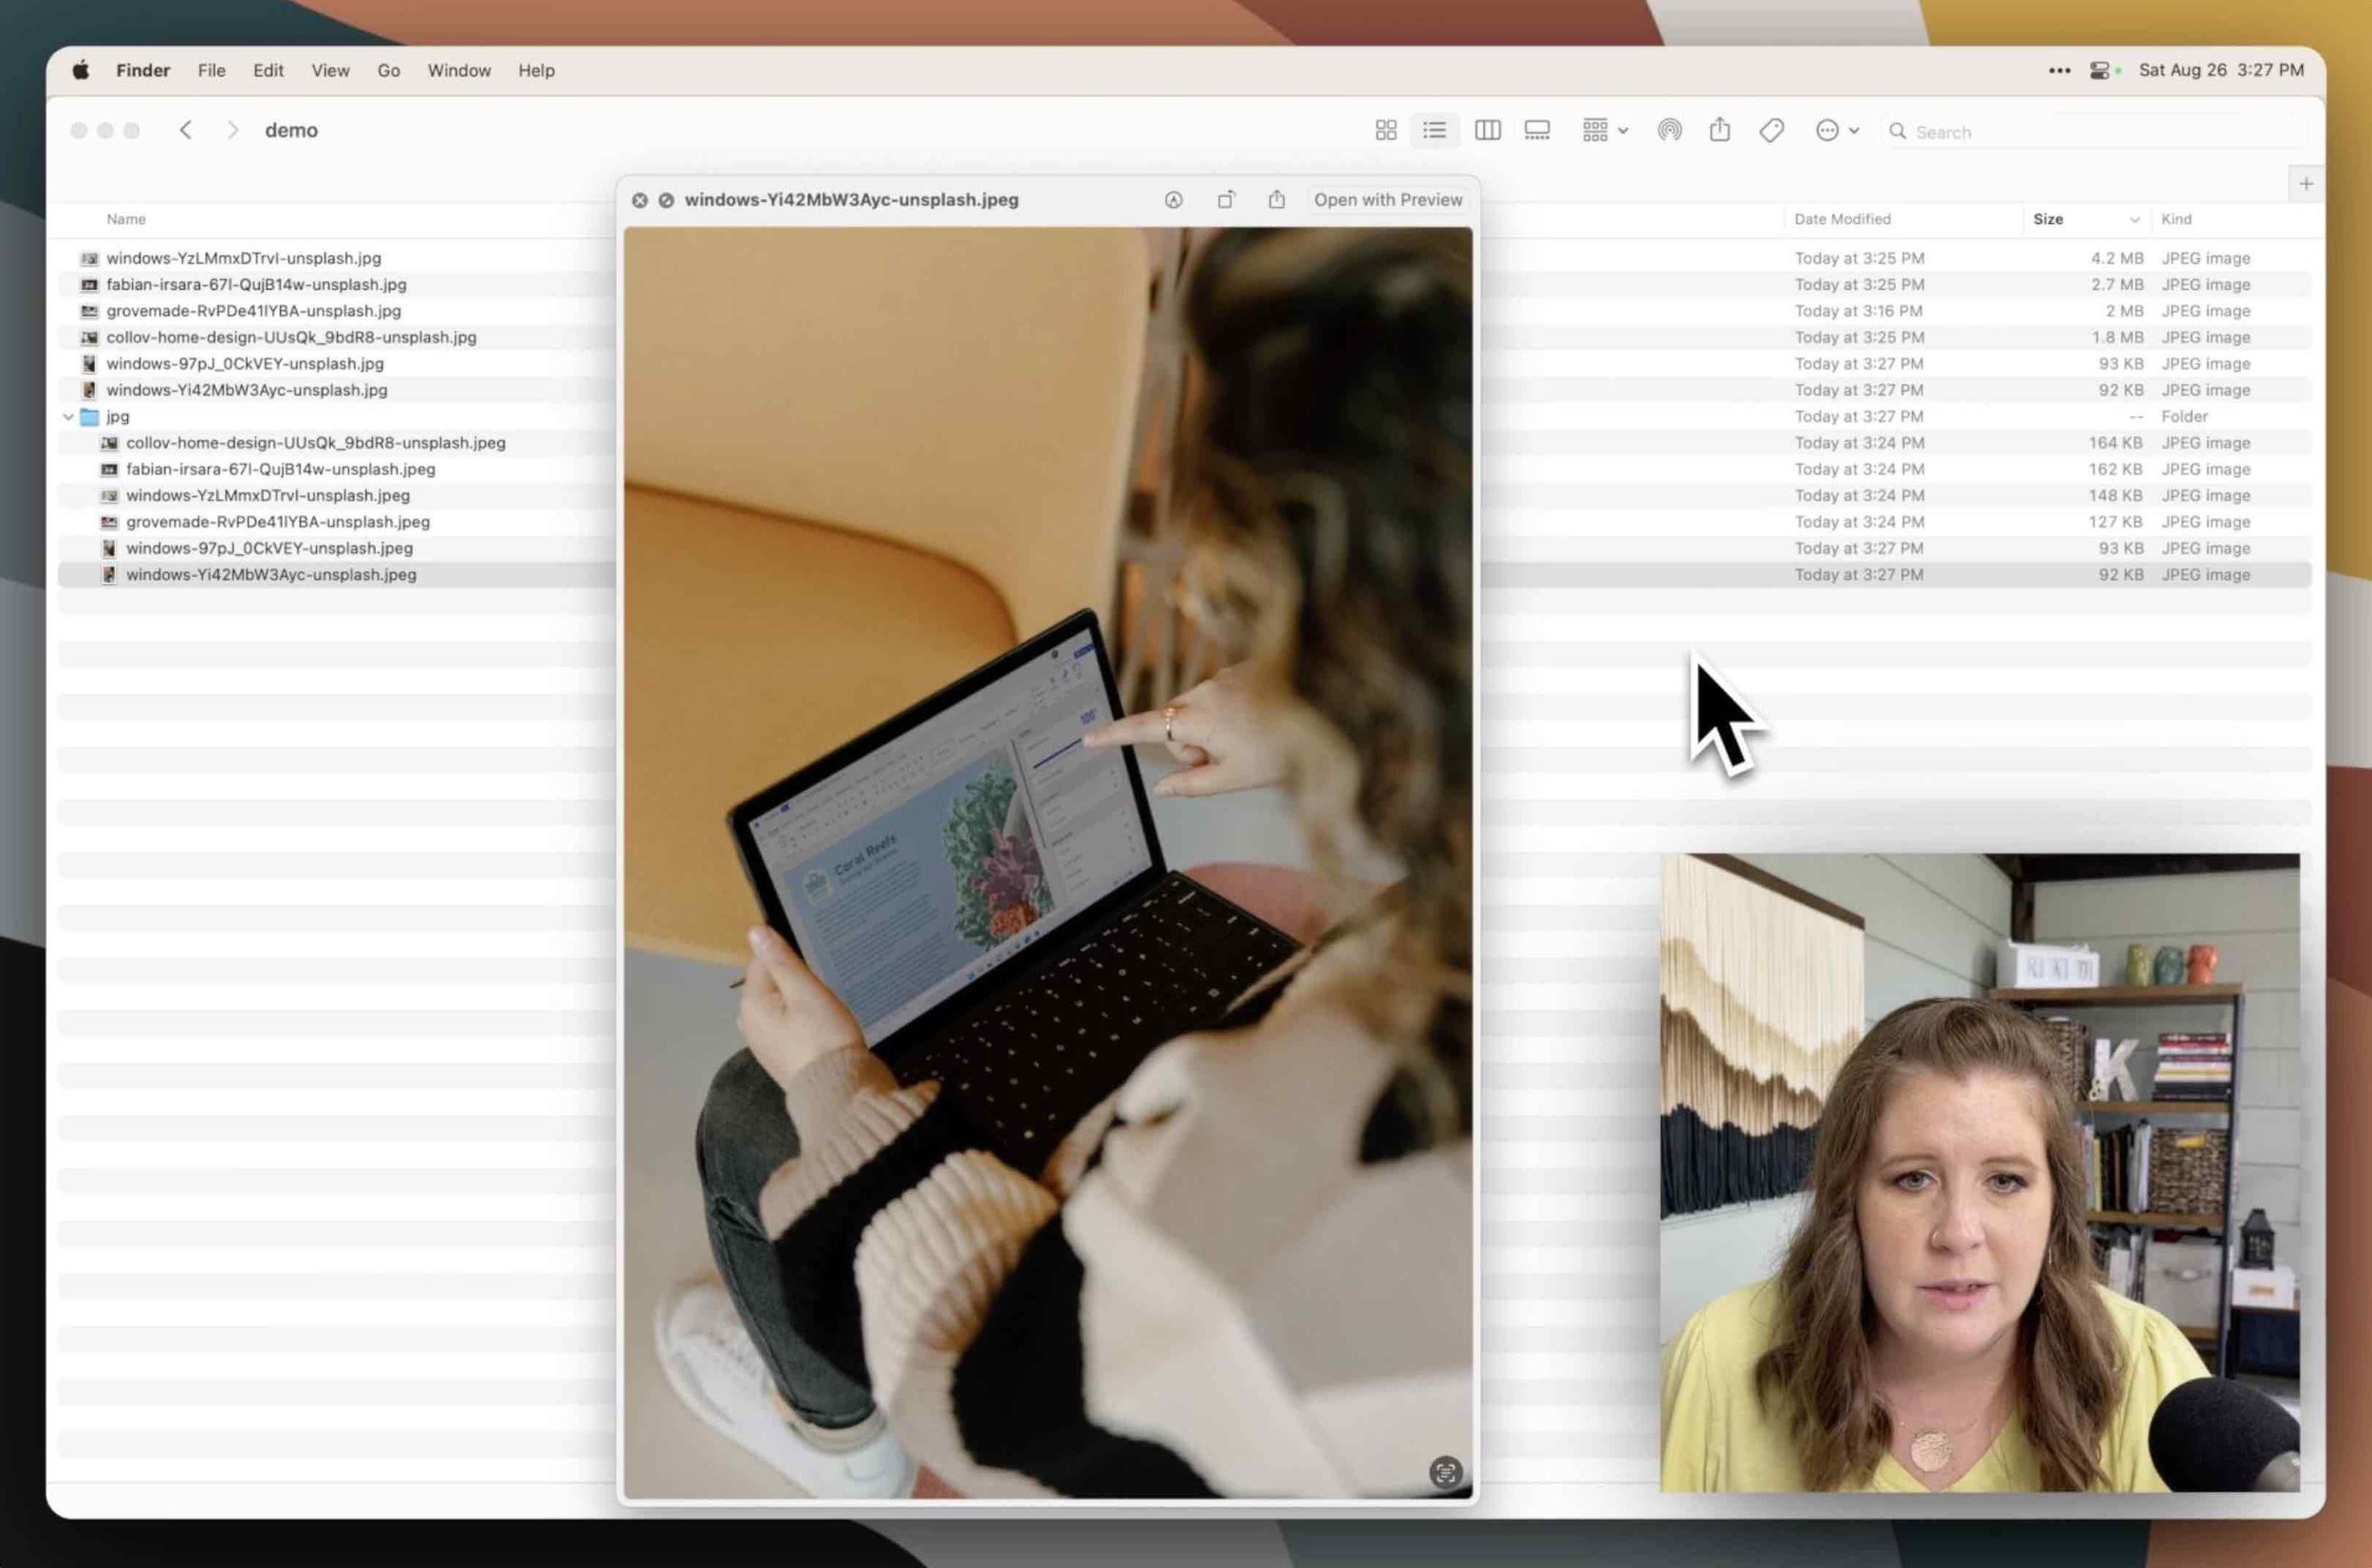
Double-check that the final files are of decent quality & check the file size that it’s what you expected or hoped for.
In this example, the original image was 1.8 MB (megabytes), and when we resized & exported it in Finder, the JPG version is now 164 KB (kilobytes), which is roughly a tenth of the photo size! They're going to load a lot faster on the website this way.
info Know your file abbreviations! There are:
- 1,000 KB in 1 MB
- 1,000 MB in 1 GB (gigabyte)
- 1,000 GB in 1 TB (terabyte)So 1.8 MB would be ~1,800 kilabytes, –resized to just 164 KB!
Remember: for Portrait images, you want to do the same process as you did for Landscape, but adjust the height instead of the width.
Select them, open them together, Select All (either you can do Command + A to select all in the list, or you can click and then hold Shift on your keyboard, and click the second one in the list).
go to Tools,
then Adjust Size
type in the value that you want, but this time because these are taller than they are wide, we’ll adjust the longest value to reduce the file size most effectively.
pick your values, then click OK
then you’ll Select All again,
go to File,
click Export Selected Images
Choose a folder in the Finder popup window to export the files to,
click Show Options to choose the exported file format (for web, JPEG or JPG is most common & will often be the smallest file size).
then click Choose
Now we just need to double-check that the quality & file sizes are what we wanted.
So now we have the originals files, and then we have the copied & resized images.
Bonus! Here’s an easy shortcut
A quicker way is to select all the files you want to resize & export, then duplicate them, export them before you adjust the size, then open the duplicates as a group, adjust the size of the duplicates & save the changes. It’s slightly faster & you don’t have to worry about accidentally saving changes to the originals.
First, duplicate the original files & put them in a folder:
Select the group of files in Finder,
then right-click,
select Duplicate
right-click on the selected duplicates,
this time choose New folder with selected items
name the new folder something different (ie: “resized” or “JPGs”)
you can also create a new folder for the originals and name it “originals”
Then open the duplicates in Preview together (quickest way is to open all the Landscapes first, then repeat for all the Portraits separately).
Select All
go to Tools,
select Adjust Size,
choose the new width or height value
click OK
using Portrait images for backgrounds on a website is not ideal & hard to get the file size down
Note:
If you want to use a portrait image orientation as a background image, first you ideally need to crop it.Why? Because if you make the width wide enough to be a background images –about 2,000px wide for example– then the height will still be very tall & the image’s file size will likely be too large, causing the page to load more slowly for viewers.
For example, if I make a portrait image 2,500 pixels wide in the hopes that the width will be approximately 2,000px, you can see in this screenshot example that the image’s file size isn’t downsizing enough, so we'll have to crop out the part we don’t need & try again to get the file size down.
If we Select All and then click File, Save (or Command + S on my keyboard), then that should save all the changes to these files as a group.
Pro tip:
If you're not sure the group-save-all worked (sometimes it’s a bit quirky), you can always click to exit out of the Preview window, then it'll ask you to Save each image in the list (over and over again) until you’ve saved each one individually before the window actually closes.
Before you move on, double-check the file size & image quality!
For example, if we already adjusted the image size width to 2,000px but the file size is still a little bit high, then maybe we take it down to 1,800px wide, save the changes, and see if the file size gets small enough without losing image quality.
That's the process of resizing the photos in Finder and Preview without needing Photoshop. It's a great process for clients using a Mac, not just for us!
Image size best practices for Squarespace + SEO Space
If you're using SEO space on Squarespace, it'll tell you that it wants images to be 250 KB or LESS. That doesn't tend to apply to background images necessarily. If you can get the image’s file size down that low that’d be great, but historically anything under 500 KB should be fine.
After you’ve done the steps listed above, double-check the files in Finder to see if any are above the 250-500KB size. If you have any, open them individually & adjust the size further.
Renaming files in bulk with Finder (on a Mac)
Next, I’ll show you how to rename files in bulk within Finder –without needing any other external software.
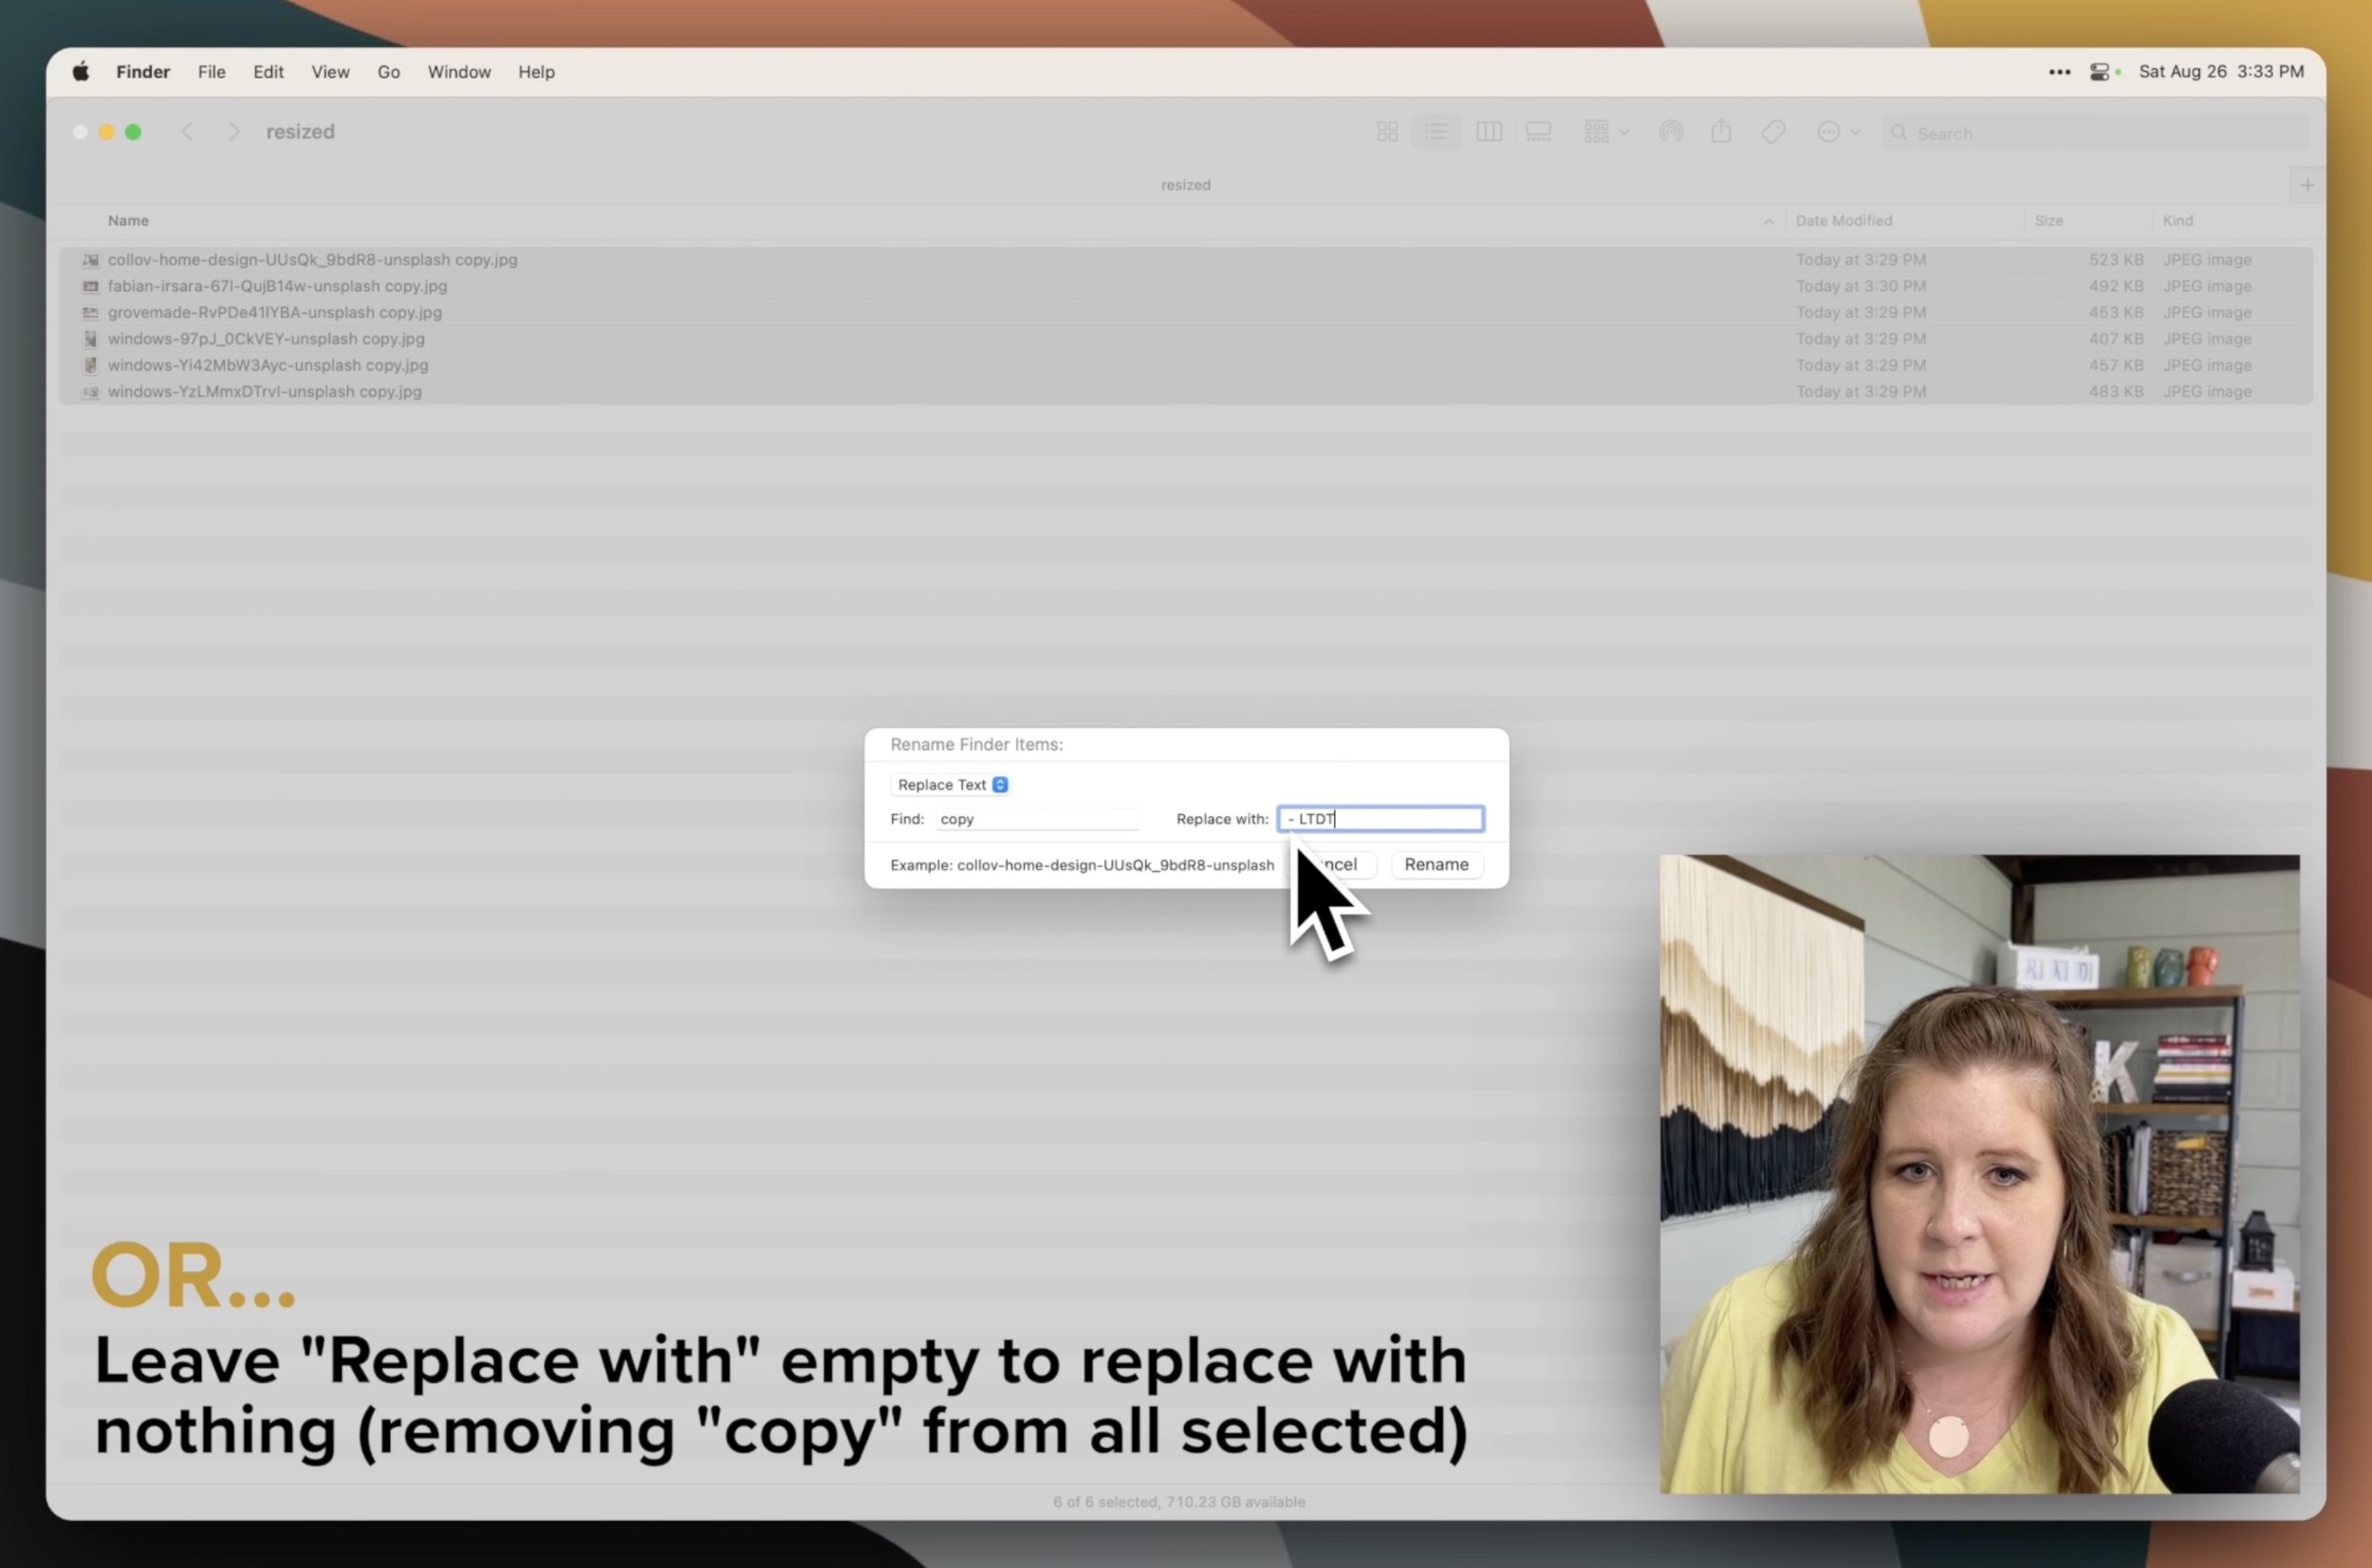
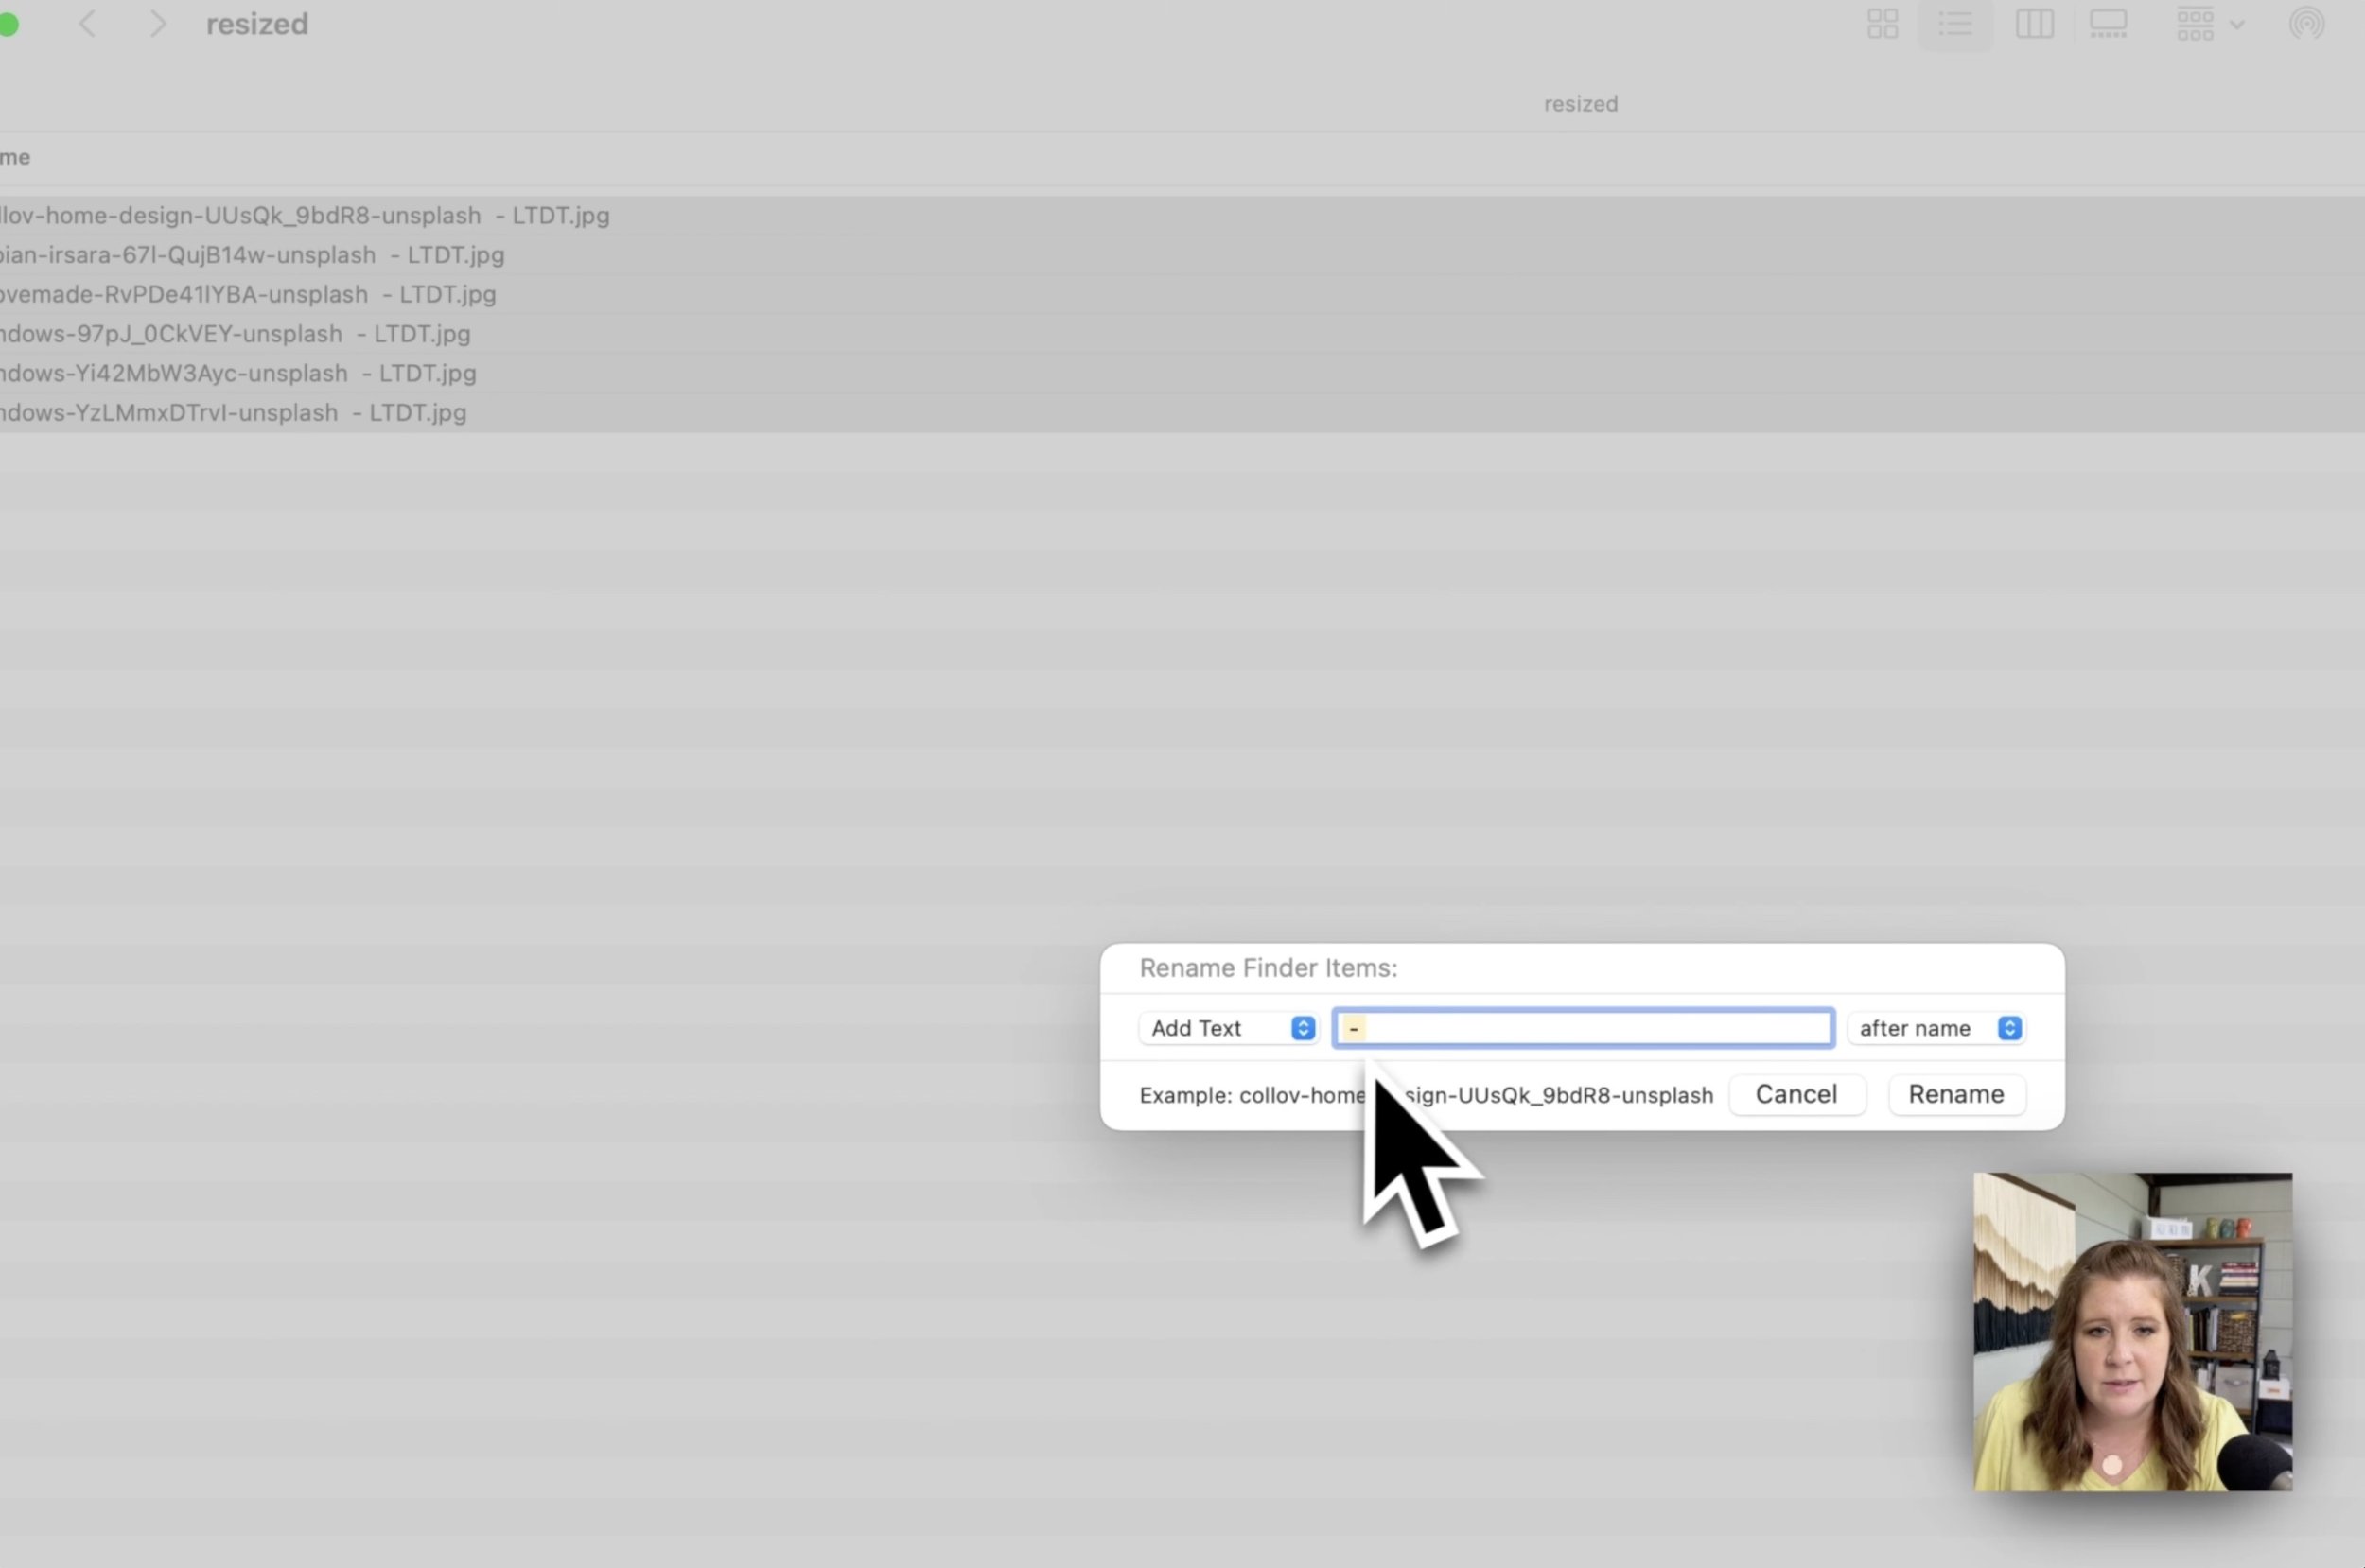
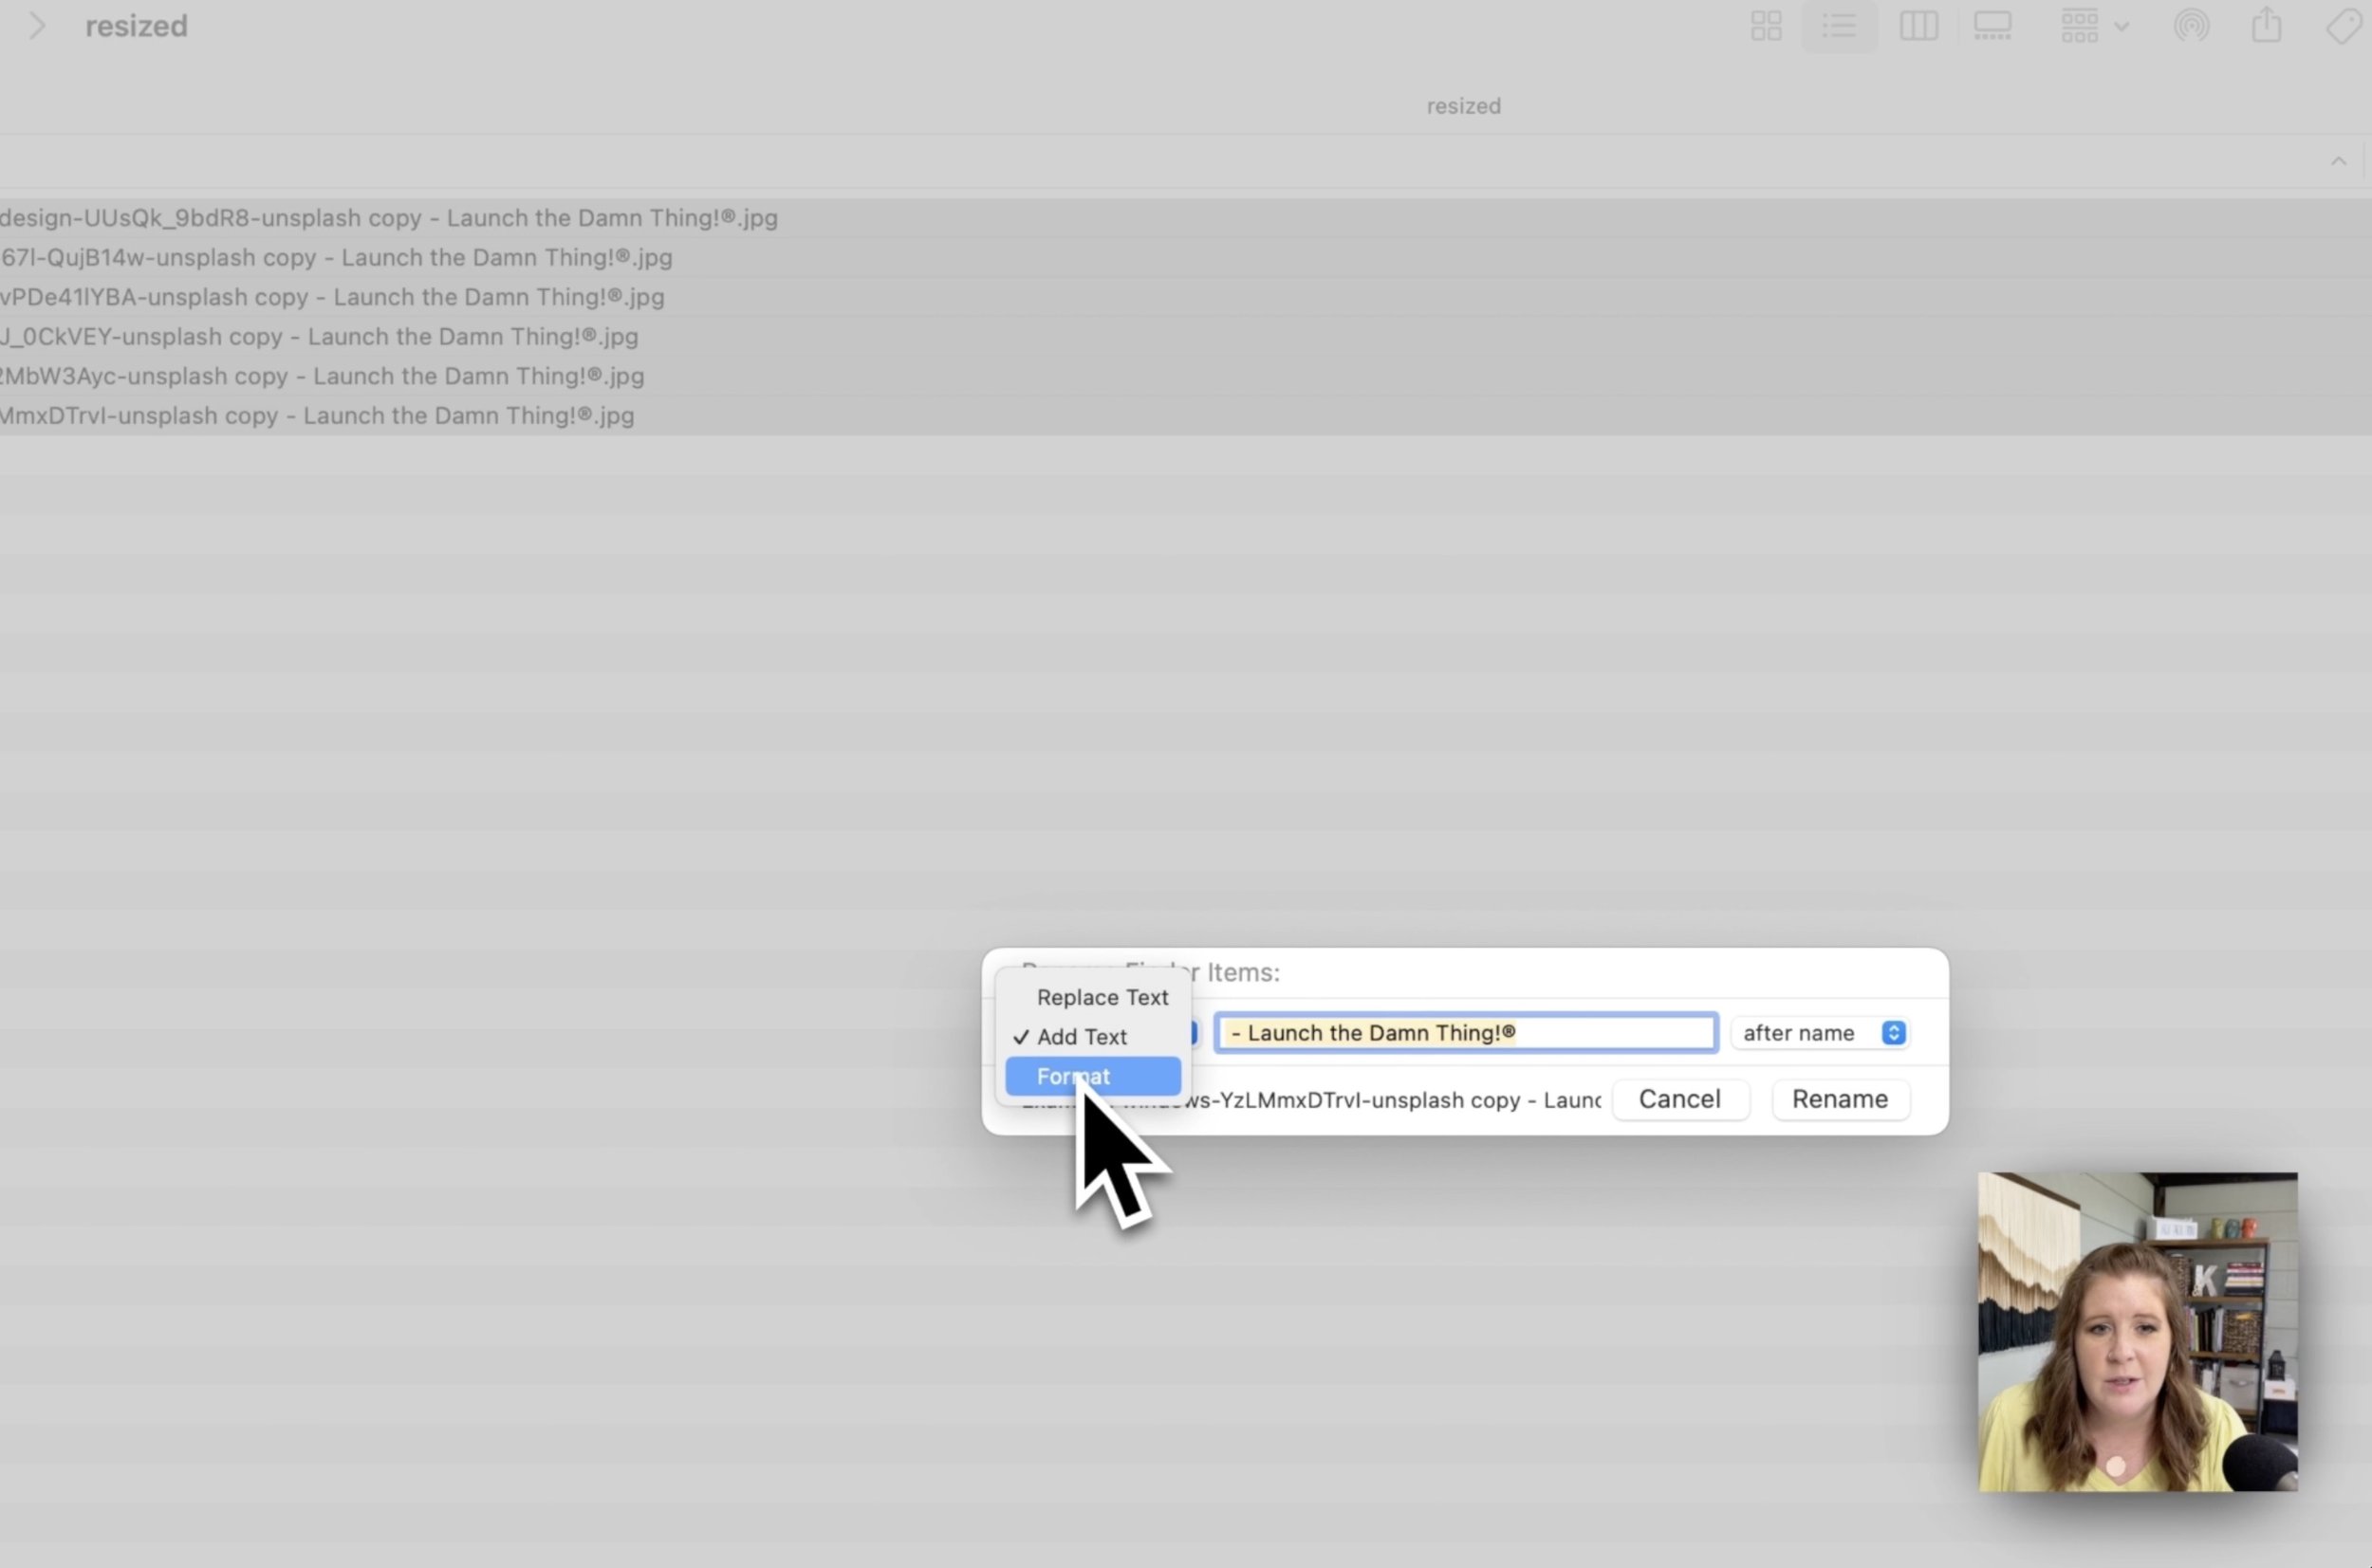
First, you always select the group of files that you want to adjust together, and then right-click, and select Rename.
Within the Rename popup window, you will have a few different options.
You can replace text, so if you wanted to, for example, remove “unsplash” or remove “copy” from the file name, then we would
click Replace text
type what we want to remove in the first field
then type what we want to replace that with in the second fiel
then click Replace and it would actually remove & replace whatever you selected from the file name
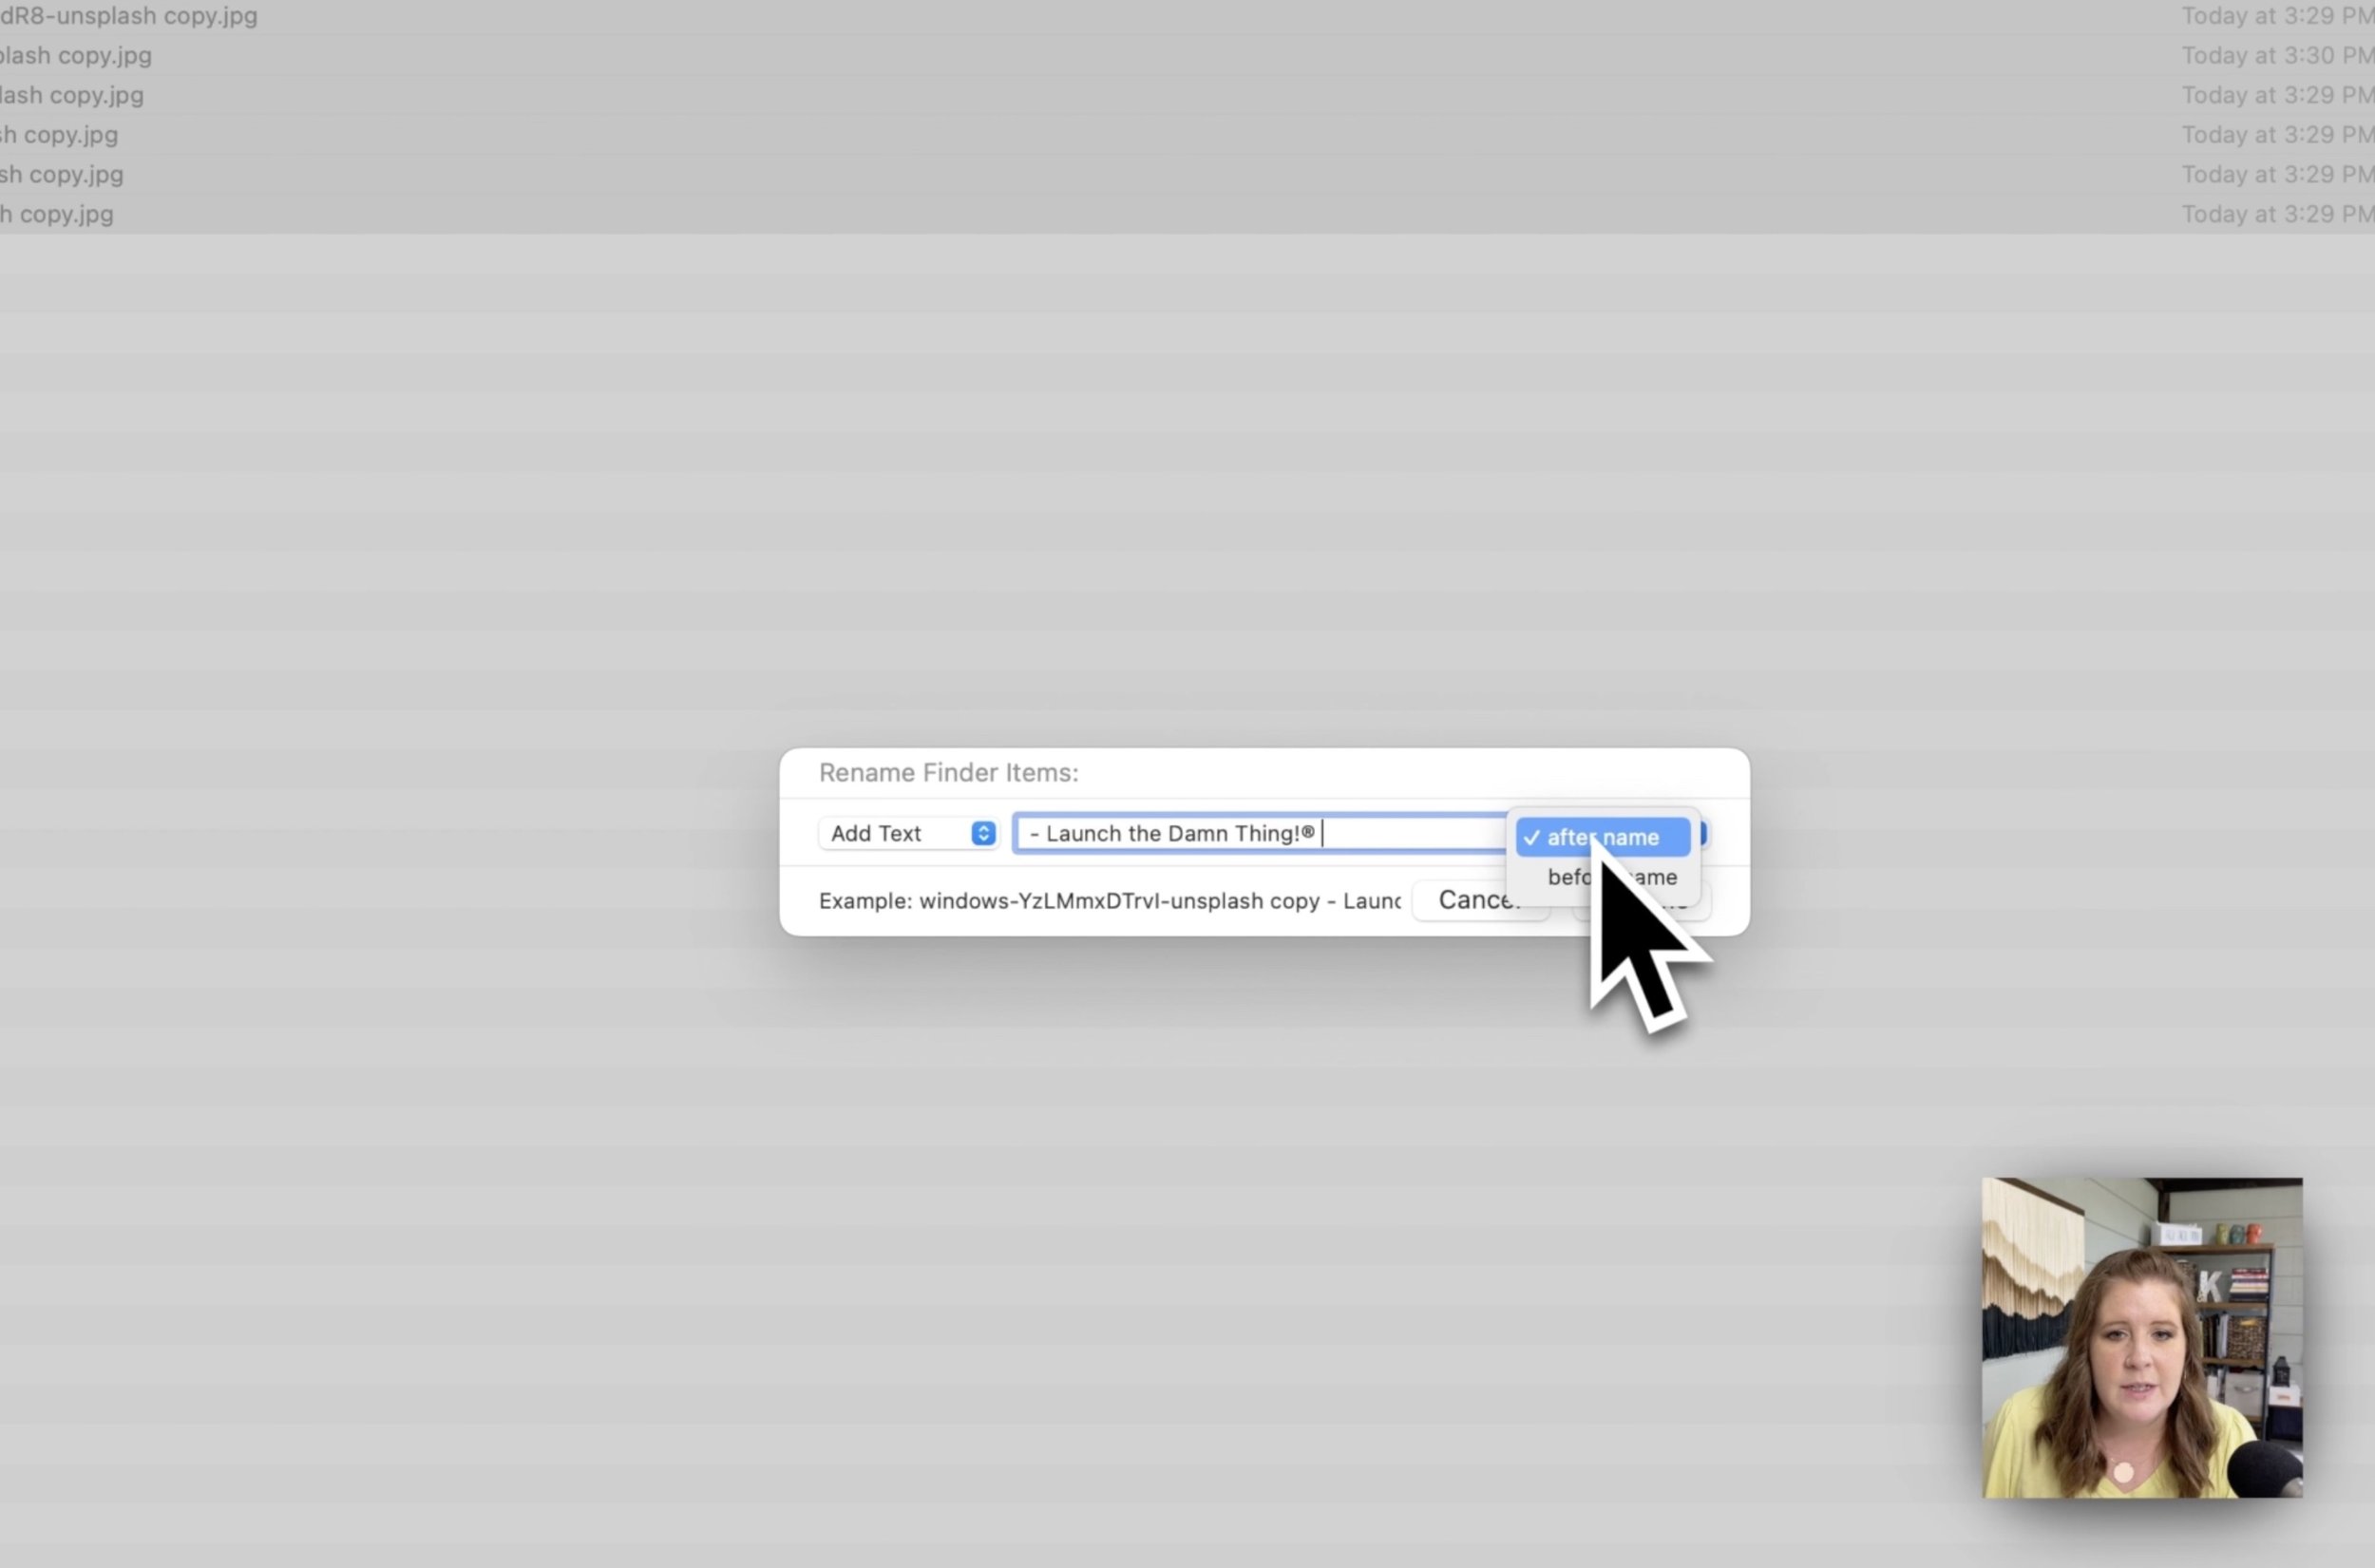
You can also Add text, if you want to literally add text before or after the existing file name
click Add text
in the field type what you want to add
then you choose where to add it, Before or After the existing file name
You can also Rename the files entirely & index them.
click Name & Index, start with the name and index. That's going to basically give all the files the exact same name. And then add a number after the end of it, numbering however many files there are in the selection, whether that's 500, 1, 000, or 2, it doesn't matter. If we wanted to name this, for example, Launchdam thing, unsplash, photos for blog, and then Always remember that whatever you end the filename with, it puts the number immediately after that.
Follow along visually:


To Replace text within the file names:

To Add text to the file names:

To totally reformat the entire file name for all files selected in the group:

EXAMPLES:
Replace Text:
If you want to replace a part of all the file names, then you’d use the first field to “find” that part of (all) the file names, then use the 2nd field to type the text you want to replace it with (or leave it empty to replace that text with nothing, removing it from the file names), like this:FROM THIS → existing file name blog image.jpg
TO THIS → existing file name YouTube image.jpg
OR THIS → existing file name image.jpgAdd Text:
If I wanted to add my business name to the end of all the files, then I’d use the text field to type “- Launch the Damn Thing!®” and choose WHERE I want to add that text, to the beginning or end of the existing file names. If you add something you may also want to add some sort of separator (a dash, underscore, etc) between the current file name & whatever you want to add to it, like this:TEXT ADDED AFTER → existing file name blog image - Launch the Damn Thing!®.jpg
TEXT ADDED BEFORE → Launch the Damn Thing!® - existing file name blog image.jpgFormat:
If you want to totally rename all the files in the list & want them to have the same name, you can choose this option to ‘start over’ and automatically have them numbered too. You may want separate the indexed number from the file name; if so, put the underscore/dashes at the end of the reformatted file name to separate the last word in the name from the indexed number like this:FROM THIS → existing file name blog image (1).jpg
TO TOTALLY RENAMED & NUMBERED → LTDT—blog image__1.jpgPRO TIP!
You can use a combination of these renaming tactics to do things like rename all files AND add or replace text while keeping them numbered automatically, etc. Just keep them selected & keep choosing your Rename options to continue editing the names in bulk with each rename you do.
I do this very often when I am resizing photos in bulk for client projects ––or my own projects–– so I can group gallery or portfolio images together, etc.
This is a really easy way to rename files in bulk, and great for updating file names when you’ve misspelled something, or want to add more context to your file name to make it more searchable on your computer (or on Google when the file name is descriptive).
––As opposed to selecting each one, double-clicking on the file name, retyping the file name, clicking off of it, and repeating for every file you want to change in the whole list. 😳
Once ya get the hang of it, you’ll end up using this unknown feature of Finder all the time!
Now you know there's a quick way to do this on a Mac with very little effort. I hope this tutorial was helpful for you, saves you loads of time and frustration, and maybe even a Photoshop subscription fee, ––because we all secretly hate Adobe, don't we? 😂
