

How to schedule auto-posts to Instagram with Tailwind & Later apps

📌 Pin it!
LAST UPDATED IN 2018
Several companies have released automatic posting for Instagram. That means no more notifications like, “It’s time to post!”
It’s about damn time!
If you’re anything like me, you’re lucky if you have time to set up and schedule posts for Instagram (or any other platform). You might not also have time to post it yourself at the time scheduled.
Are you staring at the screen and thinking, ‘What––scheduled times?! I just post it whenever I can! Why do scheduled times matter?’ or ‘How do I do/find ALL those things?’
If so, then I’m so glad you found this post because I’m going to walk you this.
What you need to know first:
Instagram only seems to allow this with their Business accounts at this point, and Auto-posts don’t work for:
Personal Instagram accounts
carousel posts (multi-photo posts)
video posts
Tailwind vs. Later (2018)
I haven’t updated this post, because I’ve since switched to using Planoly for Instagram Scheduling and I’m just not on social as much anymore so I’m not as familiar with posting limitations. I definitely prefer Planoly to these 2 options though.
In case Planoly’s not a good fit for you, here are 2 other options to check out! Check their websites & Help Centers for current information though; I’m sure a lot has changed since I used them last.
TAILWIND
Tailwind allows scheduling for only Pinterest and Instagram platforms, so you'd still have to use another scheduler for other platforms.
PROS
30 free posts to try it out
AUTO-posts!!
Automatically posts to a time slot that’s best for most of your followers
Gallery preview
Unlimited posting on the annual plan
2 collaborators allowed
30 day history archive
Basic insights
Hashtag support (inserting hashtags into captions)
Hashtag popularity info (which ones are used more/less frequently)
Control over caption formatting if typed on a computer
Saved captions (can include hashtags)
CONS:
Paid feature (after 30 posts)
400 posts/month (on the monthly plan)
Formatting captions can still be quirky, depending on how/where you type it
Not all emojis are supported
(a few of mine have been posted something like this :slightsmile: instead, and I’ve had to edit the live post to insert the icon)
1 account per platform (even on a paid plan)
1 plan for Pinterest
1 plan for Instagram (separate from Pinterest's)
The media gallery is the same as the drafts section, seemingly
Doesn't auto-post carousel posts
Doesn't auto-post to personal accounts
Doesn’t post to Story feed (regular feed only)
Insights are so basic (free trial) that they’re useless
Instagram has better insights
LATER
Later is a multi-platform scheduler, and has free and paid plans which allow scheduling to Facebook, Instagram, Twitter & Pinterest.
PROS:
Free (forever) plan
Paid plans with more features
AUTO-posts!!
Gallery preview
Supports time-slots for best times to post (manual)
2 collaborators allowed
30 day history archive
Basic insights
Hashtag support (inserting hashtags into captions)
Hashtag popularity info (which ones are used more/less frequently)
Better control over caption formatting if typed on a computer
Saved captions (can include hashtags)
Saved hashtag lists
Current Emojis are supported
Basic analytics
Search & repost (share)
Unlimited media gallery items
CONS:
(updated Jan 2023)
1 Social Set, 1 user, 1 Access Group
10 posts per month per social platform
A Linkin.bio page
Instagram Analytics (3 months)
Unlimited media storage
Photo and video scheduling
Saved Captions
Visual Instagram Planner
Can’t auto-publish carousel posts on the free plan
Can’t auto-publish to LinkedIn or Pinterest
Can't auto-publish to personal accounts; business profiles only
Can’t auto-publish to Stories
Okay, but how do I set it up?
Tailwind
I'll keep Tailwind's setup short, since honestly I prefer Later for this (Tailwind wins for Pinterest, hands down though!).
In your settings, go to Accounts, and then select + Add New Account then follow the steps they provide for you.
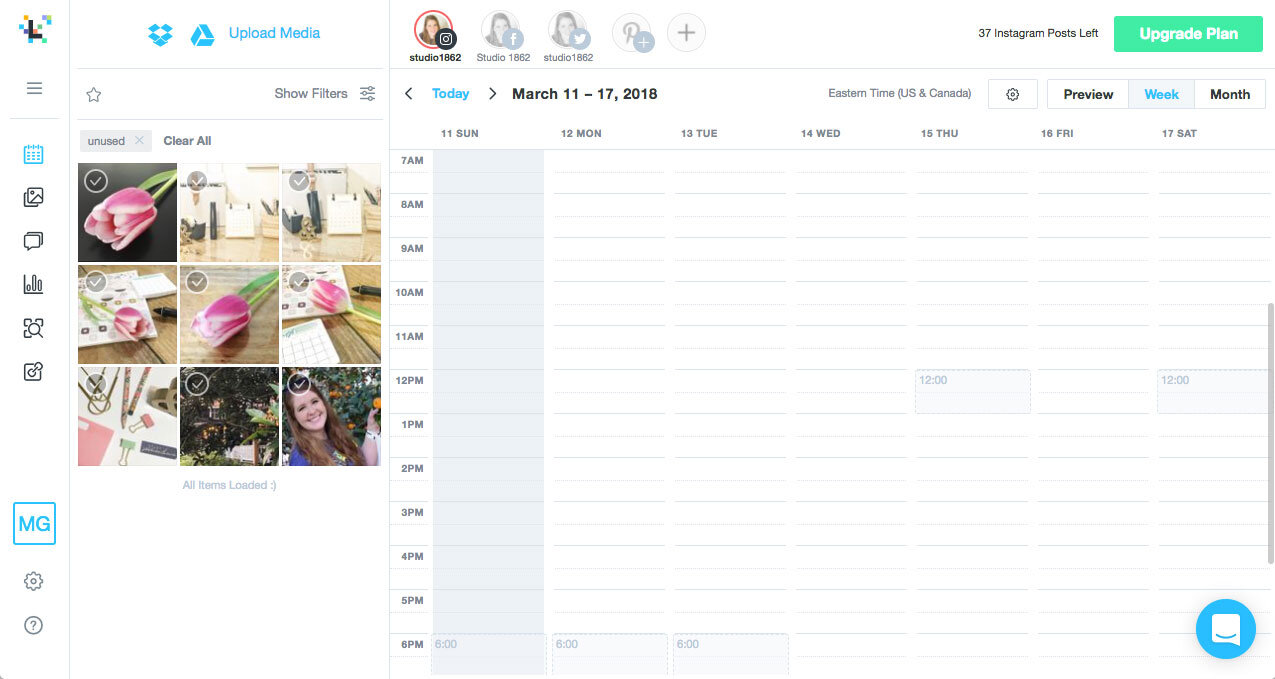
Once you've set it up, this is what your 30 post free trial page will look like (below).
Check out the main points in Yellow, Blue and Red. Those areas are what you'll use most, to upload new posts, see how many free posts are remaining, and switch between calendar and gallery view.
Click on any draft to type the caption, choose your hashtags & schedule the post.
The main thing Tailwind does automatically that Later doesn't, is figure out the best times to post for your account. I'll touch more on that further down!
This is basically how it will look when you get it set up, and upload some drafts.
Later
Okay, now we're getting to the good stuff! Later has a FREE plan, this is the one I continued using for a while, even after trying Tailwind's version. They do almost all the same things, so why pay Tailwind to do what Later does for free?
Here's how to setup your social media profiles within Later:
Once that is done, your account preview will look something like this:
I've set up my Instagram, Facebook and Twitter accounts, but not Pinterest. You can see those in the middle, at the top of the page.
Now, upload some images to your media gallery, if you haven't already, and click on one to create a new post.
This window will pop up where you can type in your caption, add hashtags, etc., but this is also where you'll be able to enable the auto-post feature for the first time.
Notice at the bottom, where it says Notification, next to the Save button.
To setup auto-posting, you'll need to select Notification, then click Set Up.


Next, Later will tell you which accounts are eligible to connect for Auto-Posting. In my case, it tells me I cannot connect my personal account, but I can connect my business account.
Click Authenticate with Facebook.

Then you'll need to login if prompted, or if you're already logged in, you'll see this popup, where you authenticate your Instagram Business profile with your connected Facebook account.
This is also where you can choose your permissions & what you'll allow.
Note:
Sadly, if you don't want to connect Facebook, I don't think you'll be able to use this feature.

You're practically done with this part! Just click Finish Setup.

Now, when you're ready to schedule your next post, you'll see that instead of Notification, it now says Auto.

What appears on that button will now also appear next to posts in your schedule, so you can see which ones will be posted automatically, at a glance.
How to setup time slots in Later
Let me clear up some of that Later vocabulary term for ya!
time slots are just just an exact moment you want to designate as a post time.
You don't need to use them, but they are handy to have!
First, you need to open your Instagram app and click on your Insights. We've gotta find out when your followers are most active, so we know when to create the time-slot/s for each day.
Why?? Using this information gives you the best organic reach when you post, so you don't have to pay to extend your reach with ads.
Using all of your available hashtags in each caption will help too; you get 30 with each post, so use them! Your Insights will also tell you how many people found you via hashtags, if you click on View Insights on any particular post.
To see that information, scroll up with your finger on the little View Insights popup, and then scroll down to Impressions. It will give you a total number, a number from Home, and a number from Hashtags (which will be the number of people who found that post from the hashtags you used)!
Note:
Setting up the best time to post is something Tailwind does FOR you, which is helpful, because as you gain/lose followers on Instagram, this data changes.
If you choose to use Later instead of Tailwind, it's a good idea to check this next step each week and adjust the time slots in your Later account, based on your ever-changing insights.
Okay, now I'll walk you through finding this information in your account's Insights.

On your Account page, click the Insights icon at the top right.

Then scroll down to the Followers section, and click See More.

Scroll down to the Followers section again, and you'll see times for each day when your followers are most active. Select a different day, by clicking the < and > arrows. Right now, my best time to post on Saturday is 12pm.

To see which days your followers are most active, select the Days button, and look at your graph. Right now, mine are Mondays & Thursdays.
Write down those days/times, or keep your Instagram app open so you can add that information accurately to your Later account.
Note:
You can only do this in the browser; not using the Later app.
Now go back to your browser, and double click on the time you want to use for each day, to add a new time slot. If you miss it a little bit, you can change it by dragging it up or down to adjust its time more accurately.
If you create one by accident, just click the X in that box and it will be removed. It's a little quirky, so you might have to click the X a few times, or even come back later & try again if it doesn't work right away.
Note:
Next time you check your Instagram Insights again, and if those time slots have changed, you won't need to create a new time slot in Later, just click on the time slot you've already created, and drag it to the new time for that day. Super easy!
Okay! You've got all your time slots ready to go, right? 🙌🏻
How to quick-schedule your drafts in Later!
Just to clarify:
quick-schedule is just a way to automatically plug in your drafts to those pre-selected time slots you just created.
(this is not the same thing as auto-posting; this only adds the posts to your schedule and does not auto-post them for you)

Select multiple images you've uploaded to your Media Gallery, and at the bottom, select Quick Schedule.
Later automatically plugs in those drafts to the pre-selected time slots you created in the previous step.
WAIT! They aren't set for auto-post just yet, so go back to your Calendar, and edit each post, adding captions & hashtags there too.
When you're ready, click Save and make sure Auto is still selected, instead of Notification.
Do that for each post you just scheduled using the Quick Schedule feature, and you're all set!