How to create a smooth scroll effect for same-page navigation links
Table of Contents Show

📌 Pin it!
A while back I posted a tutorial about how to create same-page jump links or anchor links, whichever you prefer to call them, either way they essentially just link to another spot on that same page allowing the viewer to “jump” to that spot quickly. So quick, in fact, that it can be pretty jarring.
Anchor links are great for long pages where you want to provide the viewer a way to skip through it & get straight to the good stuff, IF they want to.
I got a lot of great feedback on that post & promised I’d add a new one with the scroll animation effect, so that when someone clicks the link they can see the page quickly scroll to that section for them, rather than just appearing there in an instant.
And that smooth scroll effect is what I’m sharing today!
Would you rather watch it than read it? Click here to jump straight to the video!
How to create same-page navigation links with a smooth scroll action
For this part, it’s truly pretty simple.
Add a Code Block with a single line of code in it, at the start of each section you want to be able to jump TO.
Then you link a button or text above or below to that section by typing the # symbol before the name you put in the code.
If that sounds a bit convoluted, keep reading: I have examples!
❶ Creating the anchor code
First we’ll create all the anchor code. This tells the browser where the hell –erm, code– it’ll jump to on the page. It’s basically a very specific bookmark (anchor) in the code that a link can find easily.
(No, this doesn’t interfere with other links on the page, and this method works best for same-page jumps.)
Add a Code Block to the beginning of the first section you’d like to be able to jump TO.
If you need an example, let’s say on your Sales page you has all this content, but maybe you want a button that jumps to the pricing area of that page from the top. You’d add a Code Block to the top of the Pricing area of that page. It won’t show up in the design, so no one will know it’s there but you!
Here’s the copy-and-paste code:
<a name="section-name-goes-here"></a>
Copy & paste that into a Code Block you just added.
Then replace “section-name-goes-here” with whatever brief description makes sense for the location you want it to jump TO.
So if you wanted to jump back to the pricing section of your sales page, then replace “section-name-goes-here” with “pricing" or something very simple. It will have to be EXACT in both the code & the link, so the simpler the better!
Now your code should look like this, with your word in it, instead of “example.”
<a name="example"></a>
Apply the changes to that Code Block + save the changes to the page.
❷ Create the link
Okay, so now you have the digital ‘bookmark’ on the page!
Go back up to the area where you want the link to that section.
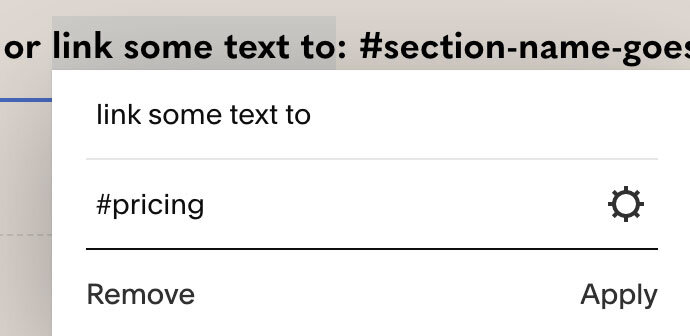
Add a button or link some text to: #section-name-goes-here ––or in our example, it’d be #pricing.
<a name="pricing"></a>

how to link the button to the code
how to link text to the code
Now Save the changes on that whole page.
❸ Add the CSS for the smooth scroll effect
Go to the Design < Custom CSS and add a short snippet of code that tells your website to smoothly scroll to that section, rather than the immediate jump which is kinda jarring for the viewer. (You only have to do this step 1x for your whole site!)
/** anchor links - smooth scroll effect **/
html {
  scroll-behavior: smooth;
}
Save your changes to the Custom CSS. Refresh the page, then test it! See if it works by clicking the linked text or button (whichever you did) and see if it jumps to that spot on the page, where you inserted the Code Block.
Now repeat steps 1 & 2 for every jump you want to create from now on. Don’t worry, it’ll seem more simple & familiar the more you do it. 😉
Troubleshooting:
If it isn’t working, go back & check what you typed in both places, and make sure that word matches EXACTLY, ––capitalization & everything.
If it still isn’t working, check this Squarespace tutorial. I know the Pacific template has an extra thing to add to the link.