

How to keep an art department organized
Table of Contents

My previous job was as an in-house graphic artist for a local screenprint & embroidery company.
When I started in 2012 I was the 2nd artist in a department with 1 other senior artist, and by 2019 I was one of 4 artists, 1 of which was completely remote.
We had A LOT to work through with just accessing past artist’s files if the client resurfaced & wanted to repeat an old order, because the artist before me was shamefully bad at file organization. 😂
Not to mention some initial confusion on how to access files from our remote employee who used his personal laptop, –and searching for files now & then from our senior artist who wasn’t as used to carefully naming his files, having been there for a good 10 years before I started (most of that time he worked alone in that dept).
Curious how we got through all those growing pains? Let’s dive right in!
This is going to be a hefty post, so here are some quick links if you want to jump around in the content:
Organize digital files in the same way, from now on
Graphic designers create a LOT of files over time, so keeping your shit organized is one of THE most crucial parts of working in a department with a team of other designers.
Even if you work alone, at some point you’ll either retire or switch jobs & someone will have to come after you & figure out your mess. So this applies even for those of you who may be in a one-person art department.
Here are some best practices for file naming:
📂 artist’s name
📂 year
📂 open projects
📂 client name(s)
📂 project name(s)
PO#–brief–description–20XX–ip# = in progress (the editable file)
PO#–brief–description–20XX–FA# = for approval (approval form / proof)
PO#–brief–description–20XX–location–PRINT = print file for [location] {front, back, etc.}
PO#–brief–description–20XX–WEB# = web ready file (clear, but low res for faster loading on web)
📂 approved
same format as project files
📂 completed
same format as project files
From now on, use that format for each year the artist works there and as long as each artist adopts a similar format for their own file names, things will be easy to find for anyone in the department.
Yes, that makes the file names long, but it also makes them easily searchable on any of the artist’s computers or on the local server for easy access.
PRO TIP:
Move the folder with that client’s files from open projects to approved to completed as the production process is completed AND make sure you (rename, put in a folder within that project & label it as unused/not approved/x-files, or) delete files that were not approved with the project approval, so they don’t get used accidentally if the client repeats an order & you aren’t there to handle it (or it’s been too long for you to remember which ones were used).
DO
Using –dashes– or _underscores_ instead of spaces, makes the files more manageable for PC users when artists are dealing with vendors or other departments which may not be using Macs.
ALWAYS include the number at the end for the rep you’re on. So if you have 5 revisions you’ll have 5 ip files & 5 FA files (or 1 file with 5 labeled artboards for each ip & FA).
That makes it easier for you to know how many revisions you’ve had to make at a glance & you can go backward any time if the client decides he/she liked version #3 better than the others.
Try to include the year in your file name too, even if it’s just the last 2 digits. It’ll make it easier when searching for files to know where that file exists & how old it is.
In departments that do similar projects for annual events, this is a must. If you have 10 designs for 1 client’s bi-annual event over a period of several years, having the year in the name will be super helpful in finding a specific version if needed.
When you get ready to print, make sure you include the location, side, version or page number.
Example: if it’s a double sided business card, put side–1 or side–2.
If it’s a t-shirt print file, put front–PRINT or back-PRINT, etc.
When you save for web, make sure you have some descriptive terms in the file name so Google can see what the image is more easily.
Google does not like images with arbitrary labels like “IMG-1875_edit5.jpg”
Do save the approved jpg proof file if you can & are in the type of business where the client may repeat that design with no further changes; it’ll be easier to send a confirmation proof next time they place a repeat order.
DON’T
NEVER name your files something vague which only YOU know what it means, like: ‘bullshit–1.ai’ ‘effin–logo–5final.ai’ ‘fine–ill–do–this–one–final5.ai’
No one can understand that. No one can search for that. No one can find that. Those types of file names don’t have helpful information and you might offend somebody too. 😂
Don’t adopt a format that only works for you, if you’re in a team environment. In other words, if you don’t like dashes or long file names, tough shit. Don’t decide to do it differently if your actions are not good for the overall team.
If your team asks you to make a change to the way you handle something, please for the love of all things holy, LISTEN to them. Most people don’t like confrontation, so the fact that they’re asking you about it likely means they really need you to adapt a little.
Don’t get stuck in a rut. Just because it’s been a certain way for years doesn’t mean it has to remain that way. Businesses evolve & change, and you’ll have to change too if you want to be part of an effective team.
STORING FILES ONLINE
When we first got the remote employee, to avoid additional expenses, we tried having him add each project’s files to the project’s card on his board (all revisions, ip files, print files, etc.), but we quickly found limitations with that.
Attachments are limited to 10 or 20 MB per attachment in each card, –plenty of our .ai files were larger than that.
Accessing them meant downloading the file from the Trello card each time, to get the latest version & that was if that employee remembered to update it EVERY time.
It didn’t take us long to decide that having him use Dropbox was a MUCH more efficient system & worth the price tag for the online storage space.
He downloaded Dropbox on his computer, which gave him a Dropbox area inside Finder where he could use it in a way that felt native to the Mac OS system instead of through the web browser, making it easier to work from files stored in Dropbox just like he could with files stored on his computer.
Dropbox also allowed for more private comments on files if we had to ask questions about something he’d edited or added.
Adopt and use a Project Management tool
My dept began using Trello for project organization & Slack for communication across departments & with our remote employee. That combo worked REALLY well for us.
I introduced Trello in 2017 and even though I left in mid-2020, I’m still in contact with my fellow art dept coworkers, ––they’re still using it & consider Trello a MUST-have resource for their work there.
Slack is a newer tool we had adopted in order to increase communication without running all over the building or beeping in on phone systems when we needed to ask different departments questions. It takes up much less time to Direct Message a coworker about something than it does to walk to the back of the building when they might be on break or too busy to talk. Slack is technically a PM tool also, but it works more like a messenger with extra features, and there just so happens to be a PowerUp for Slack inside Trello. 😉
If you don’t know what a PM tool is, or you don’t know which one to use, check out my Project Management tool comparison post here to look at 6 different popular platforms that I have personally used myself when I was researching it for my own business.
Pros of using Trello for design departments
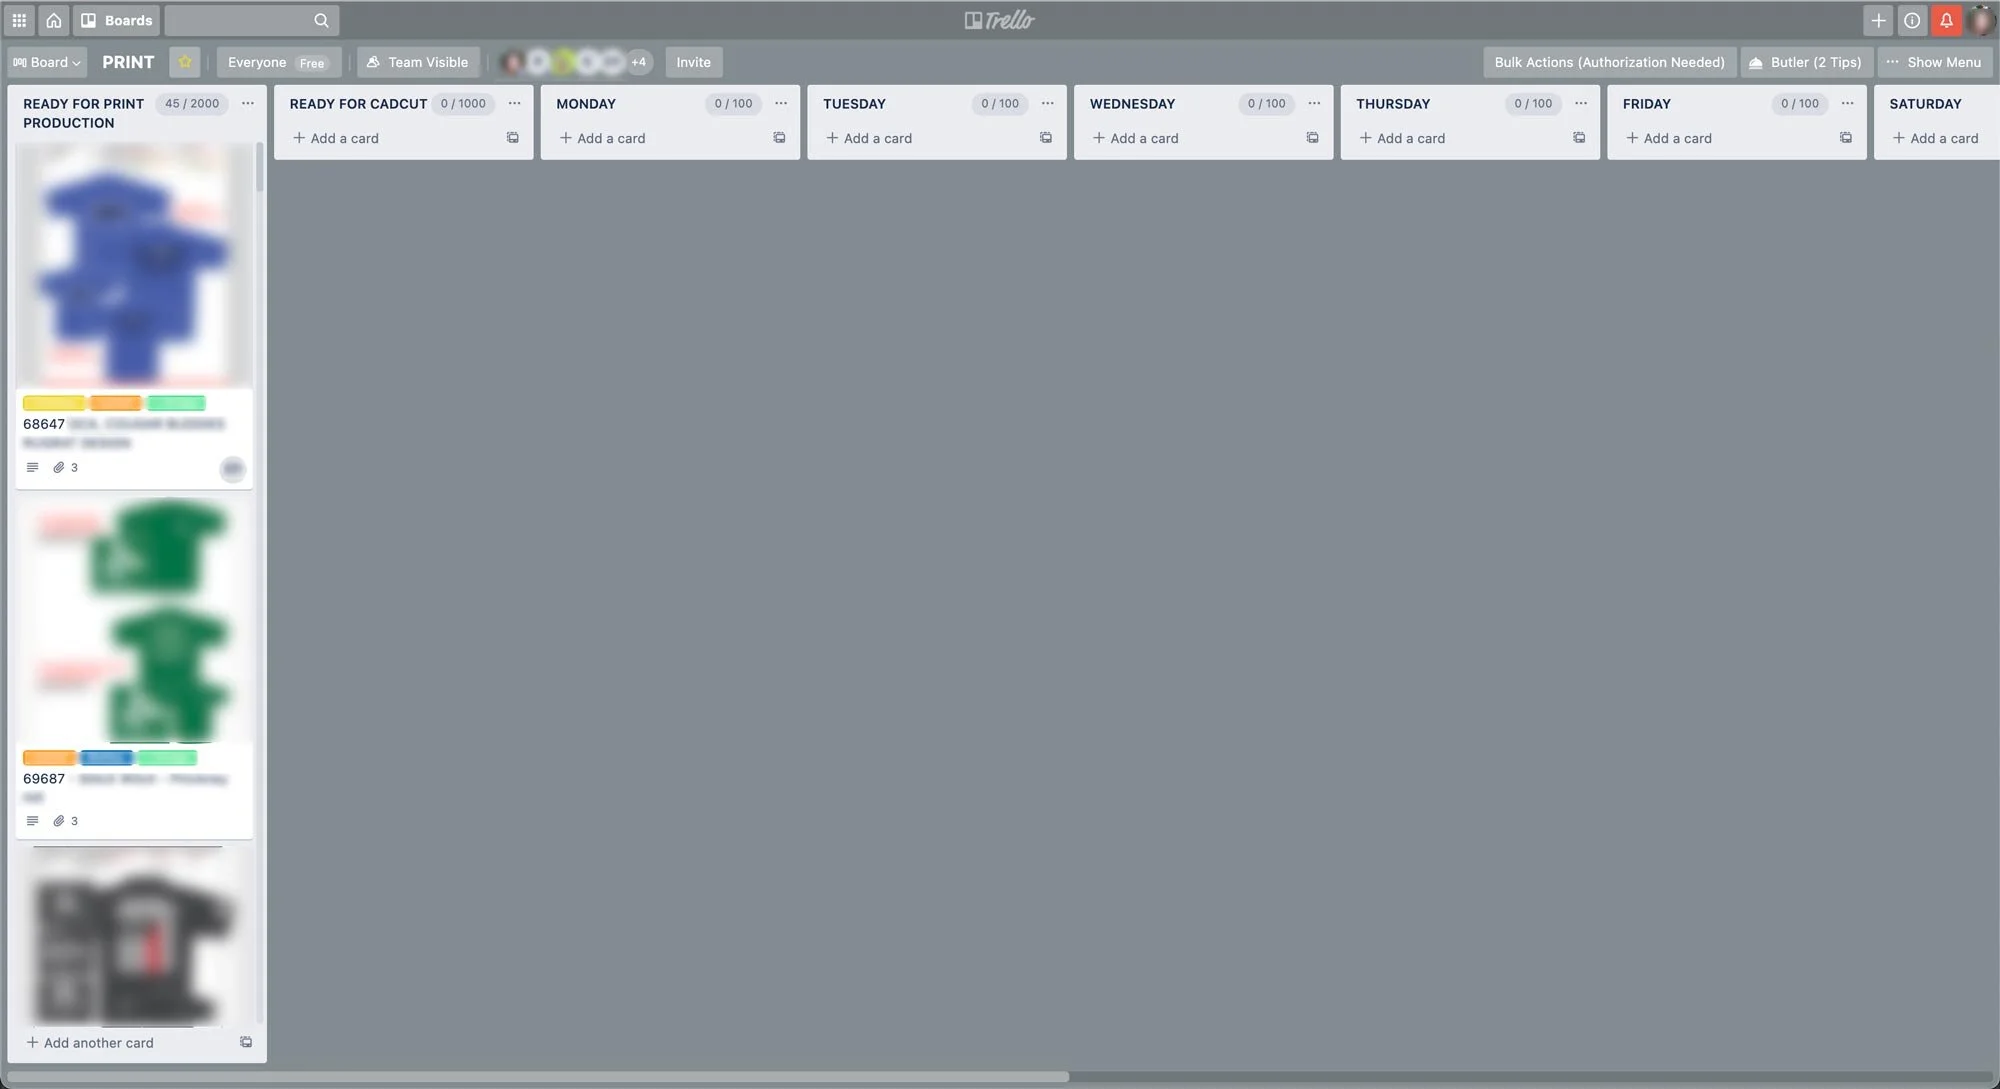
VISUALS – It’s a VERY visual platform! Proofs, labels, dates & more are all quickly visible at a glance.
KANBAN COLUMNS – The columns make it easy to move data between statuses/columns as the project moves throughout the building / production process.
SEGMENTED – Work is segmented into boards, so each department or artist can have their own space to regulate/manage.
FLEXIBLE – Trello is pretty flexible, so we were able to do almost anything we really needed & some things we just liked for the fun of it (like changing each board’s background photo).
FREE TO USE – Believe it or not, we never had to upgrade to a paid plan in order to use Trello for that business, even though we had 3-4 artists, a board for the print dept, a board for repeats, a board for the embroidery dept and 3-4 additional people with accounts & access privileges to most of the boards in order to see what project is where in the building.
Cons of using Trello for design departments
NO GLOBAL CALENDAR – There’s no native way to see ALL cards with due dates across ALL the boards, in ONE place, without using Butler automations to duplicate cards with due dates & put them on a central customized “Calendar Board” that you create yourself (i.e.: with kanban columns for each day of the week & you manually move cards as needed there).
At least there wasn’t as of summer 2020, without using a PowerUp like Planyway, which is a paid option.
LIMITED POWERUPS – On the free plan you only get 1 PowerUp per board, but there are TONS to choose from & several that would’ve been useful to use together in 1 board. You’ll have to upgrade if any of those are really important to your dept’s process, such as:
time tracking per card (project)
reports / analytics
global calendar
approvals / rejections
process checklists with auto status updates
custom fields, + a lot more
How to setup Trello effectively for design teams
CREATE BOARDS
Each person or department will need their own login for their own Trello account, and their own board(s) with access to any boards they need in order to their job well. For example:
Art Dept = 4 boards, 1 for each artist
Embroidery = 1 board for the head of that department
Print Dept = 1 central board with columns for upcoming, each day of the week, and completed


Don’t forget that you can also add boards for other necessary things, not related to the production process & that maybe only your dept has access to, such as:
A board to keep centralized access to branding guides for big clients or companies, house their logo files for easy access, color codes & their Pantone or ink color name equivalents, or a link to their branding folder in Dropbox / Google Drive, etc.
A great idea for clients that contact your company frequently to get their logo file, …again, so the sales reps have a quick place to go & grab whatever is requested (if well labeled) without bothering the art dept for it.
A repeat board to keep cards (orders) for the most frequent repeated client orders
A board to keep track of topics to address at upcoming meetings
A board to keep track of departmental processes that could help train new employees on how to use the system (SOP’s = Standard Operating Procedures)
A board for departmental information, such as links to the printer manual, info on computer updates/upgrades, vacation requests, a calendar for holiday office closures, meetings and other announcements
MAP OUT THE PROCESS
Generally map out the process each project goes through, to make sure each board in a single department has the same (or similar) set of columns (called “Lists” in Trello) in the Kanban layout. For example:
The Art Dept’s general process (set of Lists per artist’s board) was:
New/To-Do → Out for Approval → Revise → Approved to Print → Ready to Print (moved to the Print board) → 20XX Client List (completed projects for each year)The Print Dept’s general process (set of Lists per artist’s board) was:
Upcoming → Monday → Tuesday → Wednesday → Thursday → Friday → Complete (cards are then moved back to the original artist’s board)
ADD LISTS & MEMBERS TO EACH BOARD
Add a list for each stage in the process, to each board.
You can use my example above for a starting place, or search for board templates within Trello!
Then add Members (people who have viewing & editing permissions) to each board where appropriate. The boards don’t do any good if all of the right people don’t have access.
For example, you’ll want the customer service reps (CSR) to have access to each artist’s board & the print/production board so that when a client inquires about the status of their order, all the CSR has to do search for the PO# to find the order & see where it is, eliminating the need for constant questions about who has what order & where is it in that artist’s radar.
That quick search will tell the CSR which artist has it, what column (status/stage) the order is in (whether it’s still in To-Do, Out for Approval, etc.).
The CSR can also pop in to change the due date, move the order to the top of the To-Do list or manually approve it by moving the card from Out for Approval to Approved/Ready. Trello will notify the board owner of the changes so nothing is missed.
ADD CARDS TO MOST BOARDS
A “card” in this case will represent each project. So you/your team will add 1 card per project and move that card throughout the process (lists & boards) as it changes stages, to update its status.
For example:
As long as an order remains in the art dept, the card stays on that artist’s board, moving from the different columns/stages in the process. But when it’s approved, it moves to the next board (ie the next stage in the process), so it could move from the artist’s board to the production or print board to signify to that dept that it’s approved & ready to produce.As long as the due dates are updated, the next dept will know the timeline they have to complete the order & how to rearrange what they already have in order to make room for that added project in the given timeline.
CSRs can move projects (cards) from Upcoming to the list representing the day of the week it has to be completed by, giving the production dept an idea of how many jobs need to be completed for each day of the week.
If your CSR who take the orders use something like Quickbooks, they could potentially email the quote/estimate/initial order entry to a specific board’s email address, which would automatically create a card on the New board with some information attached, and prevent wasted time in the art dept creating cards for new orders from scratch.
To get the email address in any board, go to:
the Settings menu for the specific board you want (upper right corner)
••• More
Email-to-Board settings
Your email address for this board (copy the address or click below that field to generate a new one)
If sent from an email app like Apple Mail or Outlook, Trello will attach any content from the email to the card’s description & any email attachments will be attached the to card, automatically. You can also add card titles, labels & members in the subject line of the email.
For more on that, follow Trello’s tutorials using the links below:
STEP-BY-STEP: CREATING CARDS
First of all, you can do this once & create a template from that card for each use-situation & then just create new cards from the right template.
Card Templates can have specific information that may be repeated often, such as adding a specific label & member each time, or always starting with the first 2-3 digits of a long PO# where those first digits don’t change as frequently.
Best practices for creating USEFUL cards for each project:
A good card example for a single project that was approved & completed.
Format the card title like this: “PO# Client Name, brief description”
This info makes each card searchable from anyone’s Trello account with access permissions to those boards, and makes it easy to quickly track down an order by PO#, client name or description.
Add a label & member to the card for the person who took the order from the client, so you don’t have to check the paperwork to remember who to send proofs to.
You can give labels unique names.
What we did was choose a color (& named that label with the rep’s name) that was most like the physical folder color our paperwork was delivered in for each client, because each sales rep always used those color folders. It was a quick way to see at a glance who was managing that project or client.
All purple labels were Sales Rep A’s clients & projects,
All yellow labels were Sales Rep B’s clients & projects,
All blue labels were Sales Rep C’s clients & projects, etc.
You can add more than 1 label, for example:
We had another label for RUSH orders, another for opportunities (quick to-dos with no immediate paper trail to help us keep track of it), additional departments who need to know about this order (used with Butler automations to notify them when that label is created)
Add a due date with a reminder to make sure you stay on top of your deadlines
Add any attachments that are necessary to complete the project, including a digital image of the PO paperwork for a quick reference of project details, deadlines, etc.
The Trello mobile app will let you take images from within the app that attach to the card easily, so if your company is not yet fully digital, you can take photos of each page of the order you receive when it gets to your dept & add them to the card if you want a digital copy.
The day-to-day process of using a system like this
Every day we each open Trello –and keep it open on our computer, editing & checking it frequently for updates & notifications
We enter the incoming orders in Trello, daily, at the start/end of the day:
create a new card for each of the incoming NEW orders
for repeat orders:
we search trello for the previous order’s card (that will be repeated), and
we move that card to a current status (ex: from an archived list to Ready to Print, as a reminder to send the print file to the print dept for production), and
add a comment to that card with the current PO# for that repeat + any additional information needed for future ref (such as ink color changes, eliminated pages, whether the art has been tweaked a little & how, etc.
After we complete a process we each update our own order’s card in Trello by adding the 1st proof or moving the project to a new stage in the process
each artist is only responsible for the orders (cards) they take on themselves
great for CSRs dealing with a constant stream of customer’s calling to check on the status of their order
When the order is complete it’s moved to a Completed list so everyone knows it’s finished & ready for pickup/delivery/shipment
1x a day/week/month (whatever works best) each artist will go through the Completed list on the production board and move their own cards back to a Client List for the current year, keeping all cards/projects in the year they were last created/edited/approved/produced.
Sound like too much effort?
If it sounds like a lot of moving parts, and it is, but not an unmanageable amount because the extra ‘work’ is broken up between departments & individuals.
For this to work really well, you have to have a good team of people, all willing to do a little extra in order to prevent general chaos throughout the building.
You will easily get the hang of it after you develop the habits & having this process in place will actually save time by avoiding redundant questions and generally making sure the process runs as efficient as possible while keeping everyone updated at the same time.
#thankmelater
