How to get quick & easy feedback from clients with Markup
Table of Contents Show
I have a secret weapon when it comes to getting feedback from my web design clients, where I can ask them specifically where they want changes, all without them needing an account or a login to access that particular tool, and I also don't have to pay for it.
Are you curious what it is?
Keep reading! Cuz I’m sharing it with you today!
It's a very simple, and easy-to-use tool & I’ve been using it for years for FREE. Yes, you heard me!
Getting feedback or revision requests on client design projects was always tricky before I started using this tool!
With websites or multi-page documents, it can be especially hard to pin down exactly where the client wants to make changes. (ie: On the 42nd page, in the 7th paragraph, 1st sentence, change the word “their” to “there.” 🤦🏼♀️ Do that 1,000x and you’ll be ready to shoot yourself in the foot.)
Markup.io helps keep the process fast, easy, transparent & efficient for both parties. Their flexible free plan works with any budget, and your clients won't have to log in to use it with you! Miracle.
On that note, of saving both dollarinos and time, let's hop in so I can show you how I use it, and hopefully that'll help you get your projects done faster and easier!
screenshot of the free plan features as of fall 2023
What is Markup.io?
Today's tip for you is to look up Markup. (I totally did not mean for that to rhyme. lol)
As I said, I have been using Markup for years, specifically since Sept 2020 when I stumbled onto it, and I haven't had to pay for it yet.
There may come a time when that is necessary because they do have paid plans which have been introduced since I started using it, but I'm still on the free plan & have been since the beginning.
If you use wireframes in your design business, then you may be getting your feedback via the wireframe app, Adobe XD or Figma, etc. But I hate doing wireframes myself; it feels like redundant work to me. #personalpreference
It works in two parts,
We add an asset, whether an image/graphic or a website, video or audio file, etc, and send share access to the client which allows them to preview the asset normally while also being able to pin comments to the asset wherever/whenever they need to.
Markup also takes screenshots of the asset when the comment is pinned, so each of us can see the asset at the exact moment the comment was pinned, just in case that view differs between each party’s display.
You can dive into their features on your own, but I'll show you how I actually use it on the back end with my clients, because that’s the part you’re curious about, right? Thought so!
On the free plan, you will be limited to just 1 “workspace” (which is plenty, unless you have multiple brands, designers, etc) and a limited number of Markups within that workspace. I have a few Markups in my account now, left over from recent projects this spring, just so I can show you what this example looks like with content already in here, and to show you that you can use Markup with all kinds of projects: websites, images, graphic files, videos, audio, ––all kinds of stuff.
Your next question is likely –how does it actually work with (Squarespace) drafts though? That’s a great question! Because by the time we're asking for revisions, the website isn't live/public yet.
1 known bug to be aware of 🐞
One quick need-to-know tip is that now & then Markup doesn't like to display custom fonts (typically Adobe's, but not always/only those).
So if I notice that before I share the link with my client, I'll warn her/him that if the font isn’t displayed correctly, not to worry, that it's not a reflection of the actual website fonts used & is a Markup-only issue. So basically, I just tell them it’s only like that when viewed through Markup, and won’t affect or be that way on their live website.
How to add unpublished trial sites to Markup
Every website platform handles unpublished sites differently, for example, Showit gives designers a special link that typically works for the client so they can visit it before it’s published.
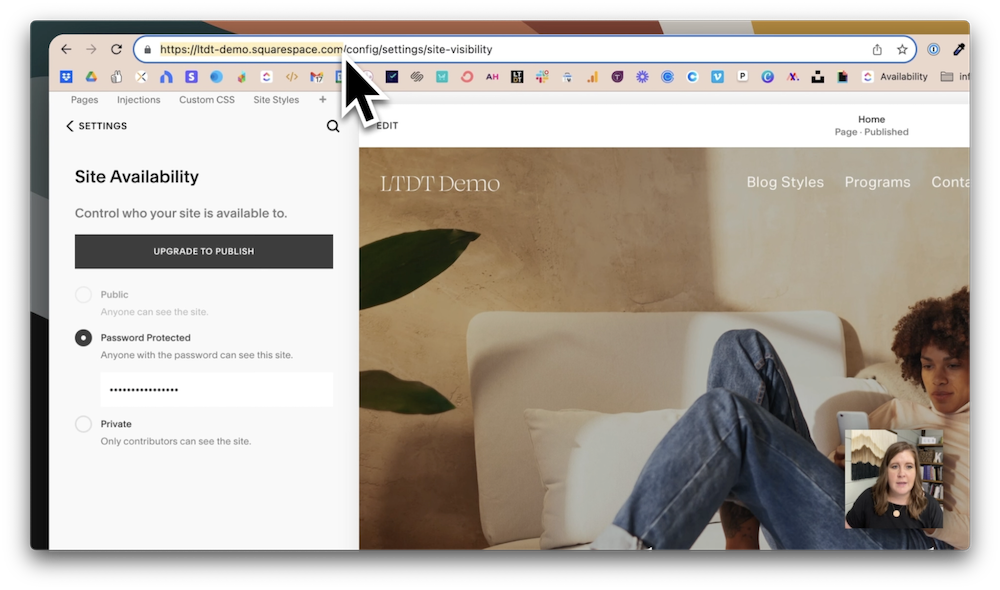
Anybody that's used Squarespace with clients before, for any amount of time, knows that you can't ‘publish’ a trial site just for sharing purposes without password-protecting it. So that's what I've done!
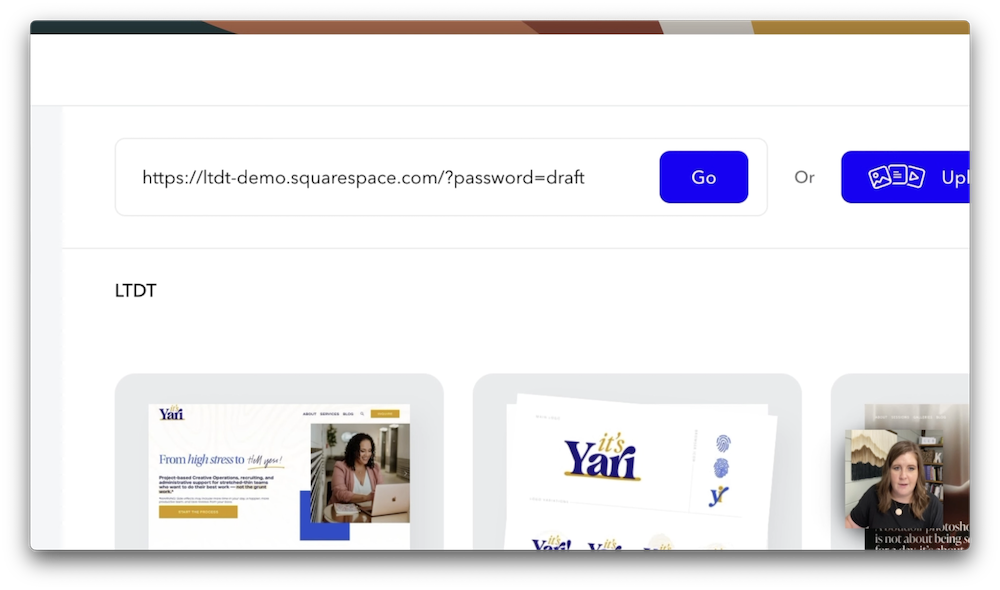
Over in my demo site, I have password-protected it. I've given it a short password that I can type in over here, and all I need to do is grab everything before/up to the .com, copy it to my clipboard, and then come over to my new Markup.
Then use the URL browser search bar at the top of your Markup page, paste the trial site URL there ––but don’t hit Enter/go yet!
Next, you’ll add something to the end of the URL.
Add /?password= immediately following the URL & pause. That is the format for how to tell the browser what to type in when it asks for a password for a simple lock-screened page on Squarespace.
Next, you’ll add whatever the password was that you set.
So now it should look something like this:
https://ltdt-demo.squarespace.com/?password=draft (if the password was “draft”)
If I click Go, it's going to pull up the demo site and enter the password, so now the client can load the site here in Markup as if it were published & bypass the pesky password login page for the whole session. Now it will act like it is published, even though it’s not.
visual example of where & how to share Markup with clients
Sharing guest access with clients
When you're ready to send a Markup to a client, it's actually pretty easy! You can either
open the markup and click the blue Share button in the top right corner.
or, click the blue Share button on the Markup preview card from your Dashboard view.
Either way, you’ll be able to choose between
sending it directly to their email address (via an email from Markup) or
copying the Share link & sending that yourself.
If you choose to have Markup send the invitation, I’d make sure to let your client know what to look for, otherwise, it may end up in Promotions or Spam and they might not see/find it!
If you instead send them the Share link, then you can control how they see it & learn what to do with it. I typically send the link with a short Loom video that walks them through how to use it with me.
screenshot of the Guest introduction pop-up in Markup, asking for the guest's Name and email address
Then when they open the Markup, at first they won’t be prompted, they can Browse, etc, but when they go to leave their first comment, it will ask them to enter their name and email address so that it can attribute their comments to them (vs you) and send notifications to the email address for updates to the markup (ie: new comments or threaded replies, resolved comments, etc).
So the guest won’t have their own account and won’t need their own account to use it with you when the Markup is in YOUR account and you’re giving them guest access to it. Of course, if they love Markup and want to use it for themselves in their own business, then they may create their own account for their business & log into that account from the Guest pop-up prompt.
how to delete old Markups from your dashboard
Deleting old Markups
When you're done with the Markup and you’re sure you don’t need it anymore, all you have to do is click the ellipsis ••• icon up in the top right of the Markup card from your Workspace’s dashboard, then select Delete.
The reason you must delete Markups, is because the free plan will limit you to 20 or fewer, as of posting. So if you’re on the free plan like me, you do have a limit on how many active Markups you can have at one time.
If we check the box in the Deletion pop-up, then we click the Delete button, it will delete the Markup that we just had ––and all the comments on it.
So you gotta be careful if for any reason you needed to keep those comments. I don’t think there’s a way to export those comments on the free plan, –maybe on the paid plans? I’ve never tried that, so I’m not sure. If comments can be exported & you find the way, leave a comment on this post & let us know it can be done!
Markups for various file formats
The other way to use Markup is with images, graphics, video, presentation files, or audio. Each work slightly differently in the actual Markup, too.
With websites, you have browse mode to see all the pages, but not a literal page list like you would with a multi-page document or PDF. Each file format will behave a bit differently in the actual Markup, ideally in the way that will work best for that file type.
If you want to create a Markup that is not a website, click the button across the top of the Dashboardnote down here what images are supported or what file formats are supported. There's a long list and it's surprising!
JPG
JPEG
PNG
SVG
BMP
GIF
PDF
PSD
AI
EPS
TIFF
RTF
TXT
DOCX
PAGES
ODT
PPTX
ODP
KEY
MP4
WMV
AVI
MOV
That's basically everything, right?
To create a multi-page Markup, click Upload, then drag and drop your files into that popup. With that popup you can upload files in groups to create a new Markup and those files will create multiple pages within 1 Markup.
You can also Upload one file at a time, with each upload process creating 1 Markup, and if you need to add pages to any Markup later, you can do that from within the Markup typically.
screenshot of how to create a Markup with other file formats
Markup accepts 23 different file formats!
With website Markups, you can’t add pages from within; it’s just the initial link which is typically the home page & whatever is available in the navigation for the client to see those pages.
PRO TIP:
If you’re sharing a Markup with a client and you want them to see system pages like a checkout page, member login, lock screen page, error 404, thank you page, legal pages, etc., temporarily put those links in the footer so they can navigate to them directly! Remove them when the revision period is over.
How to use Markup: the basics
how to switch between browsing the website & pinning comments to it, using the buttons in the top center
Comment vs Browse mode
The two options for using/navigating websites in Markup are Comment mode or Browse mode.
Browse mode will literally let you or the guest use the website, scroll through it, see all the animations, and click on buttons that take the viewers to other places in the website to look at everything, and see how it all works.
Then, when you or the guest are ready to leave a comment to request a revision or make a note somewhere, you’d switch over to Comment mode, and then you get a different cursor. That cursor indicates that wherever you click, it will leave a pin on the screen, to literally pin the comment on that particular spot, relevant to their request.
a visual example of what adding a pinned comment process looks like after the initial click
How to pin comments
If the client wanted this button to say something different besides Contact Us, then they can literally point & click, then tell you what they want it to say instead.
Commenters can add attachments, and videos (Markup works easily with Loom, for example).
Emojis are also really helpful to provide tonal context for how the tone of the request or comment is meant to be received by the other party.
For example, if the client requested a wording change, and the designer replies with “done” vs “Done! 😊,” the client will automatically feel less like they’re annoying the shit out of the designer if there’s a bit of basic emotional context for how that request was received. ––Just sayin’!
Both parties will be able to see all of the comments coming in, both here in Markup and in our inboxes if we’ve turned on notifications in the Markup’s settings. Either person(s) can click on those comments to be directed the spot where each comment was pinned.
a visual example of how Markup groups comments by website page in dropdown accordions
When there are a few different comments, over in the sidebar, I'll be able to look through the list of submitted comments and easily see how many comments are on each page of the website.
Comment organization
Each pinned comment is numbered, and they’re automatically grouped by page, no matter what order they were pinned in which is SO helpful for tackling these requests in a more efficient process ––rather than jumping back & forth between pages to see & resolve requests.
Let’s say you have three requests for feedback, for example. You’d be able to see that 1 of them is on the contact page, and 2 of them are on the blog page, in this demo’s screenshot.
These automatic groupings by page are also collapsible accordions, so I can go page by page through all of the requests very easily while the comments stay organized, and that keeps me from constantly bouncing between pages in the process.
If you have the Markup Chrome extension, (or maybe this is built-in now & ya don’t need the extension but I still have it?) it will also take a screenshot of how the page looked when the comment was pinned, just in case both parties aren’t seeing the same exact view. This, of course, is more and more possible now, with responsive design layouts & people using a wide variety of screen sizes.
Comment error messages
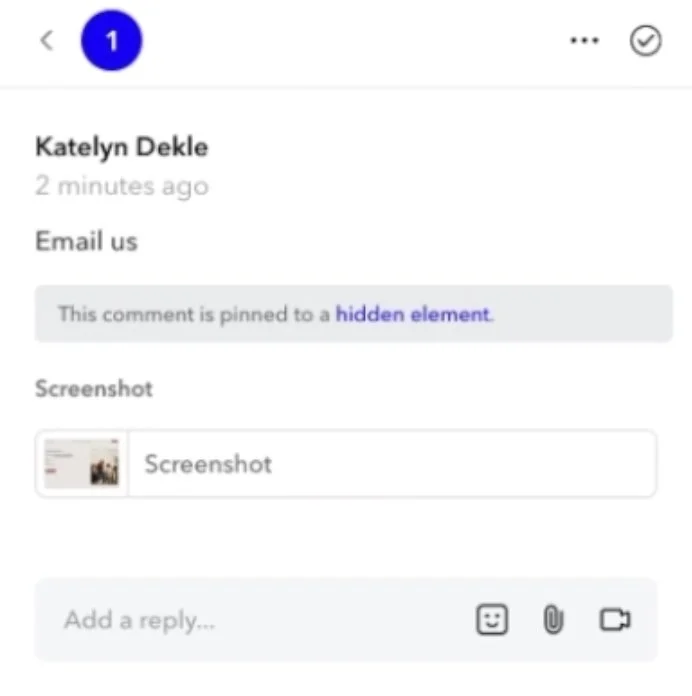
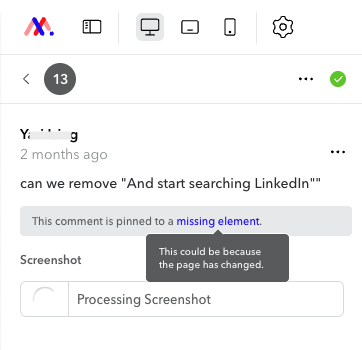
If either party uses Markup to pin a revision request to something that's hidden, like pinning a comment to the paragraph or text inside of an accordion on an FAQ page, it will tell you that the comment is pinned to a hidden element.
If a comment is pinned to an element that is later removed from the design for whatever reason, that comment will have a message on it that says the comment is pinned to a missing element.
Comment status
When the designer has completed each request, they can click this little check mark on each comment to resolve it and move it from Active to Resolved.
That grouping makes it easy to see which comments have been attended to, and which are still waiting.
You can also move comments back to Active status from Resolved if it needs to be opened up again.
Active vs Resolved comments in Markup, organized groups by status
the settings panel where notifications can be set in each Markup
Notifications & emails
Both parties can adjust their notifications per Markup very simply with a toggle for email notifications for all activity, or only comments that mention them specifically.
I typically set this or check it, before I invite my client to use the Markup with me.
If you want to make sure the other person sees your comment or reply you can tag or mention them in your comment.
You can also mention all people using the Markup without mentioning each individual by using @project to mention ‘everyone’ in the Markup.
Mentions will send notifications to the person’s inbox to make sure they see it!
How do notification emails work? Because sometimes that’s a (legitimate) concern with apps these days!
Markup groups notifications into a handful of emails over time, so no one should get an email for each singular update/comment/reply, etc.
The number of emails from Markup I tend to receive are based on how often the client pins comments. In other words…
If 30 comments are pinned in 1 session, then I get 1 email with a list of truncated comment previews and a button to go see them in Markup.
If the client leaves 30 comments, but from multiple sessions (5 comments pinned, break for lunch, comes back at the end of the day & leaves 10 more, does the same the next day, etc) then I will get more emails, usually 1 email with a list of notifications per usage-session.
a visual example of opening comments in Markup, and adding a threaded reply to the comment
Threaded comments or replies
If either party has a question to ask or needs to clarify something before resolving the comment, or even if they just asked a question where no change is necessary, each comment can host a whole thread or conversation.
Other tips
You can also search through the comments, filter the comments, or sort/reorder them.
You can also preview the website design in desktop, tablet, or mobile view. Please note that any pinned comments in those alternate views are pinned within that view ONLY, and they will show little notification dots on the version of the site they were pinned in.
For example:
If requested a change while previewing the website in Mobile view, there would be a notification icon dot on the mobile icon across the top o f the Markup. But the comment would only show in that version, because that's where it was pinned.So that's a little bit of a hiccup, because sometimes I have to question, ‘do they actually want that change only on mobile, or were they just looking at that version of the website when they pinned the comment?’
My experience is that kind of thing doesn't happen as often as you might think, and I can usually ask a simple question to clarify or figure it out myself based on what they’ve said or what they pinned the comment to. It's just something to be aware of, but easy to work around.
You can also hide and show the menu bar to see the full-screen preview of the website & interact without the menu showing.
In Settings, you can also decide to show pins in browse mode, so that even when you switch between Comment & Browse, you can see where the comments are as you navigate through the website.
So that's basically everything that they offer on the free plan that I’ve been using for years, and why I love it so much! It really does take the headache out of getting feedback from our design clients.
If you do revision rounds, you can create multiple markups with 1 per round, if you need to keep track. I personally don’t do it that way, and instead just limit the revisions to a certain timeframe within the project, because for me, that’s way easier!
final thoughts
So there we go! That's how you can use Markup with your clients for free very easily and get all of the personalized and pinned feedback for your website. I hope that today's post was helpful for you!
I really would love to be able to see more people using this for websites and other design projects because it's such a budget-efficient, time-efficient solution. And since your clients won't need a login to use it with you, it's incredibly easy to share access to it. I have no complaints & I’ve been using it for years!
They do have paid plans, but as I said, I've been using the free plan for years & haven’t needed or wished I’d had a paid plan in any of that time, though I can see how a paid plan would be better for agencies, for sure!
No, I'm not an affiliate. They are not sponsoring this post or the accompanying video. I just think it's a really badass tool for designers or any service-based business where it’d be way easier to have more exact & organized revision requests!