

Does Google know your Squarespace website even exists yet?
Table of Contents Show
If you have a website on Squarespace and you're trying to figure out how to get it up on Google…
Because ––hint–– if you just hit publish that, doesn't do it!
…It is actually pretty quick and today, I'm going to show you how step-by-step!
Don't worry, this is not going to be a long (video) tutorial because Squarespace makes it super easy to make this connection, and to make this an ongoing thing so that when you post a new blog, it automatically goes right to Google.
But before I dive into that, if we haven't met before, my name is Katelyn, and I have been running my online design business for a few years now so I have a lot of thoughts to share, tips and tricks that I learned along the way, and plenty of mistakes to share with you so that hopefully you won't make the same ones that I did.
All right. Let's dive in ––and make this a short one!
How to help Google find your new website
As you can imagine, Google has a f*ck-ton of websites to crawl & keep up with in its giant Rolodex. So how on earth do you expect Google to know when new sites pop up? Much less “older” websites that just haven’t done the findability tasks yet?
If you haven’t manually asked Google to come check out your site (yes, that’s a thing!) or you DIY’d your site 2 years ago and you didn’t know you were supposed to do that (“what? but how, Katelyn?!”) –then Google will just find you when it finds you, and maybe it hasn’t yet!
Luckily for you, Squarespace websites are directly integrated with Google Search Console, which is the tool that helps your site talk to Google’s search monster, and it’s totally free to use!
How to get started with Google Search Console
STEP ❶
Create a free account with Google Search Console
To get started, pull up your web browser, whatever you're using. I tend to use Google Chrome because it tends to work best with and is most frequently recommended by our online web apps (browser-based applications) that we’re all using every day, including our website builders (Squarespace, Showit, Wordpress, Wix, Webflow, etc).
Go to Google Search and literally search for “Google Search Console.” The first result that you will get will probably be Google’s Search Console web-app, at https://search.google.com/search-console/about.
Click the blue Start now button, then follow the prompts to create a login with whichever Google account you want to associate with your business & your business website.
Once that is established, stay logged in, and let’s hop back over to Squarespace so I can show you how to connect it to your website.
STEP ❷
Connect Google Search Console to your Squarespace website


Once you have the GSC account created, then go back over to your website in Squarespace.
From the main area when you first open your website in Squarespace, look in the main menu panel on the left-hand side for “Analytics.”
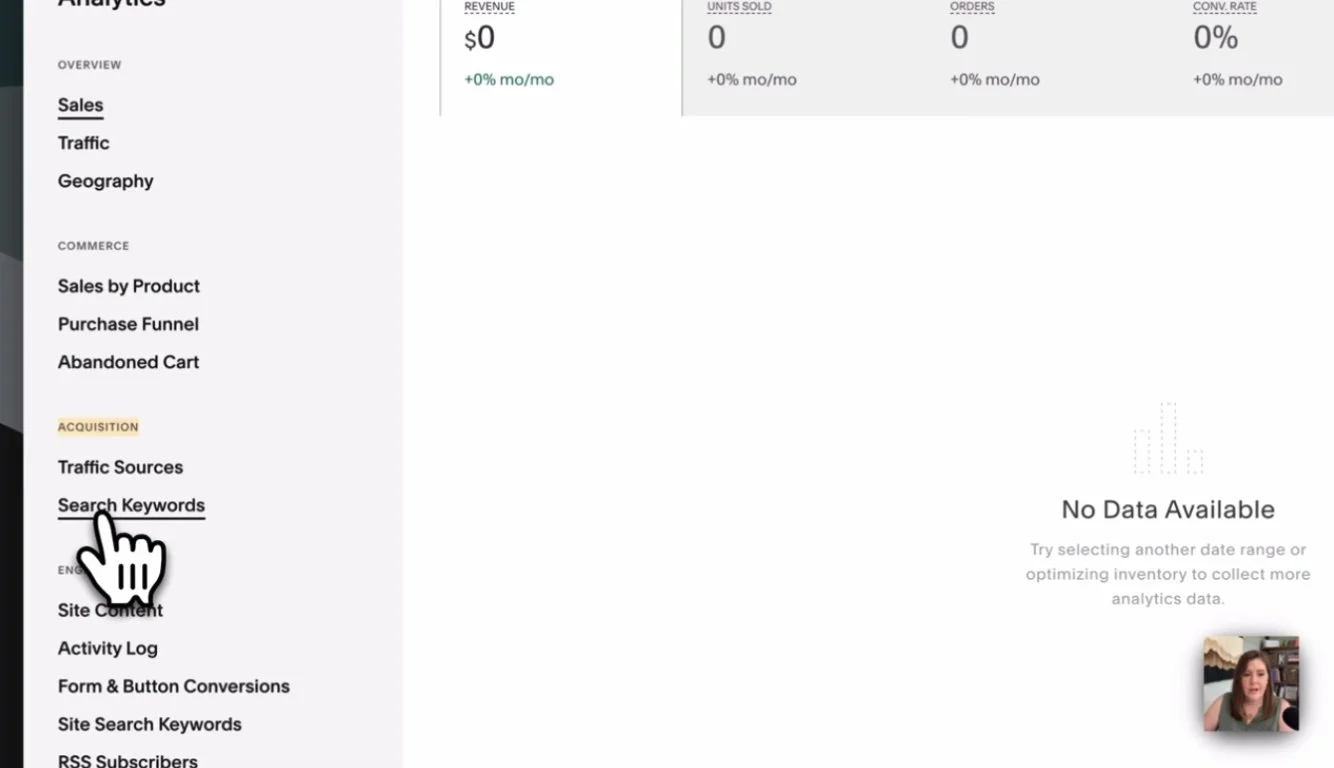
Select Analytics, then look about midway down the Analytics menu panel, in the Acquisition section, there is an option (or a link) called Search Keywords that is specifically set up for showing you which keywords your audience is using to find your website on Google searches. But it can only do that if you’ve connected your website to Google Search Console in some way (there are other ways, but this is how Squarespace does it & makes it simple for us!)
Click “Search Keywords,” and that will open an analytics panel that will eventually show you keyword-based traffic data.
If you’ve already done this & forgotten about it, then you will NOT see the prompt to connect your site to Google, as pictured in the example images here. Instead, you’ll see your data from Google Search Console, and you can move on to the next steps because Squarespace is already connected to your GSC account.
If you haven’t, you'll see example data in the background that’s very blurred and transparent. On top of that, you’ll see a small paragraph that says what this data can show, and prompt you with a black Connect button to connect your website to the Google Search Console account that you just created.
When you start that connection process, it will open a popup on top of your Squarespace browser to prompt you to log into that same Google Search Console account (which is why it’s important to use the account you want Google connected to for your business!)
From that pop-up, click on the account you want to connect to this website, or if you don’t see the right one listed, select “Use another account” and sign in.
Once you've selected that, it will then ask you for permission to connect & manage Google Search Console with this website.
Click Allow if you accept (if you don’t, this won’t work, but that’s up to you).
From there, it will close the popup & refresh the Analytics panel page we were just on, with a new message that says something like, ‘You're connected, but it may take up to 72 hours to index your data.’
Basically, that means that you’ve pinged Google to let it know your site exists, and within 72 hours, it will look through all of your content to understand what’s there & learn how to begin offering it in search results.
So it will not be an immediate change for you, ––but while you wait, there are a couple of things that you can do over in Google Search Console to get this kicked off a tad faster.
STEP ❸
To-do list for your new Google Search Console account
Go back to your Google Search Console account in another tab. From the Overview area inside that account, you will have a menu of options on the left-hand side. I'm not going to go through all of that in this tutorial, because that’s for a different tutorial on long-term use of Google Search Console and they’re not relevant (yet) for new accounts anyway!
When you connected your website to Google Search Console in the previous step and allowed those permissions, Google created a “property” in your Google Search Console account for the domain that the website design in Squarespace is using.
You can have multiple “properties” (domains) in GSC that are all managed within the same account, and they don’t have to be pointing to the same website, by the way!
Each property has its own traffic & indexing data you can refer to, so if you have more than one domain you want to manage, track, or monitor in GSC, you’ll first want to add all of those properties (which you can do easily by repeating the steps above), then selecting that “property” from the dropdown menu in the top left-hand corner to see its individual data in GSC.
This is great for people that have multiple websites!
how to submit a sitemap to Google Search Console for Squarespace websites
Click on Sitemaps in the left-hand menu. From here you can submit the sitemap for your website and luckily (again) for you, Squarespace also makes this part very easy because they actually generate a sitemap for you & you don’t need a third-party tool to make one. More on that in a moment!
Sitemaps are not available for trial websites in Squarespace, so your site DOES have to be published for Google to be able to crawl it, and for your sitemap to be generated by Squarespace.
ALL Squarespace websites have a generated-for-you sitemap, and it can be found at yourdomain.com/sitemap.xml. If you need/want more information on what it is and how it works, check out this help article about Sitemaps from Squarespace which should answer any lingering questions.
From the Sitemaps panel, all you need to do to submit your Sitemap to Google, is to click in the text box field next to your domain (pre-populated) and type sitemap.xml then click the blue Submit button.
This manually asks Google to go check out your sitemap, read through it & index all of your content so it knows what’s available to share in its search results.
NOTE: it will only look at pages you’ve NOT hidden from Google Search Engine Results (Google SERPs). Did you know you CAN hide pages you DON’T want Google to crawl & show in searches, like your legal pages, thank you pages, error 404 pages, and other ‘systems’ type pages on your website? Learn how to hide pages in this help article from Squarespace.
What happens after you’ve submitted your sitemap to Google Search Console
You’ll have about 72 hours to wait before you’ll see any data in your brand new GSC account, or in the Search Keywords area in your Squarespace analytics panel if you’ve just connected it to a new account.
After that period, you'll be able to actually see ongoing (basic) Google Search Console Analytics in Squarespace and even more information in your GSC account.
Google Search Console is a great place to keep coming back to because it helps you understand how people are FINDING YOUR WEBSITE! This will help you adjust which keywords you put in focus in your website’s content and make adjustments as you start to see increased website traffic.
TIP: I definitely suggest that you bookmark GSC and log in at least once a month or once per quarter. Luckily, it’s generally a lot more user-friendly than either Google Analytics 4 or Google’s older (deprecated /discontinued) Universal Analytics.
So that's the third step, right? We have connected it in Squarespace. We've submitted our sitemap to Google & requested an index of our information.
After you submit your sitemap, it'll tell you approximately how many pages are discovered. So a five-page website or a 20-page website, it should show you the approximate number of pages that Google can find on your site.
You can also come here to check if Google found any errors in the sitemap submission, or to submit a new sitemap if you’ve made a lot of changes to your website & want to make sure Google knows about them and has crawled and indexed the most recent version of your site.
Use the top search bar to ask Google to “Inspect the URL” of individual pages on your website (ie: manually request an index of individual pages)
STEP ❹
Manually submit a crawl request for your site’s main pages
The last step isn’t mandatory or required; it’s just an extra precautionary step that should only take a couple of minutes.
While you’re in GSC, at the top of the page, there’s a search bar. Use that to paste in your full website link (https://www.yourwebsitedomain.com/) with the page slug after it, for each page and press Enter on your keyboard.
One at a time, do this for each of your website’s main (most important) pages, up to about 10 pages (I think that’s the limit of times you can do this per property.
For example, start with your Home page, then your About page, etc. as shown below:
https://www.yourwebsitedomain.com/home
https://www.yourwebsitedomain.com/about
https://www.yourwebsitedomain.com/services
https://www.yourwebsitedomain.com/contact
This will ask Google to inspect the page content at each specific URL, which is a forced submission specific to each page. Yes, it's a redundant process, which is why I say, it’s not required but it can help move things along a little faster if you have a few extra minutes to spare for this.
if I search or submit, If I submit my homepage, I will get something that looks like this that says, Hey, we've already crawled that. You're doing good. If it says it's not on Google, then you can click this request indexing and it will actually go index. It's a manual request for Google to go crawl that page.
Again, you can do this for up to 10 pages of your website, I believe. So start with the main pages that are most important for your audience and/or potential clients or customers. For example, it’s not important for you to crawl a Frequently Asked Questions page, unless you’ve already submitted more important pages and still have a few left (of your 10 allowed) to use up.
Then you're just about guaranteed that Google is not only going to find your newly published website, but it's also going to know that it exists so that it can try to put it in search results for people that are searching for keywords that you are using on your website.
Now your content has a much better chance at being shown in Google SERPs (search engine results pages) and starting the ranking process, even though you've just launched your website (or just connected it to Google).
IMPORTANT NOTE:
Will this help me rank #1 on Google?
Please do NOT read this tutorial & think that doing these steps will mean your website will suddenly start ranking #1 on Google within 72 hours. That is NOT how this works, sadly, and is not what this process is for.
If only it were that easy!
This process is what ALLOWS you to even have a chance at ranking because now Google just knows you exist. Period.
Helpful Analogy:
Think of your website as a student at a large college. Technically, when you enrolled (submitted your sitemap) the Deans know you “exist” on a surface level as a student at their university, but they don’t know you by name and they couldn’t spout off your information on the fly without looking you up in a student roster (Google’s index database) first if someone asked about you.
Let’s say you’ve applied for a job after graduating and your new soon-to-be employer contacts your university to confirm you did in fact get a degree from there (sidenote, does this really happen? Who the hell knows!)
The Dean (or whoever does this kind of thing) would have to look you up by name in some sort of database in order to find information about you and they would depend on the accuracy of the information submitted to that database in order to provide this person with the specifics they’re requesting, such as the year you graduated and what you majored in, etc.

That is EXACTLY what we are doing here with Google Search Console in connecting & submitting sitemaps and crawl requests. We are only submitting the first bits of information to Google so that it knows you exist, because if it doesn’t know you exist, it can’t provide your website’s information to people who are searching for related content.
Ranking on Google is a long-game strategy with ongoing effort.
A one-time connection to Google Search Console will help, certainly, ––and that’s why I’m showing you how to do it because it’s important AF that you do this!–– but it will not be the end-all-be-all solution to getting you on page #1 of Google.
There’s a lot of competition on the interwebs these days, so you gotta do the work to get found! But the work doesn’t have to be quite has hard as it used to be, or as expensive to get help!
Henry Purchase, SEO expert & owner of the Rough Water Media SEO agency, just developed a Squarespace plugin called SEO Space* that actually has a free plan specifically to help people DIY their website's SEO more effectively until they’re ready to hire help.
This little plugin that could is actually a Chrome extension and works with your Google Search Console account, much like Yoast works with WordPress, –except it’s ONLY for Squarespace users.
Run Basic scans for free or Premium scans on paid plans or with affordable bundles of credits, and paid plans are super affordable! It will literally help you go through the checklist, see results over time in your account insights, AND get access to the private Circle community if you need help or want to learn more.
On that note, there is one last step that will make the ongoing effort much more relevant to your overall findability with Google. Let’s dive into that next!
How to share posts with Google Search Console, automatically
How to share each new blog post with Google Search Console when it publishes, automatically
An ongoing tip that you should implement in your content updates for new blog posts or new calendar event posts, is to actually share the post with Google Search Console every time you publish a new post.
That will automatically tell Google you have new content so you don’t have to wait for Google to find it in some unknown time frame.
This is just an easy way for you to automate the process when you post something new to say, ‘by the way, Google, I've just posted something new. Please, for the love of god, go check it out!’
Whether it's a new or old post, you can always set this to happen no matter what status the post is in, no matter if it’s a Draft, Needs Review, Published, or Scheduled.
For existing posts
Hover over the published post listed in your blog entries list.
Click the ••• icon to access that post’s Settings panel.
Select the Share tab. Because you've already connected Google Search Console to the website, this will be here (probably in addition to your other social connections, which is probably what you expected to see here in the first place, like Facebook, LinkedIn, Twitter, etc).
Click “Google Search Console” in that list.
Then you’ll see the toggle to turn this share-feature ON, and the sharing options for GSC specifically, which include the automatic sharing of the post link & title (using Squarespace’s variable language).
If you turn the toggle on (it turns green), and when the post publishes, it will automatically send the title and post URL to Google Search Console for you.
As soon as you click Save on the changes you made to that post’s settings, Squarespace will be ready (has your permission) to share the post with GSC for you so you don’t have to go over to GSC’s web app and manually submit the new post page via the Inspect URL function, or submitting a new sitemap.
For posts in Draft, Needs Review, or Scheduled statuses
For draft posts, it's a little bit different because you can do it at the same time you're doing all of the other steps while drafting your posts.
While inside the post editor, drafting/writing/creating the new post,
Click the post title in the middle of the white menu bar that shows across the top while you’re in Edit Mode to access that post’s Settings panel.
From there, the steps are exactly the same as before:
Select the Share tab. Because you've already connected Google Search Console to the website, this will be here (probably in addition to your other social connections, which is probably what you expected to see here in the first place, like Facebook, LinkedIn, Twitter, etc).
Click “Google Search Console” in that list.
Then you’ll see the toggle to turn this share-feature ON, and the sharing options for GSC specifically, which include the automatic sharing of the post link & title (using Squarespace’s variable language).
If you turn the toggle on (it turns green), and when the post publishes, it will automatically send the title and post URL to Google Search Console for you.
Whether I publish it now or next year, Squarespace will know to share the post title & URL with Google every time as long as this setting is turned ON (per post; unfortunately it’s not a global or sitewide setting).
This means you could schedule the post to publish at 4am next Monday morning, and at 4am when it publishes, Squarespace will send the title & link to Google Search Console for you, so Google will know it exists the second it’s published.
Top 2 mistakes preventing Google from ranking your site
After you've done all of the previous steps and you understand the best practices for implementing the Share feature with GSC on new blog posts going forward, make sure you also know the general best practices to follow for new content that you're posting and sharing to Google to help make the most out of this new ongoing relationship with GSC!
Either of these mistakes can easily be fixed with the help of free (or paid versions of) tools like SEO Space*, as mentioned above & at the bottom of this post.
Mistake ❶
Pages that need to rank must have a minimum of 300 – 500 words
Short pages with minimal content are harder for Google to analyze and summarize for searchers.
If you have one page that has maybe 50 words on it, Google's not really going to understand what that page is there for. It doesn’t have enough information to understand that page’s context & how you intended for that page to be used with the rest of your site.
If it doesn’t understand the page, then it won’t show it to anyone and those nearly-empty pages aren't going to rank for anything really. They're not going to have much of a chance for that.
Examples of these pages could be anything from a very simplistic Contact page, to your Error 404 page, or even a Gallery page if there’s no written content on it & it just has a bunch of photos with no alt text and no usable file names (ie: NOT naming your files DSC_1469.jpg).
On the other hand, if you have a minimal content page, like a Contact page for example, typically you want to make sure that if you want that page to rank at all, it needs at least 300 to 500 words on it, so Google has a chance at indexing that information for you and where it should go in the ranking system that it uses.
Tools like SEO Space* literally help you determine whether headings, meta descriptions & titles, and page word counts are long enough or short enough, just by scanning the page and walking you through a checklist of things to tweak until you start seeing more green checkmarks. Very easy!
Mistake ❷
Page structure is bad & hard for Google to crawl
A visual example of content outlined using Headings (or paragraph styles)
FUN FACT:
“Headings” vs “Paragraphs” are NOT supposed to be used or chosen based on your stylistic preferences, like which font or color you want the text to be in any given area of your website. 😬
This second mistake is very common & I see it all the time!
If you’re doing this, it creates a page structure that isn't ideal for Google. By that, I mean the content itself isn’t organized in a way that helps Google understand the content.
For example, if you're not using any headings on the page at all, it's really hard for Google to see the overall outline of the content in order to organize it. If it’s hard for Google to understand & organize it, then it’s much less likely that your content will show up in a Google search result, even if your information is relevant to the keyword searched.

We should be using headings to organize the content on the page, like you would organize an article, an outline, or maybe a book (with different parts vs chapters, epilogue, prologue, index, etc), right?
Headings help to segment the information into more bite-sized chunks for our readers, –AND Google appreciates this too–– which also helps make the content skimmable for people who don’t want to read everything word-for-word.
If you're not sure what I’m talking about or you want examples, make sure you read this post next!
A visual example of on-page hierarchy and where to use headings on your website pages
Best practices for on-page content structure
Ideally, you want to have ONE heading 1 per page, because that is the title of the entire page and should summarize that page’s content for both viewers & for Google.
You can use heading 2s maybe a handful of times to help further segment the content into large groups throughout the page.
You can use heading 3s and/or heading 4s the rest of the time to further segment the content visually.
So essentially,
the H1s and H2s are higher in the hierarchy, so you should use them less frequently.
the H3s and H4s are lower in the hierarchy and it makes sense to use the more often, as needed.
Not everything is title-worthy, so don’t “title” too many things with those, otherwise, Google will think everything’s a title and that will confuse it. If it’s confused, it just won’t do its job and your page won’t be ranked for anything at all.
So that's the pecking order for those!
If you structure your page well, Google can use your headings to actually build an outline overview of the content on each page of your website, and then it will understand the hierarchy of information you put on the page (ie: which pieces are most important, to least important) and organize that information in its database in order to show it to the right people in search results.
Again, tools like SEO Space* can help you determine if there are too many headings on any page, if they’re using best practices, make your tweaks based on the tool’s suggestions, then run another scan to see these suggestions go from red or orange to green as you complete all the suggestions & check things off the list! So easy!
wrapping up
So those are the top two mistakes that I see related to your on-page SEO.
If you can take all of this into account and use the tips I’ve given you, you’ll have a much better chance for your site to rank on Google and get more people's eyes on your website.
But again, SEO is a long game. It’s well worth the time & effort, but it’s not the type of thing you do where you can expect to see results in less than 30 days.
If you start this process with the right expectations, then you won’t be disappointed when it doesn’t start working for you right away. But you WILL be blown away by the results when it does eventually start working and Google starts sending you new leads, customers or clients JUST because it knows who to show your website to in searches. 😉