

Squarespace SEO Best Practices: Blogging
Table of Contents Show

📌 Pin it!
I totally get it. Most people don’t want to blog, don’t know how to “write” posts or don’t have a friggin’ clue what to write about.
I’m going to use blogging as an example in this post, but it doesn’t have to be blogging specifically. You need to be creating regular, fresh content on your website, whether that’s show notes for your podcast, mini blog posts announcing your new YouTube videos or Instagram Reels, –whatever that looks like for you.
If you want to have any kind of online presence, you need to get over your fear of this kind of commitment to your website. #sorrynotsorry
Let’s dive in! I’ll tell you everything I know about why blogging (or creating fresh, consistent content) helps with your website SEO, from my own personal experience.
HINT: blogging is a “thing” for a reason –and not just for everyone to have a place on the internet to voice their innermost thoughts. 😉
Why blog?
If you write a bunch of posts about what you already know, spreading the knowledge to others who are looking for it, then it establishes YOU as an authority in your field (over time, of course).
You can directly address problems your customers/audience has, either by asking them directly how you can help or from experience dealing with the same types of people & hearing their & fixing problems over a long period of time.
It’s a way to create a network of links throughout your website and use organic search terms throughout your posts, –both are things that Google wants to see.
Blogging can allow you to address frequently asked questions, in article-form. If a client ever has a question, you can point him/her to your article about that topic & quit repeating yourself as often. #amIright? 🙌🏻
You’re not just building authority, you’re also building KLT (= know, like, and trust) with your readers.
Consistent blogging keeps your site updated & relevant, which will help your Google ranking over time. Google wants to know that your site is active before it starts referring people to you.
But... I’ll give too much away!
FALSE. No es verdad, mi amigo.
While I do know a teensy bit of Spanish from my high school & college years, I can’t speak for everyone or every business type.
For service-based businesses like my own, there are 2 types of people in my audience: 1) DIY-ers, and 2) Non-DIY-ers.
So how’s that actually relevant here?
TYPE 1: DIY-ers
These people want to learn how to do it themselves and they are only looking for a way to do just that. They were never going to pay you to do/make that thing, so you might as well be there to show them how you do it. Whether that’s through courses, shop items, download-ables like an ebook/pdf, blog posts, podcasts, videos, etc.
TYPE 2: Non-DIY-ers
These people either don’t have the time or the patience to do it themselves. They were never going to learn how and TBH they’d rather pay you to handle it for them. #nojudgement
10 Best SEO Practices for Blogging:
Kill two birds with one stone: use each post to genuinely help your audience, while also giving Google more information to help categorize & sort your site in their search engine.
Pro tip: Use SEOSpace* to help you check your work & score your pages (or your whole site) to see what to improve as you work! They have free & paid plans, a private community & TONS of resources to help you learn how to do this yourself in the easiest ways possible. 😃

❶ Use keywords organically in your titles
We already talked about this in the first SEO series post, but to reiterate: USE KEYWORDS IN YOUR BLOG POST TITLES. 😂
Optimize your titles by injecting keywords naturally, or use trendy title teasers like “# Ways to…” or “How to…”
If you want some great examples of click-bait titles, go look at Buzzfeed. Marie Forleo said in a podcast with Amy Porterfield (about copyrighting; you should really check it out! Link below) that Buzzfeed requires their writers to write something like 40-50 post titles for EACH article before choosing the one they end up using. WHOA.
I totally don’t do that, but Marie Forleo does! She said she writes around 30 titles for each post because you (typically) don’t come up with the winner until #24 or #29. She’s a powerhouse entrepreneur with a mega-huge online presence, so I guess that’s something I’ll take a whack at myself!
For some inspiration, use a Blog Title Generator (FREE)
❷ Optimize your images
We talked about how to do this last time, so I won’t bore you with more techy stuff now. To read about how YOU can optimize your images (even if you don’t have Photoshop), go read my last post. (But make sure you finish this one too!)
I also have a few tips & tricks for renaming & resizing images in bulk, to help save you some time & speed things up!
❸ Check your spelling + write like you speak
Here’s a fun little tip: download the Grammarly extension for Chrome. It checks as you type & offers suggestions to fix your errors. It also checks for contextual spelling issues for all those annoying English words that are nearly the same like they’re, their and there. (Google cares about this stuff more than you realize.)
Also: throw all your English rules out the window. Don’t write like you would for an essay you’re submitting in college. That’s BORING.
Write like you speak. Use fragments if you want. Whatever you do, just make sure it sounds like you IRL, or as close to it as possible as you work toward that goal.
I’ll be the first to admit that my own copy sucks. I’m working on it, I swear! But, this is a tip I’ve heard from all the greats: Marie Forleo, Amy Porterfield, Jenna Kutcher, Ashlyn Carter, and so many more. So I’m not dreaming this up.
It WORKS (when ya get it right).
PRO TIP: write first, edit later. Read it OUT LOUD when you begin editing; after all, if you’re writing like you speak, it’s best to actually speak the words, yes? 😉 Reading it out loud to yourself will help you hear anything that doesn’t sound right as you move along.
❹ Size matters
(Heh. Heh. Heh. 😏)
So, blog post lengths are not from a set in stone number. I’ve heard everything from:
keep it to about 3 paragraphs (that’s like … 300 words or something!)
keep it under 800 words, MAX
keep it under 2000 words, around 1200 to 1800 is recommended
do 1 mini-post of about 200-300 words, every damn day… 😱
obviously, who the hell knows
Okay so, from my own experience, the length of your post will depend on your topic & probably also dependent on how often you’re posting.
If you write mini-posts every day like Seth Godin, then each post can be a blurb about a thought you had or an idea, or whatever works for your industry & your niche.
If you’re writing a tutorial, make sure you cover all the basics so it’s detailed & complete. (Remember, you’re trying to help people with the posting of that content, so make sure you actually are.)
And if you’re writing a blurb about a commonly asked FAQ then just address it however you need to, but make sure you don’t blabber on with irrelevant info.
K.I.S.S. = Keep it simple stupid.
❺ Internal links
To use internal links the right way choose your anchoring text wisely. That means:
DON’T: To read more about Using Keywords for SEO, click here.
(Notice where the link actually is and what words are in the link.)
But how do you know when to include what? If you write a blog about your favorite Pecan Pie recipe, then make sure you sprinkle links throughout that post that go to other relevant posts (like other pie recipes, or more holiday-centric recipes). This helps keep people on your site longer so you can help them more.
Side note:
Joanna Gaines’ recipe for Spiced Pecan Pie in her Magnolia Table cookbook is LITerally to die for. O.M.F.G.
I digress. Moving on! 😂
❻ Internal hierarchy
You can help Google figure out how to crawl your post and show G’ how organized your content is, by using formal words like First, Secondly, and Finally.
You can choose whether to do this one or not. Sometimes I do; sometimes I don’t. It depends on how natural it sounds as I’m formatting & writing the post.
❼ Use your subheadings + formatting options
SUBHEADINGS
Use your Heading choices to break up the text in your post and make it interesting to read. This also makes the content more organized for those of you who skim through it looking for something specific.
Don’t know what your Headings are? If you’re on Squarespace (& I hope you are, since this is a Squarespace-focused blog), they are your ‘font choices’ from the text block menu, in the dropdown that says “Normal” by default.

text block tools
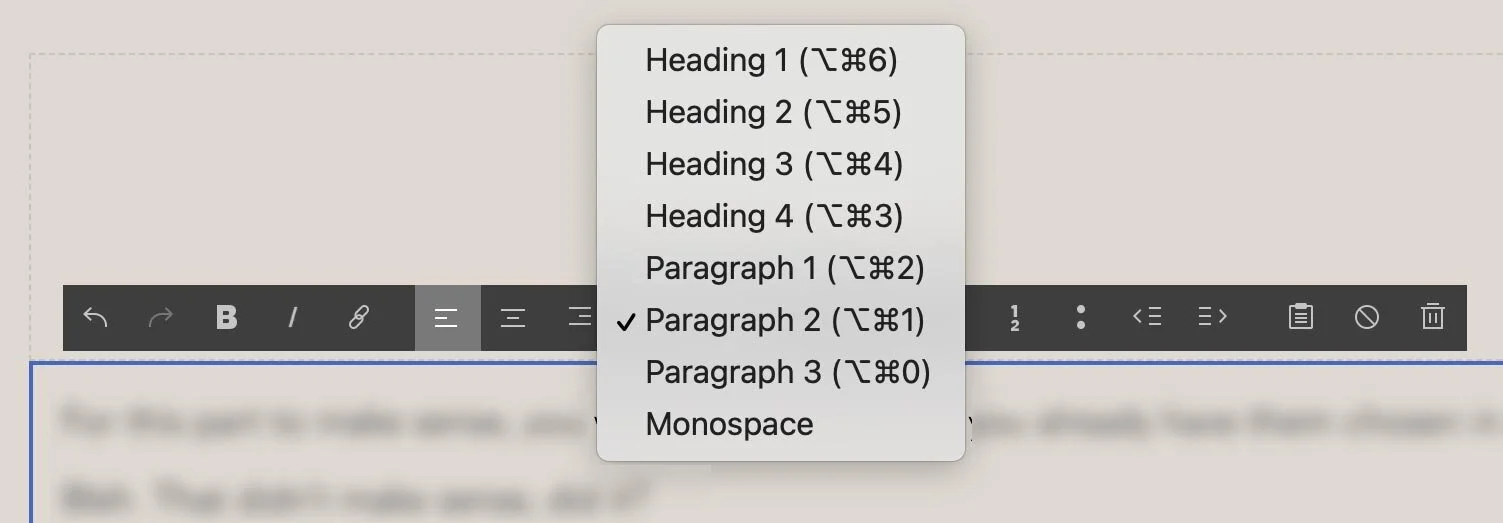
text block font options for 7.1
{7.0 only offers Heading 1, Heading 2, Heading 3, Normal (paragraph) and Monospace.}
For this part to make sense, you will need to make sure you already have them chosen in a way that makes sense in a hierarchy.
Bleh. That didn’t make sense, did it?
What I mean is: in your Style Editor within Squarespace, make sure you have already chosen the largest/boldest font style option for H1, the second-largest/boldest for H2, and the third-largest/boldest for H3.
The smallest should be your content or paragraph text (“Normal”). (That doesn’t include Meta text; I like to make mine smaller & lighter colored than the other stuff just for a cleaner, less cluttered look.)
FORMATTING OPTIONS
To format your content, break it up with the subheadings, but also use images, bulleted or numbered text, quotes, indentations, etc. to make sure your content doesn’t look boring to read (even if it actually is boring to read).
If it looks boring, no one will be dying to read it. #youknowimright
Learn more about how to use your headings correctly (one of the biggest mistakes I see on DIY websites)!
❽ Watch your permalinks
Don’t let Squarespace auto-generate these by using the date+category+title+etc. Choose it yourself or pick a title for the post wisely, knowing it will use that in the permalink.
What’s a permalink? That’s the part of the URL that sends people directly to that blog post page. For example, this blog’s permalink extension is: /squarespace-seo-blogging instead of:
/2018-10-Squarespace-?=03_seobestpracticesblogging
or even worse: /2021-01-06-xymn3hfgb29
See what I mean? Clean up those suckers!
Use dashes to separate words; Google reads those better.
Where can ya find it? It’s in the Options tab (at the top, labeled: “Post URL”) of that blog post’s settings and how to get to that, is shown in #9.
❾ Use a post description
Even if you don’t ever see it on your site (i.e.: you uncheck the Description option in Summary Carousel’s for your blog posts, etc.), make sure you include one.
This helps Google, and if you ever do need it for a page layout, it’ll be there hiding & useful. How do you include one?
In your blog post’s settings, it’s under the Options tab at the bottom.
What I try (emphasis on “try”) to do is make sure the first couple short paragraphs include some reference to my blog post content &/or title, plus a teaser-y intro or interesting story. Then I copy & paste that into the Excerpt area for that post.
For 7.0:
To edit a post without opening it in 7.0, just click that entry from your Blog page (while logged into the backend of Squarespace) and click “EDIT” on the right side of the blog entry in the menu list.
OR, if that doesn’t make any sense, you can also get there while you’re editing the post by clicking the word “Settings” in the dark grey toolbar menu. Then click the Options tab in the pop-up. The excerpt is near the bottom of that section. (Make sure you save the changes before you go back to editing your blog post!)
FOR 7.1
The blog works a little differently on this version of Squarespace. You can’t edit the post without opening it like you could on 7.0, which is not a big deal because that popup editor is hard to use since your style settings don’t show in there.
Anyway, so to edit a post in 7.1, you click the post in the list on the left, then on the preview side, you click Edit in the top left corner of the preview area.
To get to the post settings, you can get there 2 ways, just like with 7.0, but slightly different routes.
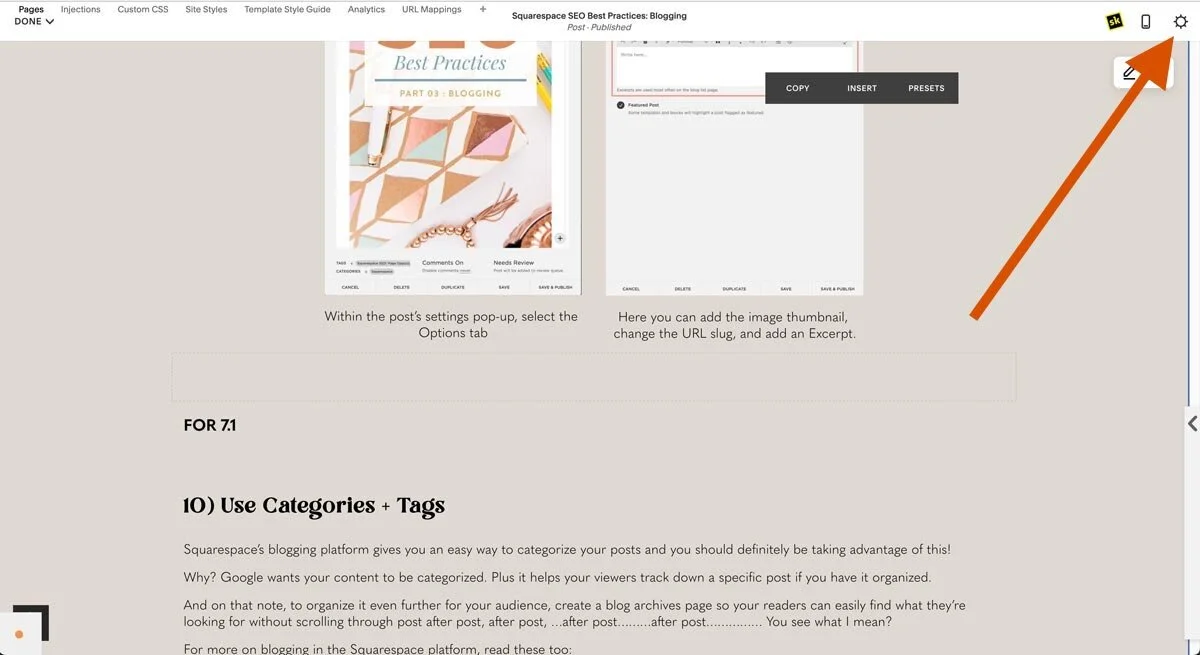
In 7.1, click the gear icon ⚙️ in the upper right-hand corner to access post Settings
{7.0 – Within the post editor, you can click “Settings” to make changes to post’s page details}
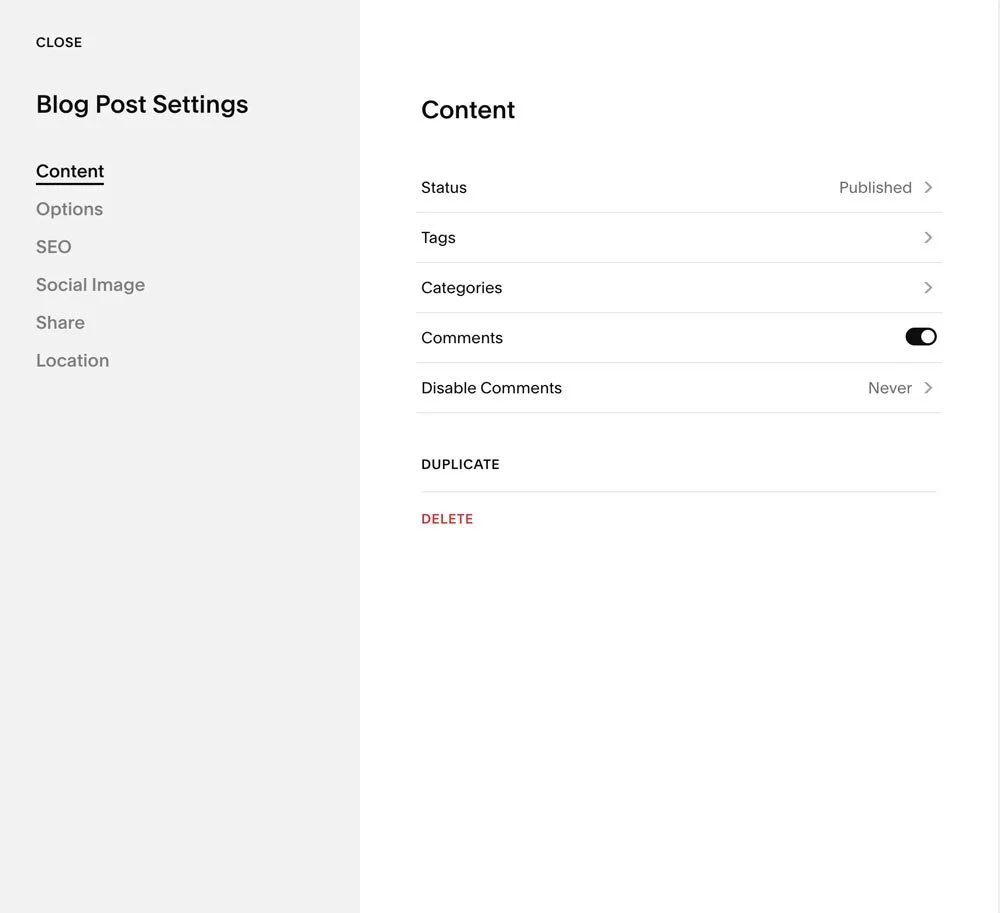
Within the post’s settings pop-up, select the Options tab
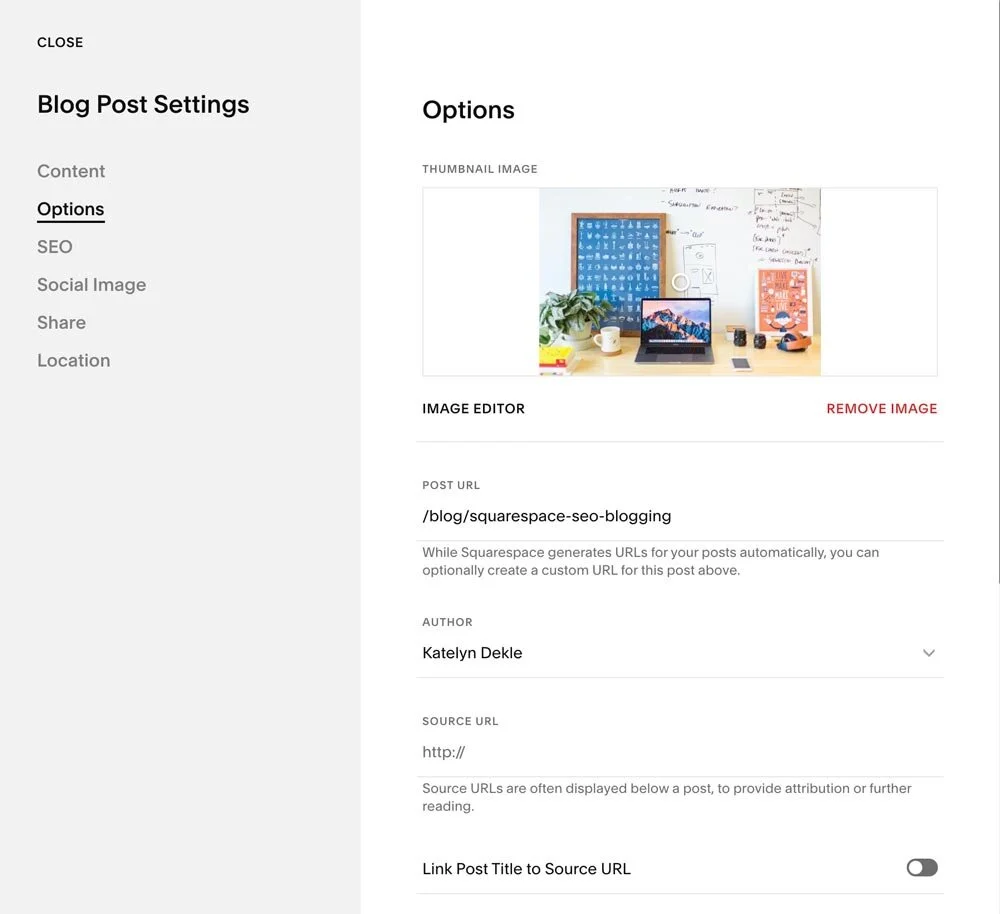
Here you can add the image thumbnail, change the URL slug, and add an Excerpt.
❿ Use Categories + Tags
Squarespace’s blogging platform gives you an easy way to categorize your posts and you should definitely be taking advantage of this!
Why? Google wants your content to be categorized. Plus it helps your viewers track down a specific post if you have it organized.
And on that note, to organize it even further for your audience, create a blog archives page so your readers can easily find what they’re looking for without scrolling through post after post, after post, …after post………after post…………… You see what I mean?
For more on blogging in the Squarespace platform, read these too:


The end!
LOL, that was a lot. I know. Again, #sorrynotsorry
Follow those Best Practices, and over time it WILL help your blog & website grow.